トランプ画像を使って神経衰弱を作ってみよう。
2023作成の最新版があります
[準備編]
1.まずは以下をダウンロードし、デスクトップに展開する。
2.以下のようなフォルダ構成になっている。imagesフォルダにはトランプの画像が入っている。

3.index.htmlはcssファイルとjsファイルの読み込み設定とメインとなるテーブルタグがある。
<!DOCTYPE html>
<html>
<head>
<meta charset="UTF-8">
<link rel="stylesheet" href="css/main.css">
<script src="js/main.js"></script>
<title>神経衰弱</title>
</head>
<body>
  <!--メインとなるテーブル要素-->
  <table id="table" border="1"></table>
</body>
</html>
4.main.jsはドキュメントの読み込みが完了したら処理を開始する記述をしてある。main.cssは現状空白の状態だ。
'use strict';
window.onload=function(){

};
[作成]
1.main.jsを以下のように更新する。
'use strict';
window.onload=function(){
//コンストラクタ作成
function Card(suit,num){
this.suit=suit;
this.num=num;
}
//カード配列作成
const cards=[];
const suits=['s','d','h','c'];
for(let i=0;i<suits.length;i++){
for(let j=1;j<=13;j++){
let card=new Card(suits[i],j);
cards.push(card);
}
}
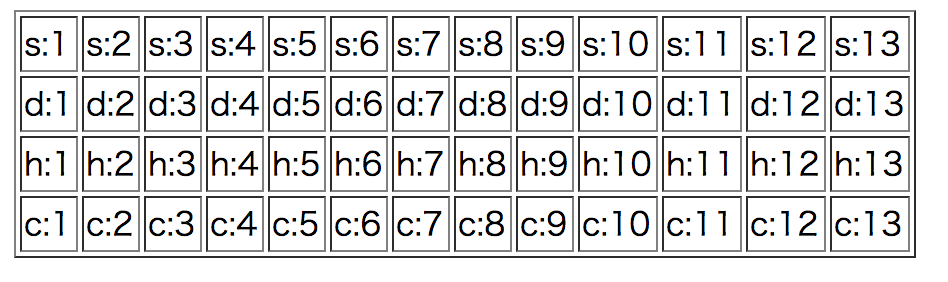
//テーブル作成
const table=document.getElementById('table');
for(let i=0;i<suits.length;i++){
let tr=document.createElement('tr');
for(let j=0;j<13;j++){
let td=document.createElement('td');
let tempCard=cards[i*13+j];
td.textContent=`${tempCard.suit}:${tempCard.num}`;
tr.appendChild(td);
}
table.appendChild(tr);
}
}
2.ブラウザから実行してみよう。以下のように表示されれば成功だ。
[スタイルをあてる]
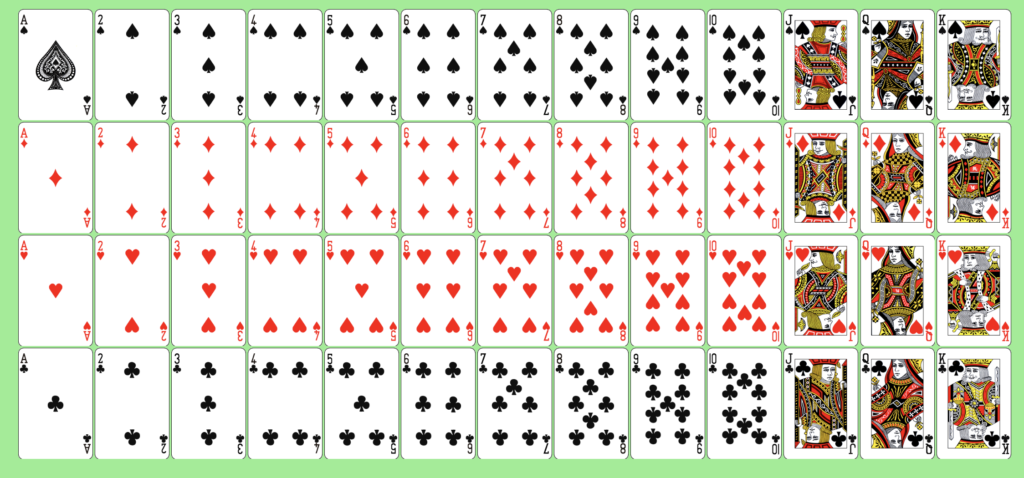
それでは画像とスタイルを用いてカードの見た目を表現していこう。
1.まずはindex.htmlのtableタグについているborder属性を外す
<!DOCTYPE html>
<html>
<head>
<meta charset="UTF-8">
<link rel="stylesheet" href="css/main.css">
<script src="js/main.js"></script>
<title>神経衰弱</title>
</head>
<body>
  <!--メインとなるテーブル要素-->
  <!--border属性を外す-->
  <table id="table"></table>
</body>
</html>
2.main.jsを以下のように編集
'use strict';
window.onload=function(){
  function Card(suit,num){
    this.suit=suit;
    this.num=num;
    //以下を追記
    this.front;
    this.setFront=function(){
      this.front=`${this.suit}${this.num<10?'0':''}${this.num}.gif`;
    };
  }

  const cards=[];
  const suits=['s','d','h','c'];
  for(let i=0;i<suits.length;i++){
    for(let j=1;j<=13;j++){
      let card=new Card(suits[i],j);
      //以下を追加
      card.setFront();
      cards.push(card);
    }
  }
  const table=document.getElementById('table');
  for(let i=0;i<suits.length;i++){
    let tr=document.createElement('tr');
    for(let j=0;j<13;j++){
      let td=document.createElement('td');
      let tempCard=cards[i*13+j];
      //以下を追記
      td.classList.add('card');
      td.style.backgroundImage=`url(images/${tempCard.front})`;
      //以下をコメントアウト(または削除)
      //td.textContent=`${tempCard.suit}:${tempCard.num}`;
      tr.appendChild(td);
    }
    table.appendChild(tr);
  }
}
3.main.cssを以下のように編集
body{
	background-color:lightgreen;
}
table{
	margin:10px auto;
}
td.card{
	width:80px;
	height:120px;
	margin:2px;
	background-size:cover;
}
4.実行してみよう以下のように表示されれば成功だ。
[シャッフル]
トランプをランダムに並べてみよう。
1.main.jsに以下を追記
'use strict';
window.onload=function(){
  function Card(suit,num){
    this.suit=suit;
    this.num=num;
    this.front;
    this.setFront=function(){
      this.front=`${this.suit}${this.num<10?'0':''}${this.num}.gif`;
    };
  }

  const cards=[];
  const suits=['s','d','h','c'];
  for(let i=0;i<suits.length;i++){
    for(let j=1;j<=13;j++){
      let card=new Card(suits[i],j);
      card.setFront();
      cards.push(card);
    }
  }
  //以下を追記
  function shuffle(){
    let i=cards.length;
    while(i){
      let index=Math.floor(Math.random()*i--);
      var temp=cards[index];
      cards[index]=cards[i];
      cards[i]=temp;
    }
  }
  shuffle();//シャッフル実行
  const table=document.getElementById('table');
  for(let i=0;i<suits.length;i++){
    let tr=document.createElement('tr');
    for(let j=0;j<13;j++){
      let td=document.createElement('td');
      let tempCard=cards[i*13+j];
      td.classList.add('card');
      td.style.backgroundImage=`url(images/${tempCard.front})`;
      tr.appendChild(td);
    }
    table.appendChild(tr);
  }
}
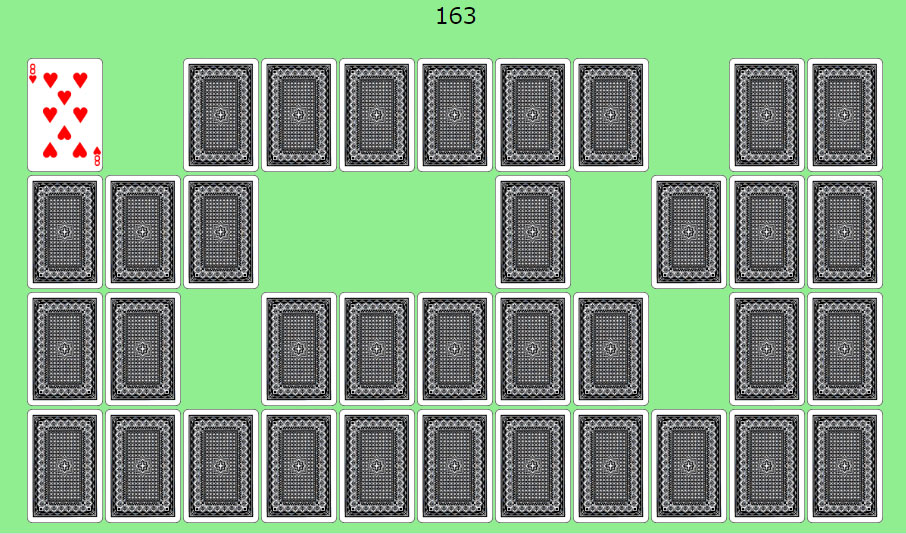
2.実行してみよう。シャッフルのアルゴリズムによりカードがランダムに並ぶようになった。
[最初は裏面表示にする]
1.まずはmain.cssを以下のように変更
body{
	background-color:lightgreen;
}
table{
	margin:10px auto;
}
td.card{
	width:80px;
	height:120px;
	margin:2px;
	background-size:cover;
}
/*以下を追記*/
td.card.back{
  background-image:url(../images/z01.gif) !important;
}
2.次にmain.jsを変更する。といってもclassListにaddしている部分にbackを追加するだけだ。
'use strict';
window.onload=function(){
  function Card(suit,num){
    this.suit=suit;
    this.num=num;
    this.front;
    this.setFront=function(){
      this.front=`${this.suit}${this.num<10?'0':''}${this.num}.gif`;
    };
  }

  const cards=[];
  const suits=['s','d','h','c'];
  for(let i=0;i<suits.length;i++){
    for(let j=1;j<=13;j++){
      let card=new Card(suits[i],j);
      card.setFront();
      cards.push(card);
    }
  }
  function shuffle(){
    let i=cards.length;
    while(i){
      let index=Math.floor(Math.random()*i--);
      var temp=cards[index];
      cards[index]=cards[i];
      cards[i]=temp;
    }
  }
  shuffle();
  const table=document.getElementById('table');
  for(let i=0;i<suits.length;i++){
    let tr=document.createElement('tr');
    for(let j=0;j<13;j++){
      let td=document.createElement('td');
      let tempCard=cards[i*13+j];
      //backを追加
      td.classList.add('card','back');
      td.style.backgroundImage=`url(images/${tempCard.front})`;
      tr.appendChild(td);
    }
    table.appendChild(tr);
  }
}
3.実行してみよう。すべて裏面が表示されるはずだ。jsによって設定したstyleはインラインに記述されるため、それを覆すにはimportant設定が必要となる。
[クリックしたら表になる挙動の作成]
1.現状classListにbackが入っているときは裏、そうでないときは表が表示される。
まずはclickイベントを作成し、backをtoggleしてみよう。
main.jsを以下のように変更
'use strict';
window.onload=function(){
  function Card(suit,num){
    this.suit=suit;
    this.num=num;
    this.front;
    this.setFront=function(){
      this.front=`${this.suit}${this.num<10?'0':''}${this.num}.gif`;
    };
  }
  const cards=[];
  const suits=['s','d','h','c'];
  for(let i=0;i<suits.length;i++){
    for(let j=1;j<=13;j++){
      let card=new Card(suits[i],j);
      card.setFront();
      cards.push(card);
    }
  }
  function shuffle(){
    let i=cards.length;
    while(i){
      let index=Math.floor(Math.random()*i--);
      var temp=cards[index];
      cards[index]=cards[i];
      cards[i]=temp;
    }
  }
  shuffle();
  const table=document.getElementById('table');
  for(let i=0;i<suits.length;i++){
    let tr=document.createElement('tr');
    for(let j=0;j<13;j++){
      let td=document.createElement('td');
      let tempCard=cards[i*13+j];
      td.classList.add('card','back');
      //以下を追加
      td.onclick=flip;
      td.style.backgroundImage=`url(images/${tempCard.front})`;
      tr.appendChild(td);
    }
    table.appendChild(tr);
  }
  //flipの作成
  function flip(e){
    let td=e.target;
    td.classList.toggle('back');
  }

}
2.カードをクリックしてみよう。backクラスがついたり外れたりして表示が切り替わるはずだ。
[1枚目のカードと2枚目のカードが同じ数字だったら表のままにする]
いよいよ神経衰弱をつくっていこう。
クリックされたカードが1枚目なのか2枚目なのかをどう判定するか・・・
今回はfirstCardという変数を用意し、それがnullかどうかで判定することとする。
1.main.jsを以下のように変更。
'use strict';
window.onload=function(){
  function Card(suit,num){
    this.suit=suit;
    this.num=num;
    this.front;
    this.setFront=function(){
      this.front=`${this.suit}${('0'+this.num).slice(-2)}.gif`;
    };
  }
  const cards=[];
  const suits=['s','d','h','c'];
  for(let i=0;i<suits.length;i++){
    for(let j=1;j<=13;j++){
      let card=new Card(suits[i],j);
      card.setFront();
      cards.push(card);
    }
  }
  function shuffle(){
    let i=cards.length;
    while(i){
      let index=Math.floor(Math.random()*i--);
      var temp=cards[index];
      cards[index]=cards[i];
      cards[i]=temp;
    }
  }
  shuffle();
  const table=document.getElementById('table');
  for(let i=0;i<suits.length;i++){
    let tr=document.createElement('tr');
    for(let j=0;j<13;j++){
      let td=document.createElement('td');
      let tempCard=cards[i*13+j];
      td.classList.add('card','back');
      td.onclick=flip;
      //以下を追加
      td.num=tempCard.num;
      td.style.backgroundImage=`url(images/${tempCard.front})`;
      tr.appendChild(td);
    }
    table.appendChild(tr);
  }
  //以下の変数を追加
  let firstCard=null;
  let flipTimerId=NaN;
  function flip(e){
    let td=e.target;
    //下の一行をコメントアウト
    //td.classList.toggle('back');
    //以下を追記
    if(!td.classList.contains('back') || flipTimerId){
      return;//表のカードをクリックしても何もしない。
    }
    td.classList.remove('back');//カードを表にする。
    if(firstCard===null){
      firstCard=td;//1枚目だったら今めくったカードをfirstCardに設定
    }else{
      //2枚目だったら1枚目と比較して結果を判定する。
      if(firstCard.num===td.num){
        //2枚が同じだったときの処理
        firstCard=null;
      }else{
        flipTimerId=setTimeout(function(){
          firstCard.classList.add('back');
          td.classList.add('back');
          flipTimerId=NaN;
          firstCard=null;
        },1200);
      }


    }
  }
}

コメント