今回はHPを表示するUIを作成していく。
Canvasの作成
ヒエラルキー+からUI->Canvasを作成する。
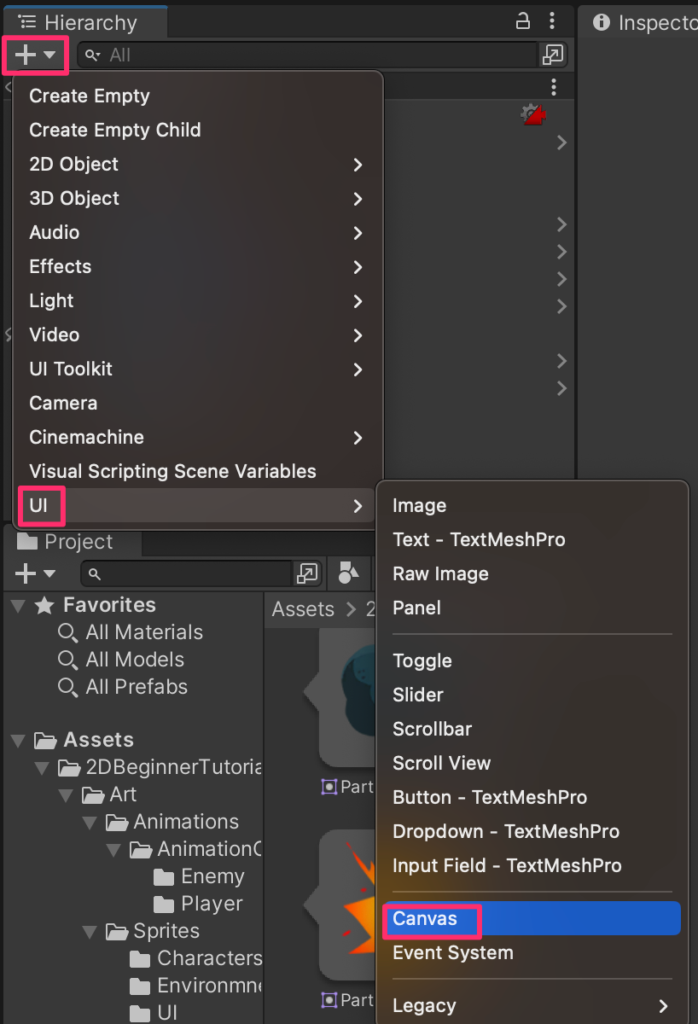
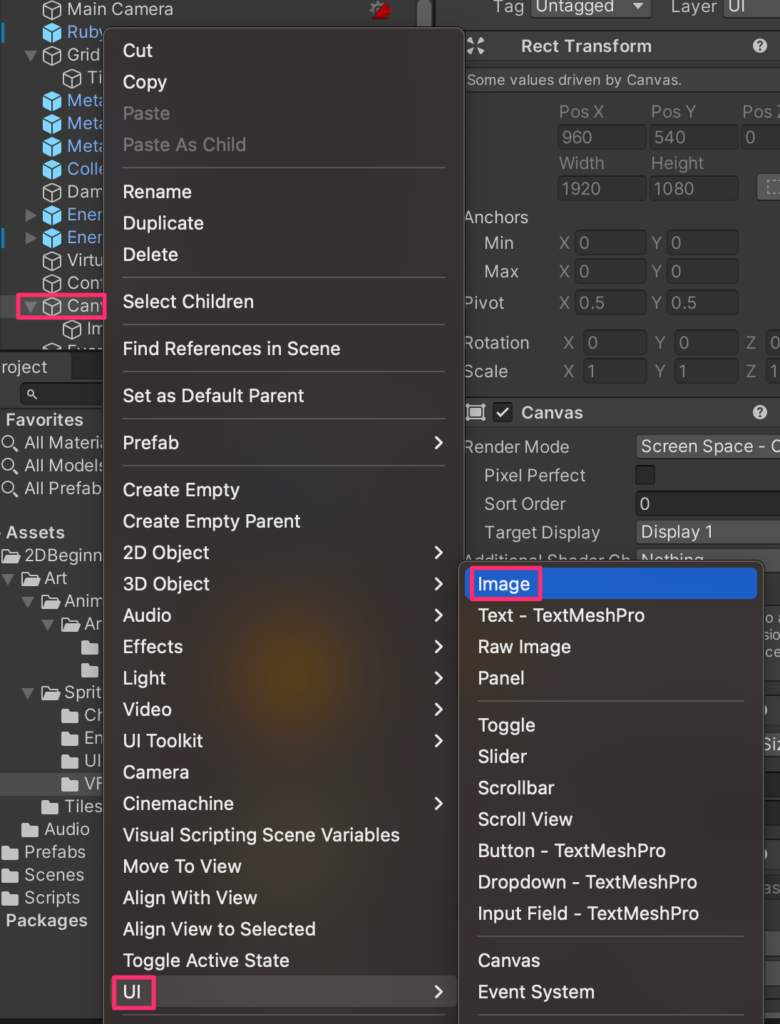
Canvasを右クリックしてUI->Imageを作成する。
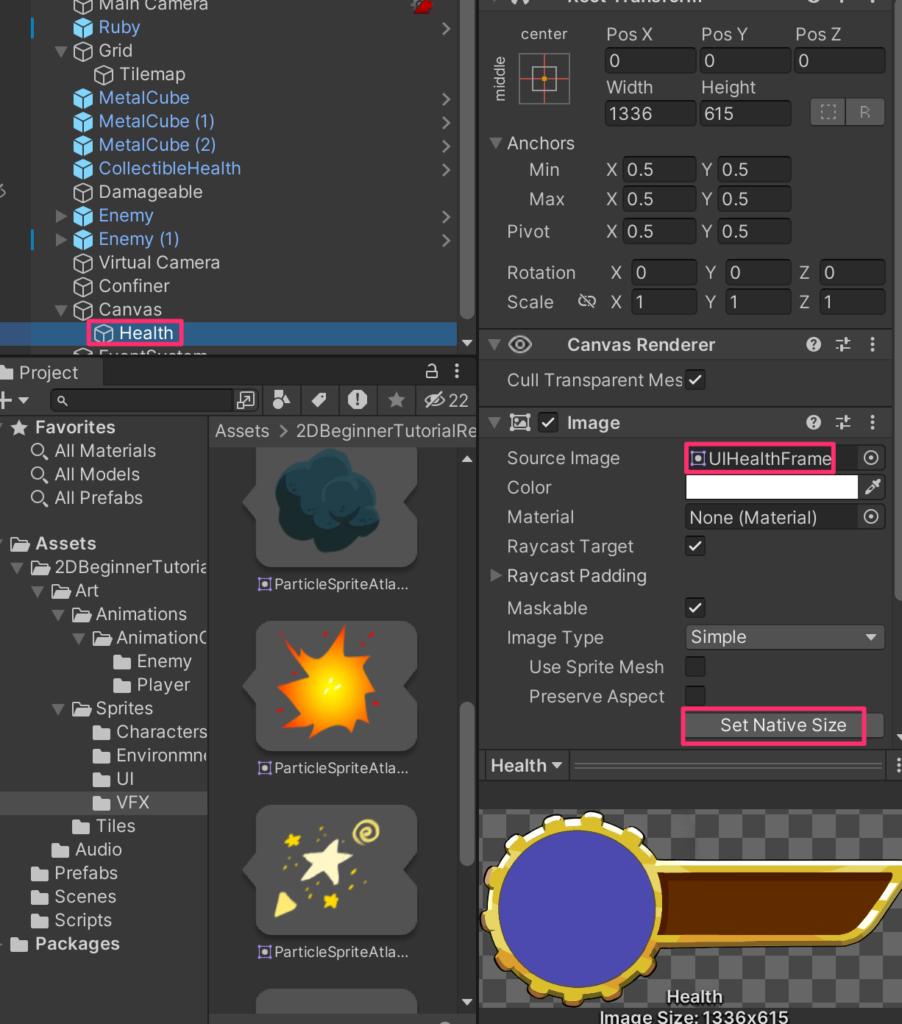
名前をHealthに変更し、SourceImageをUIHealthFrameに設定する。
画像比率を保ちたいのでSetNativeSizeを押してオリジナルの縮尺で表示する。
Sceneビューでrectツールを選択して、SHIFTキーを押しながら拡大縮小することで比率を保ったまま変更できる。左上にもってこよう。
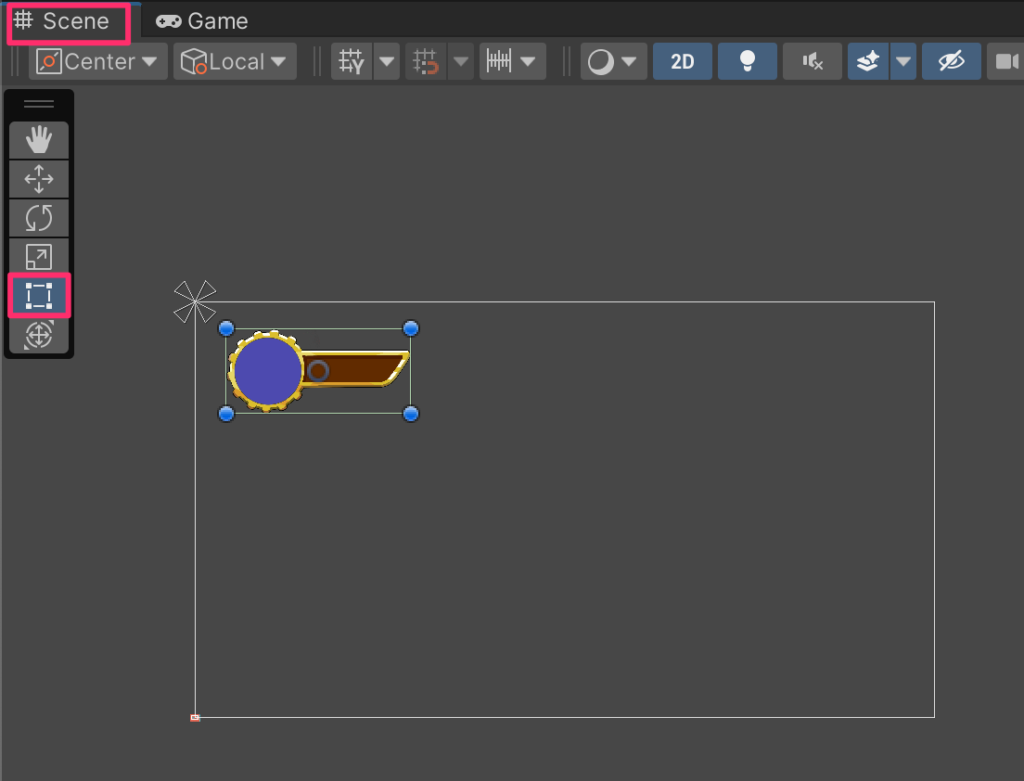
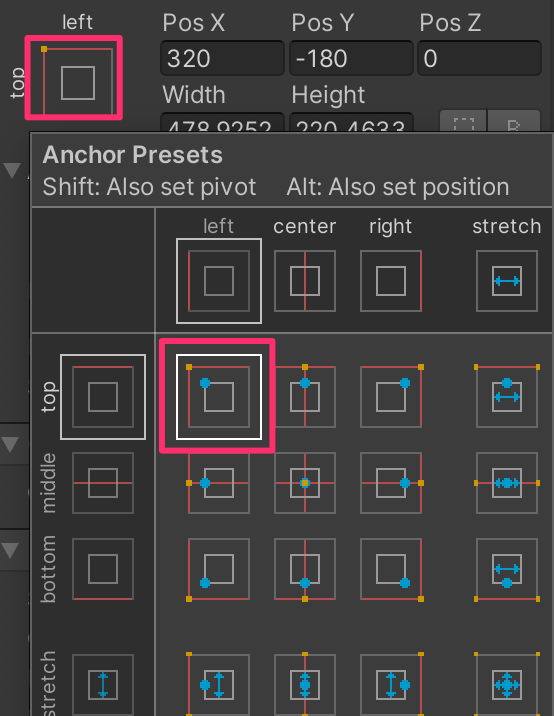
アンカーを左上に設定する。こうすることでこのUIは画面サイズが変わった際、左上を起点に配置されることとなる。
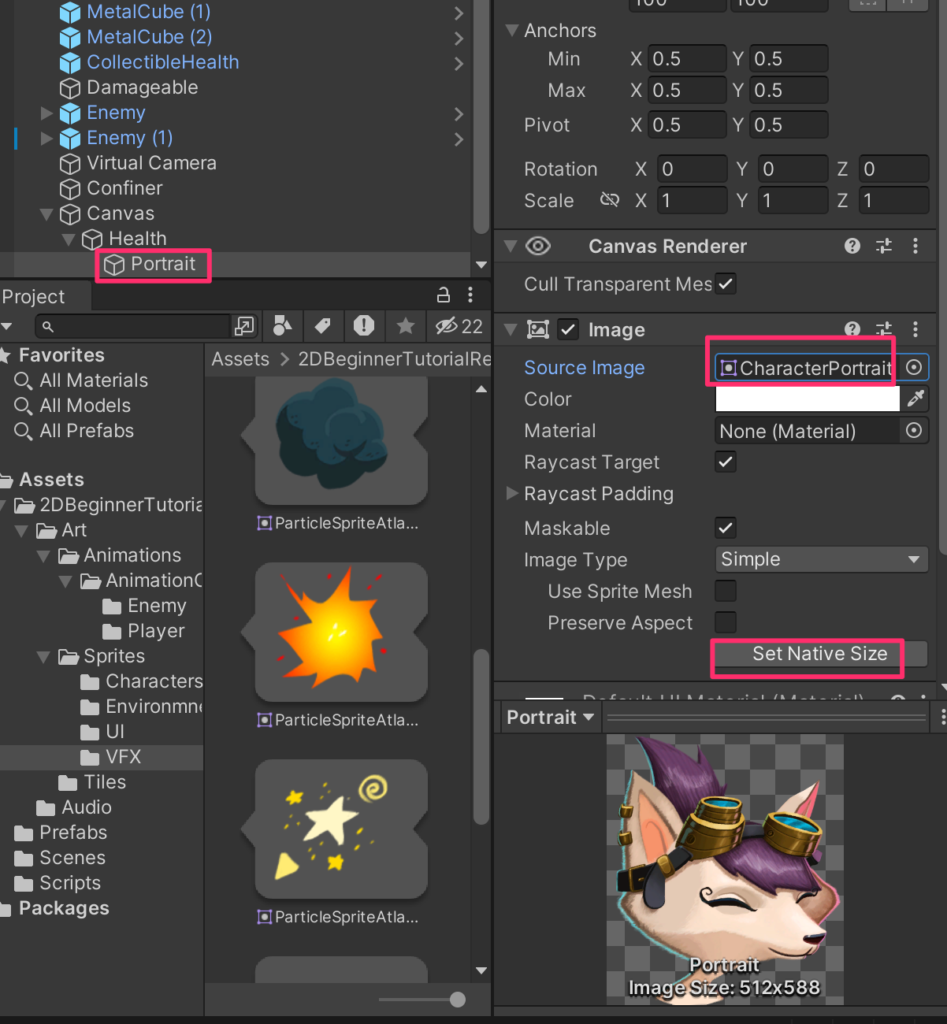
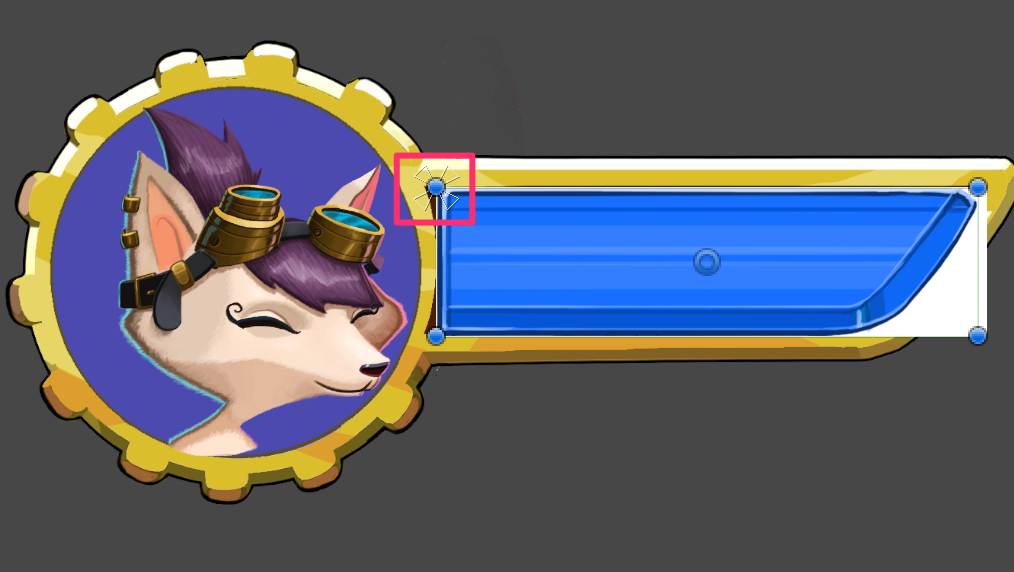
Healthの子要素としてUI->Imageを作成し、名前をPortraitに変更。
SourceImageにCharacterPortraitを選択し、SetNativeSizeを押す。
SHIFTキーを押しながらいい感じ収まるように調整する。
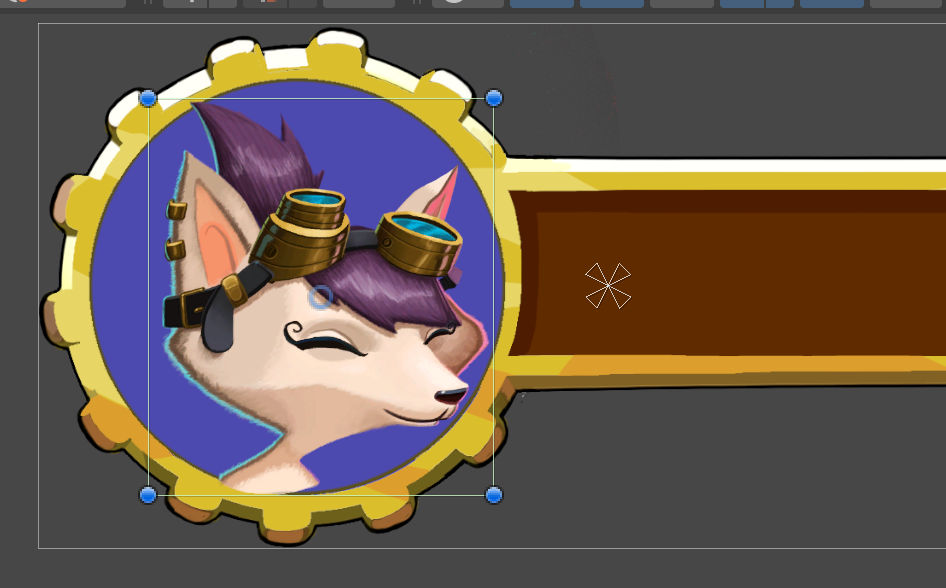
アンカーポイントを編集して親画像の縮尺が変わってもサークルの真ん中に表示されるようにする。(以下の動画参照)
親要素のHealthの大きさを変更しても、位置関係は保たれている
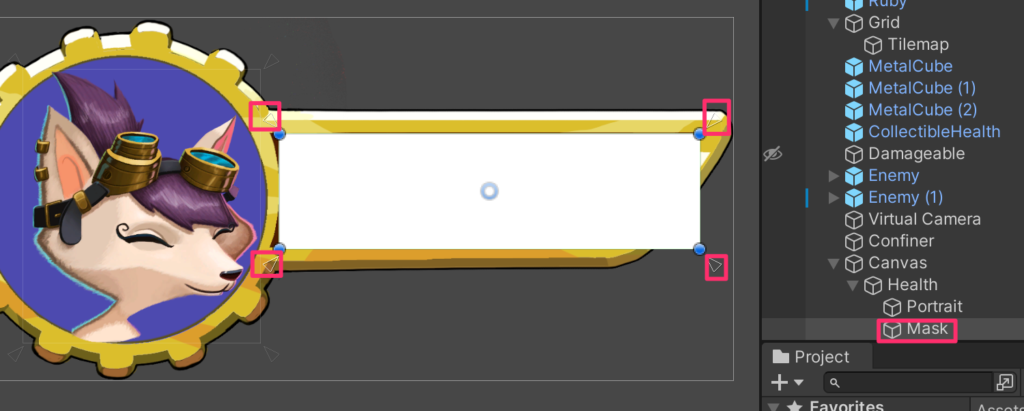
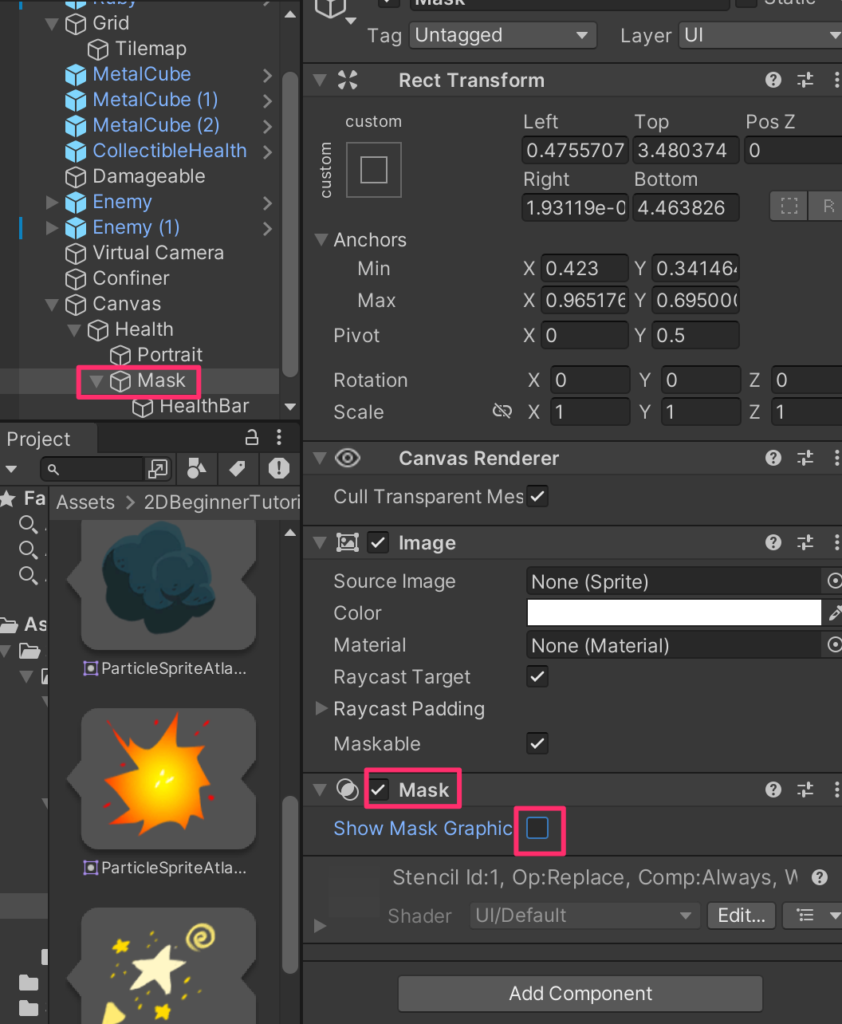
Maskの作成
重なっている部分を表示することができるマスクを作成していく。
Healthの子要素としてUI->Imageを作成し、Maskとリネーム。
大きさをHPゲージを覆い隠すように調整し、アンカーを赤で囲った位置に移動する。
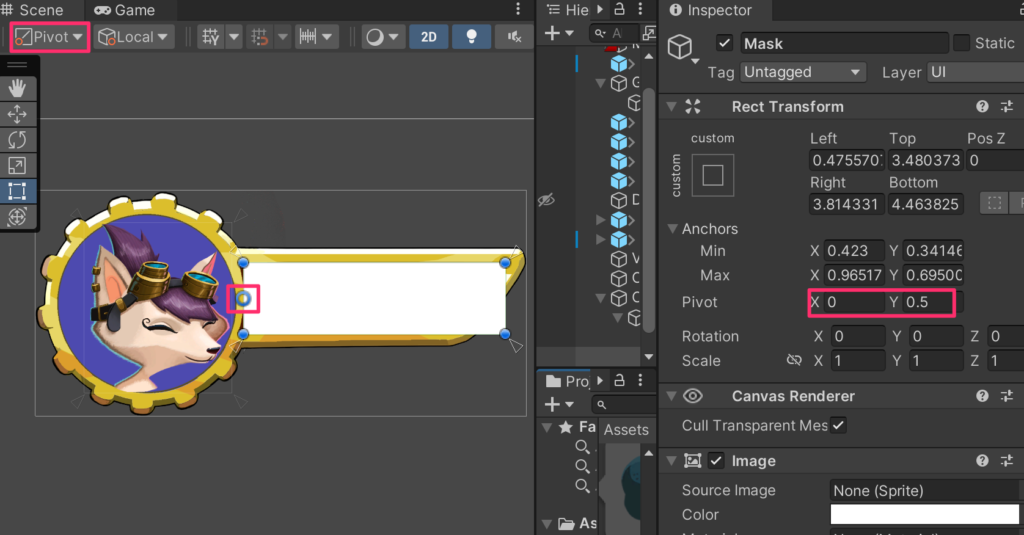
拡縮した際の基準点となるピボットを編集する。
左上をPivotモードにしてPivotがみえる状態にして、左まで移動させるか、インスペクターのPivotの項目を0と0.5にすることでピボットを左端にもってくる。
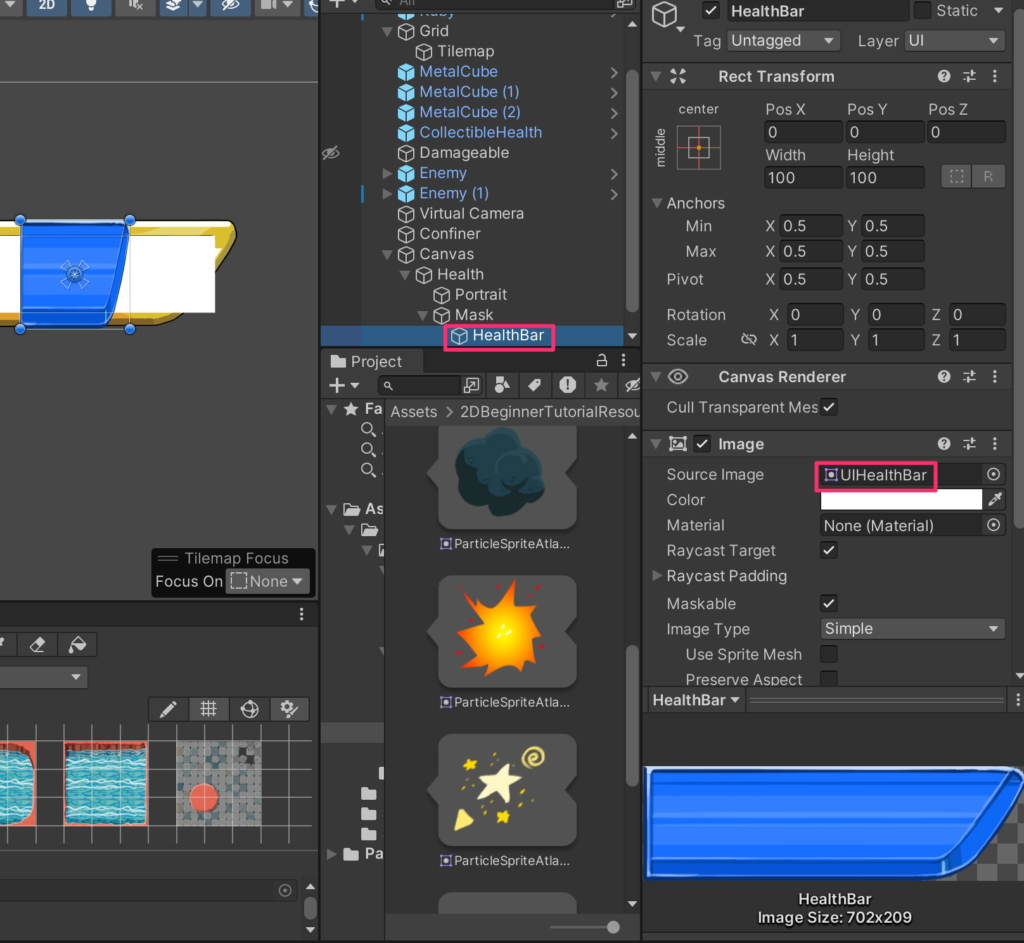
HealthBarの設置
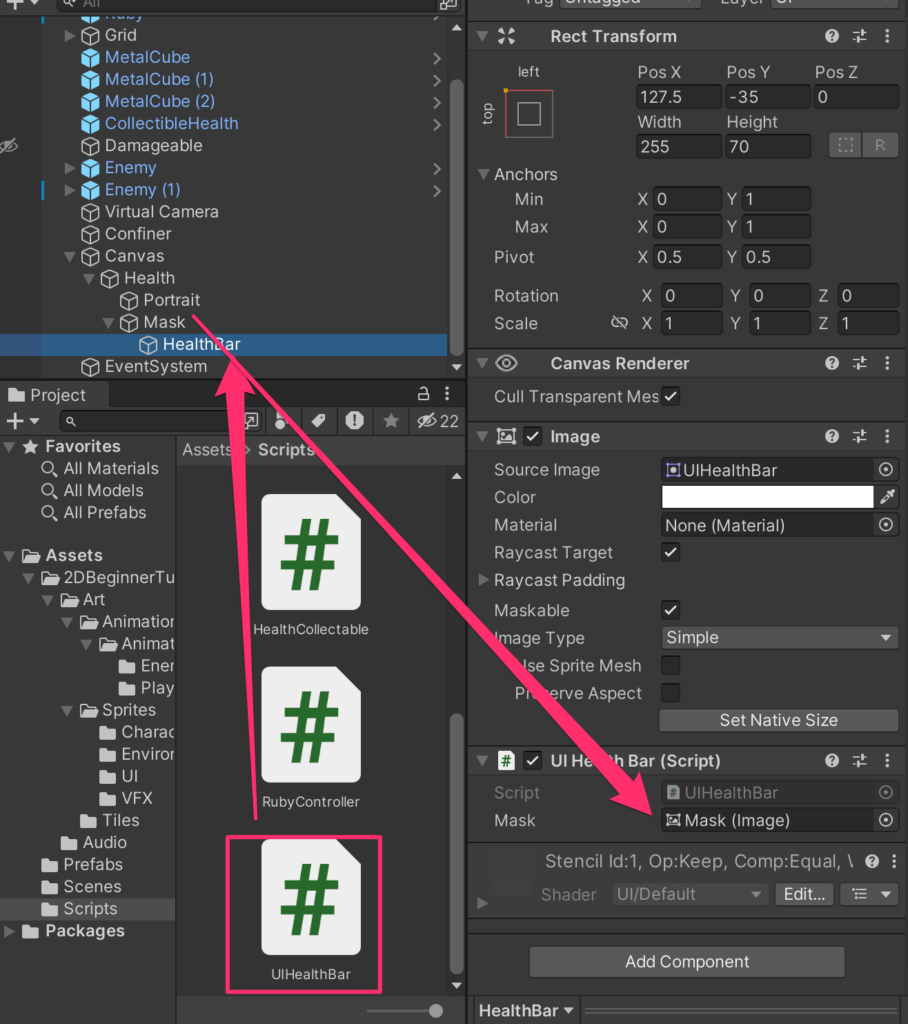
Maskの子要素としUI->Imageを作成し、HealthBarとリネーム。
SourceImageにUIHealthBarを設定する。
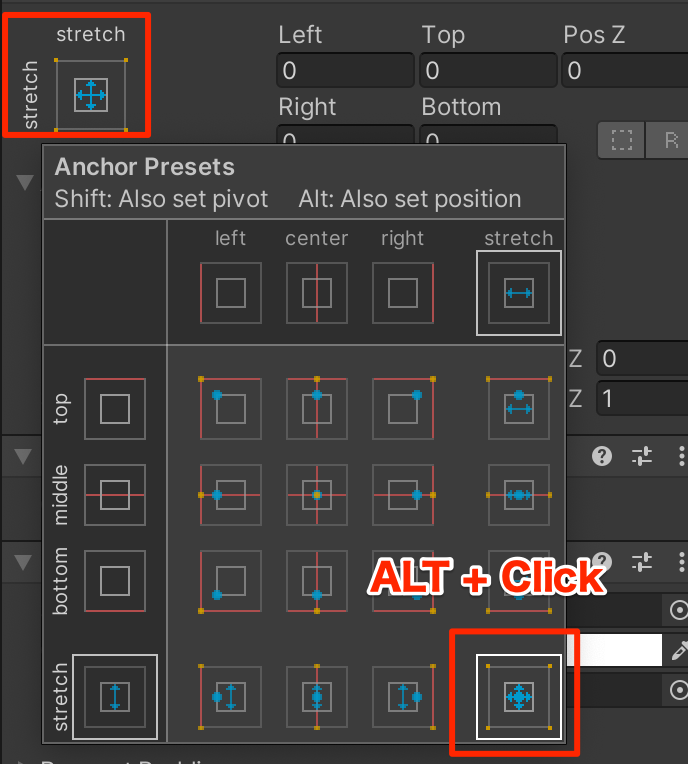
ALTを押したまま表示されたポップ・アイコンの右下の項目を選択することで、親要素と同じ大きさにすることができる。
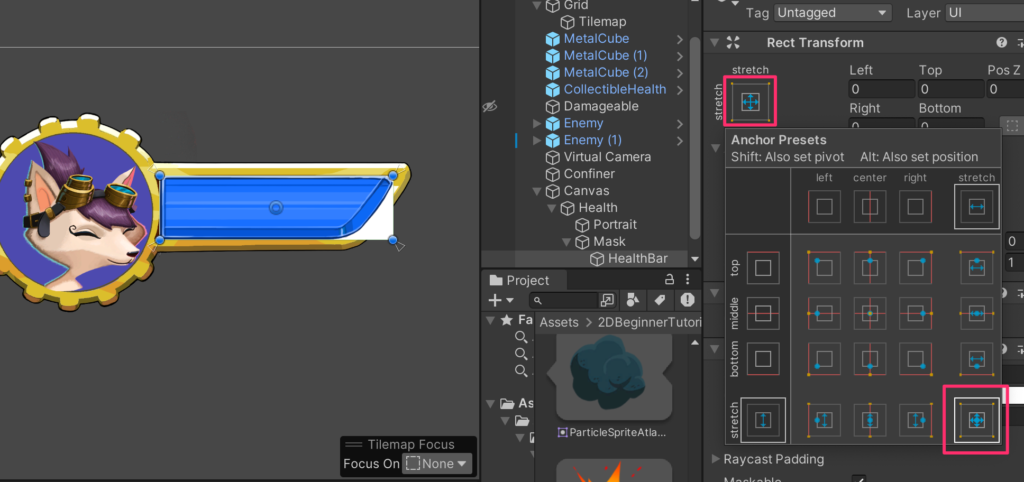
大きさの設定ができたので今度はAnchorの設定をする。
もう一度アンカー設定を開いて今度はALTを押さずに左上をクリックする。
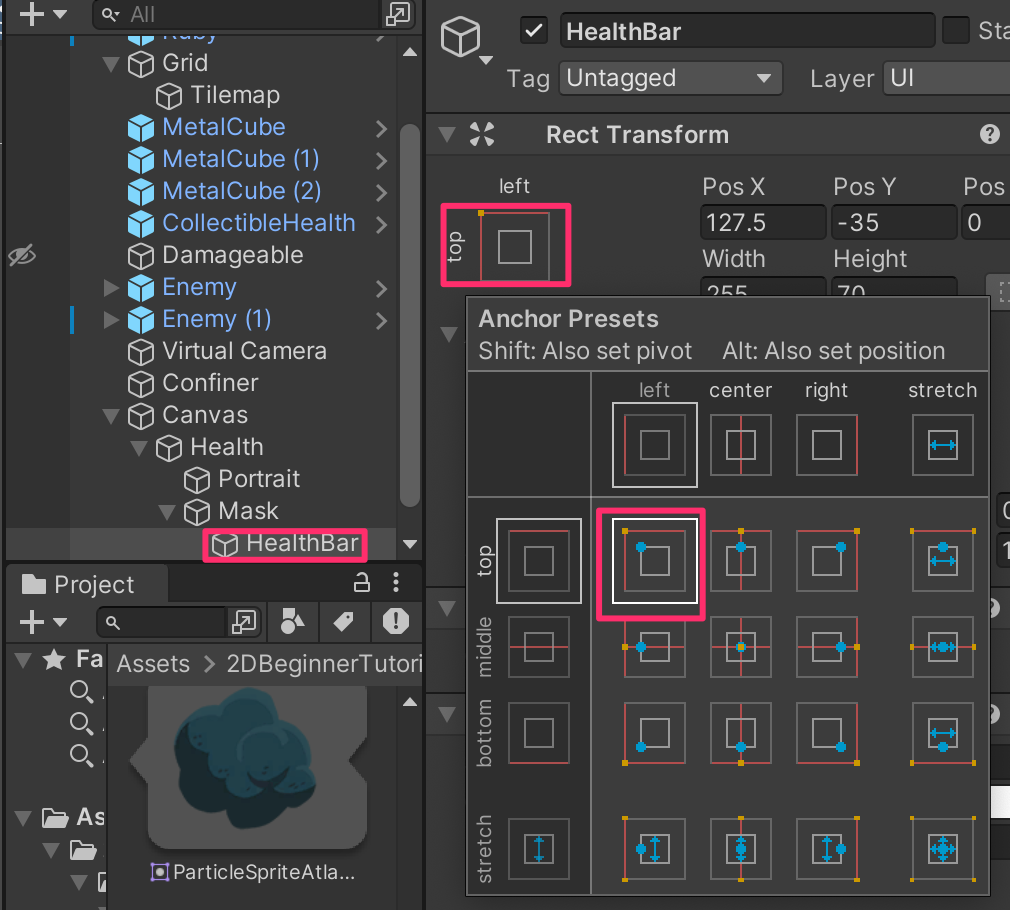
こうすることでAnchorが左上に設定される。
Maskコンポーネント追加
Maskを選択して、AddComponentからMaskコンポーネントを追加し,
Show Mask Graphicのチェックを外す。
Maskを選択して、大きさを変更してみよう。重なっている部分のみを表示していることがわかる。
UIHealthBarスクリプトの作成
見た目ができたのでこれを制御するスクリプトを作成していく。
まずは、UIHealthBarスクリプトを作成し、以下のように記述する。
using System.Collections;
using System.Collections.Generic;
using UnityEngine;
using UnityEngine.UI;

public class UIHealthBar : MonoBehaviour
{
    public static UIHealthBar instance {get; private set;}
    public Image mask;
    float originalSize;

    void Awake(){
        instance = this;
    }

    void Start()
    {
        originalSize = mask.rectTransform.rect.width;
    }

    public void SetValue(float value){
        mask.rectTransform.SetSizeWithCurrentAnchors(RectTransform.Axis.Horizontal,originalSize * value);
    }
}
HealthBarにアタッチして、Maskを登録する。
続いてRubyControllerに以下を追記
using System.Collections;
using System.Collections.Generic;
using UnityEngine;

public class RubyController : MonoBehaviour
{
    public float speed=3.0f;

    public int maxHealth=5;
    int currentHealth;
    public int health{get{return currentHealth;}}
    public float timeInvincible=2.0f;
    bool isInvincible;
    float invincibleTimer;

    Rigidbody2D rb;

    Animator anim;
    Vector2 lookDirection = new Vector2(1f,0);

    public GameObject prefab;
    void Start()
    {
        rb=GetComponent<Rigidbody2D>();
        currentHealth=maxHealth;
        anim=GetComponent<Animator>();
    }
    void Update()
    {
        float horizontal = Input.GetAxis("Horizontal");
        float vertical = Input.GetAxis("Vertical");

        Vector2 move = new Vector2(horizontal,vertical);
        if(move.sqrMagnitude > 0f){
            lookDirection.Set(move.x,move.y);
            lookDirection.Normalize();
        }

        anim.SetFloat("Look X",lookDirection.x);
        anim.SetFloat("Look Y",lookDirection.y);
        anim.SetFloat("Speed",move.magnitude);
        Vector2 position = rb.position;
        position.x = position.x + speed * horizontal * Time.deltaTime;
        position.y = position.y + speed * vertical * Time.deltaTime;
        rb.MovePosition(position);

        if(isInvincible){
            invincibleTimer -= Time.deltaTime;
            if(invincibleTimer < 0){
                isInvincible = false;
            }
        }
        if(Input.GetKeyDown(KeyCode.C)){
            Launch();
        }
    }
    public void ChangeHealth(int amount){
        if(amount < 0){
            if(isInvincible) return;
            isInvincible = true;
            invincibleTimer = timeInvincible;
            anim.SetTrigger("Hit");
        }
        currentHealth = Mathf.Clamp(currentHealth + amount,0,maxHealth);
        //Debug.Log(currentHealth + "/" + maxHealth);
        UIHealthBar.instance.SetValue(currentHealth/(float)maxHealth);
    }
    void Launch(){
        GameObject cogBullet= Instantiate(
            prefab,
            rb.position+Vector2.up*0.5f,
            Quaternion.identity
            );
        CogBulletController cogCon = cogBullet.GetComponent<CogBulletController>();
        cogCon.Launch(lookDirection,5f);
        anim.SetTrigger("Launch");
    }
}
実行してみよう。HPに増減があるとバーが動くことがわかる。
ダイアログ
キャラクターの作成
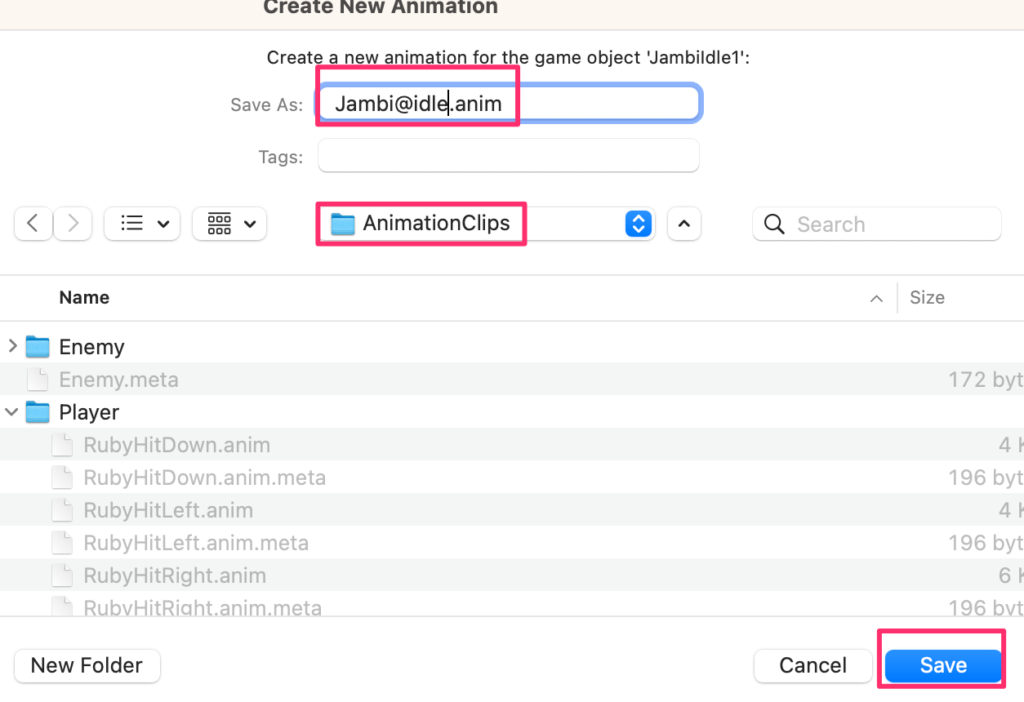
Chractersフォルダに入っているJambiSheetを展開して、3枚のスプライトをヒエラルキーにドラッグする。
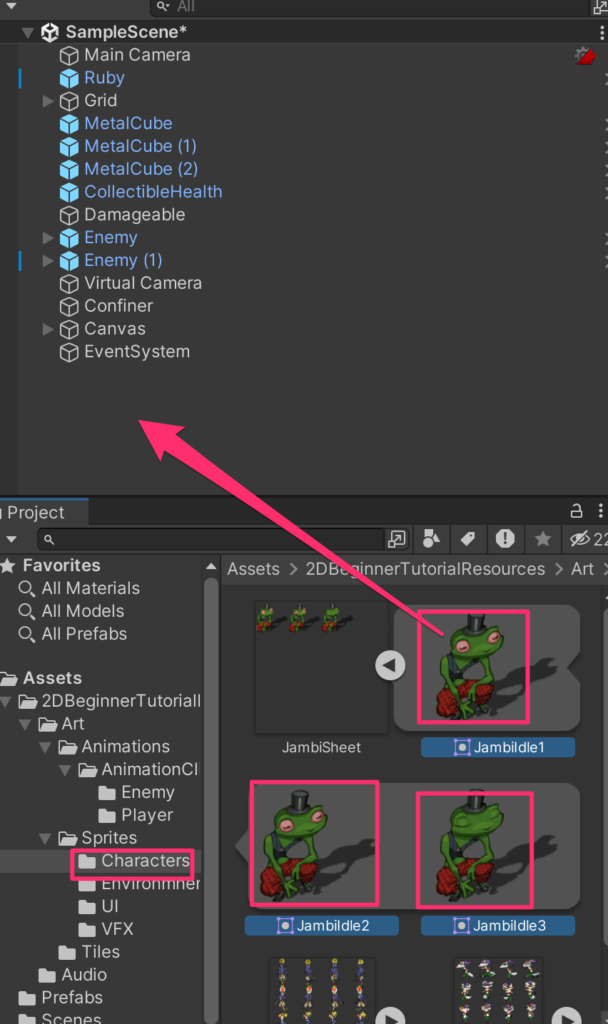
するとアニメーションクリップ保存画面が開くので
Art -> Animations -> AnimationClipsフォルダの中に
Jambi@idle.anim
として保存する
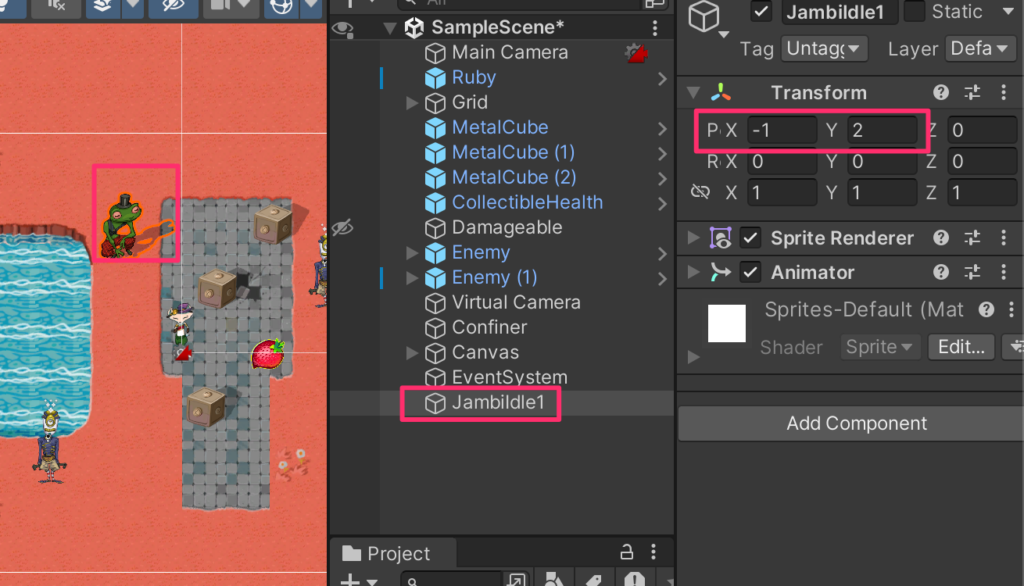
Jambiが適当な位置になるようにTransformを調整する。
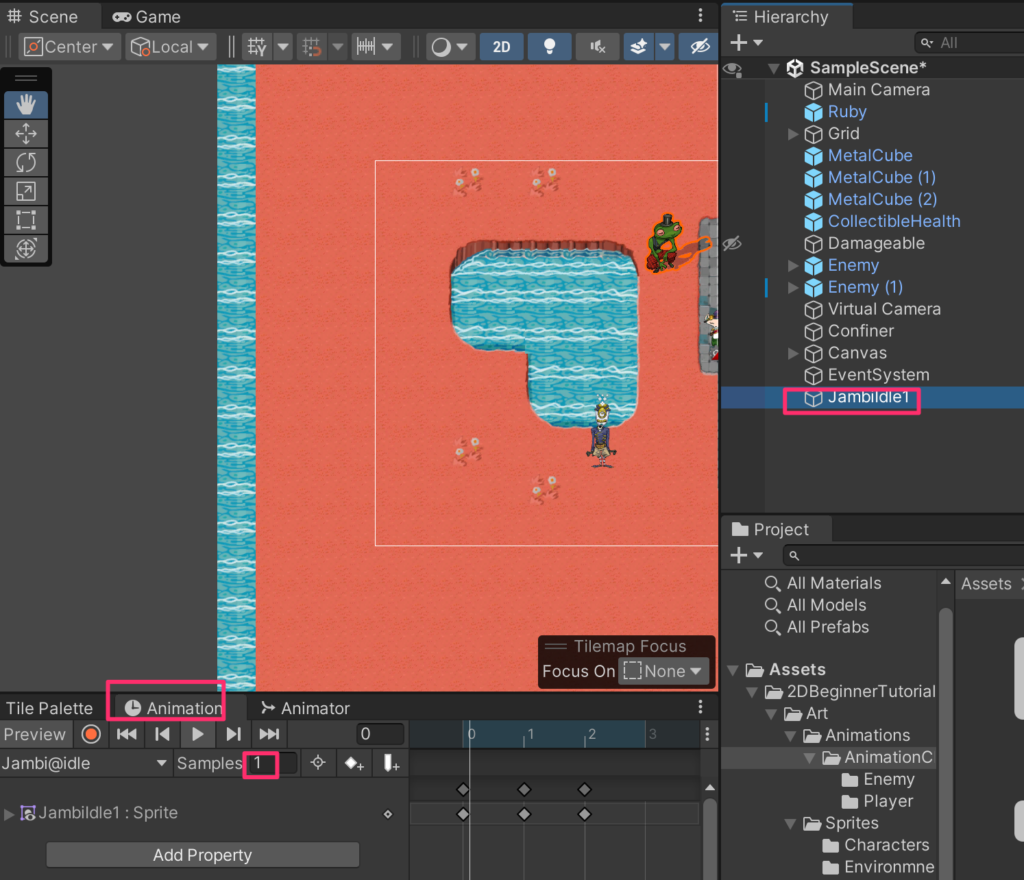
ゲームを実行してみるとJambiの瞬きが速すぎるので調整しよう。
Jambiを選択して、Animationウインドウを開いて、Jambi@idleクリップのSamplesを1に設定する。これで瞬きがゆっくりになった。
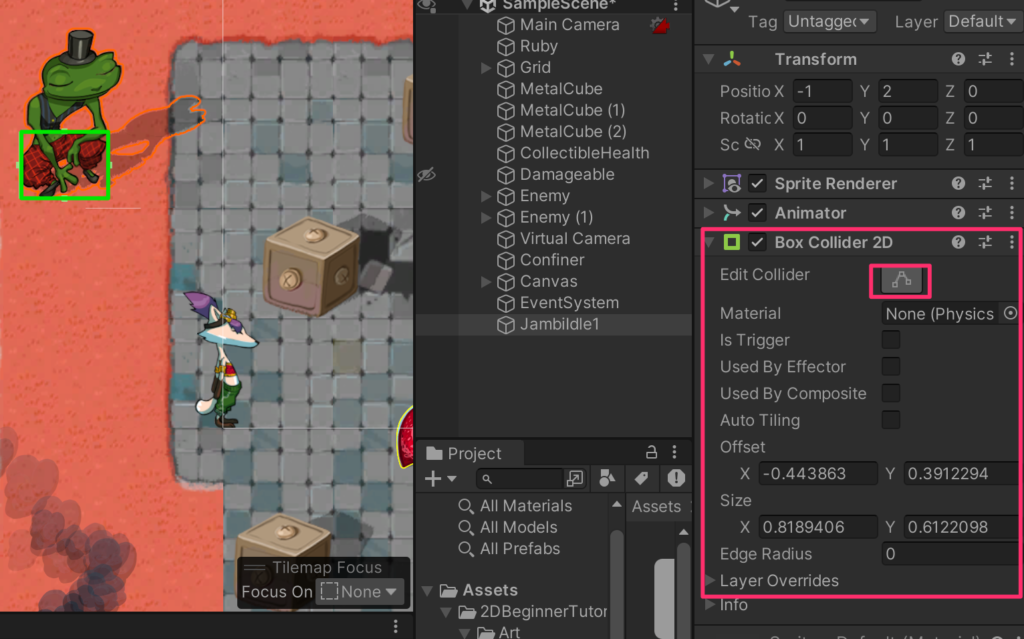
BoxCollider2Dの設定
続いてコライダーの設定を行う。AddComponentからBoxCollider2Dを選択し、コライダーの大きさを調整する。
レイヤーの設定
他キャラとの識別ができるようにNPCという名前で新規レイヤーを作成し、Jambiに付与する。

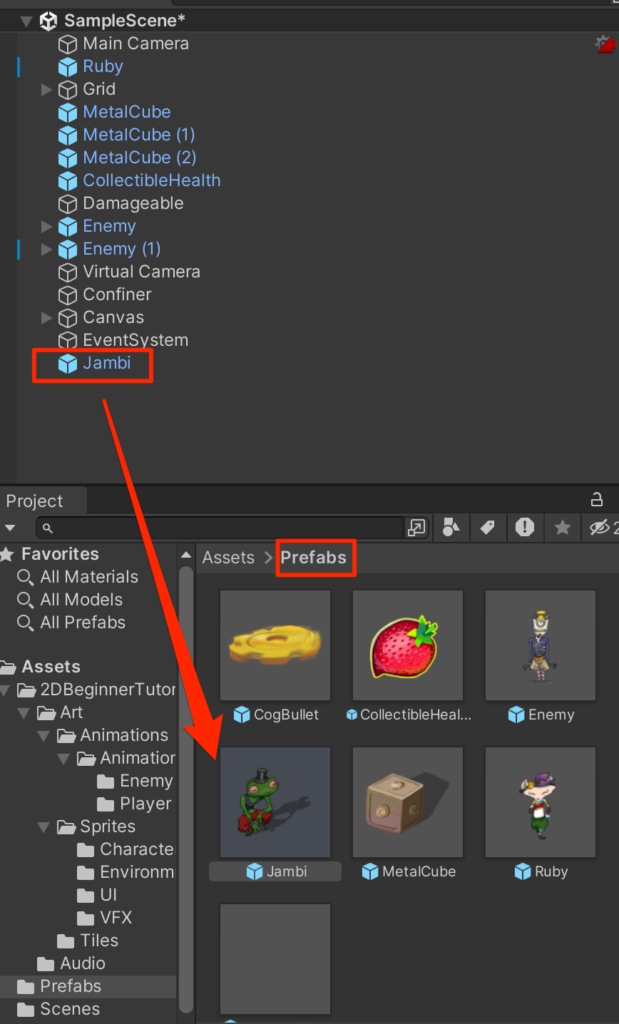
プレファブ化
ここまで設定ができたら、名前をJambiに変更し、プレファブ化する。
レイキャスティング
向き合った状態でxキーを入力した際に会話ダイアログが表示されるようにしていく。
まずは、向き合っているかを判定する必要がある。それにはレイと呼ばれる見えない光線をRubyの前方に飛ばして特定の距離にJambiがいるかを判定すればよい。
RubyControllerのUpdate内に以下を追記する。
using System.Collections;
using System.Collections.Generic;
using UnityEngine;

public class RubyController : MonoBehaviour
{
    public float speed=3.0f;

    public int maxHealth=5;
    int currentHealth;
    public int health{get{return currentHealth;}}
    public float timeInvincible=2.0f;
    bool isInvincible;
    float invincibleTimer;

    Rigidbody2D rb;

    Animator anim;
    Vector2 lookDirection = new Vector2(1f,0);

    public GameObject prefab;
    void Start()
    {
        rb=GetComponent<Rigidbody2D>();
        currentHealth=maxHealth;
        anim=GetComponent<Animator>();
    }
    void Update()
    {
        float horizontal = Input.GetAxis("Horizontal");
        float vertical = Input.GetAxis("Vertical");

        Vector2 move = new Vector2(horizontal,vertical);
        if(move.sqrMagnitude > 0f){
            lookDirection.Set(move.x,move.y);
            lookDirection.Normalize();
        }

        anim.SetFloat("Look X",lookDirection.x);
        anim.SetFloat("Look Y",lookDirection.y);
        anim.SetFloat("Speed",move.magnitude);
        Vector2 position = rb.position;
        position.x = position.x + speed * horizontal * Time.deltaTime;
        position.y = position.y + speed * vertical * Time.deltaTime;
        rb.MovePosition(position);

        if(isInvincible){
            invincibleTimer -= Time.deltaTime;
            if(invincibleTimer < 0){
                isInvincible = false;
            }
        }
        if(Input.GetKeyDown(KeyCode.C)){
            Launch();
        }
        if(Input.GetKeyDown(KeyCode.X)){
            //rayの作成(原点、方向)
            Ray2D ray = new Ray2D(
                rb.position + Vector2.up * 0.2f,
                lookDirection);
            //RaycastHit構造体の検出
            //Raycast(レイの原点,レイの方向,レイの長さ,対象レイヤー)
            RaycastHit2D hit = Physics2D.Raycast(
                ray.origin,
                ray.direction,
                1.5f,
                LayerMask.GetMask("NPC")
            );
            //Rayをデバッグ(可視化)
            //(開始位置,方向と長さ,色,表示時間)
            Debug.DrawRay (ray.origin, ray.direction * 1.5f, Color.green, 1f);
            if(hit.collider != null){
                Debug.Log("Raycast has hit the object"+hit.collider.gameObject);
            }
        }
    }
    public void ChangeHealth(int amount){
        if(amount < 0){
            if(isInvincible) return;
            isInvincible = true;
            invincibleTimer = timeInvincible;
            anim.SetTrigger("Hit");
        }
        currentHealth = Mathf.Clamp(currentHealth + amount,0,maxHealth);
        //Debug.Log(currentHealth + "/" + maxHealth);
        UIHealthBar.instance.SetValue(currentHealth/(float)maxHealth);
    }
    void Launch(){
        GameObject cogBullet= Instantiate(
            prefab,
            rb.position+Vector2.up*0.5f,
            Quaternion.identity
            );
        CogBulletController cogCon = cogBullet.GetComponent<CogBulletController>();
        cogCon.Launch(lookDirection,5f);
        anim.SetTrigger("Launch");
    }
}
Debug.DrawRayはシーンビューで描画されるので、以下のようにシーンビューとゲームビューを同時に開いて実行し、レイがどのように飛んでいるのかを確認する。
レイがJambiのコライダーに当たったときにDebugログが出力されることを確認しよう(確認が済んだらDebug.DrawRayの行はコメントアウトする)
//Debug.DrawRay (ray.origin, ray.direction * 1.5f, Color.green, 1f);ダイアログUI
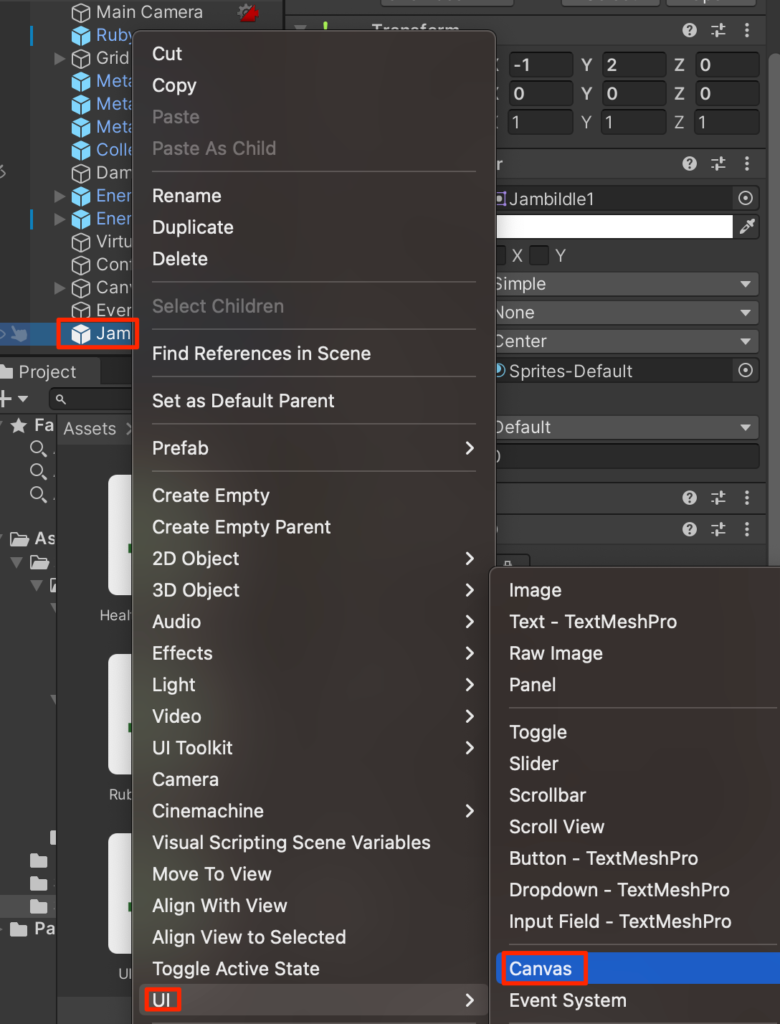
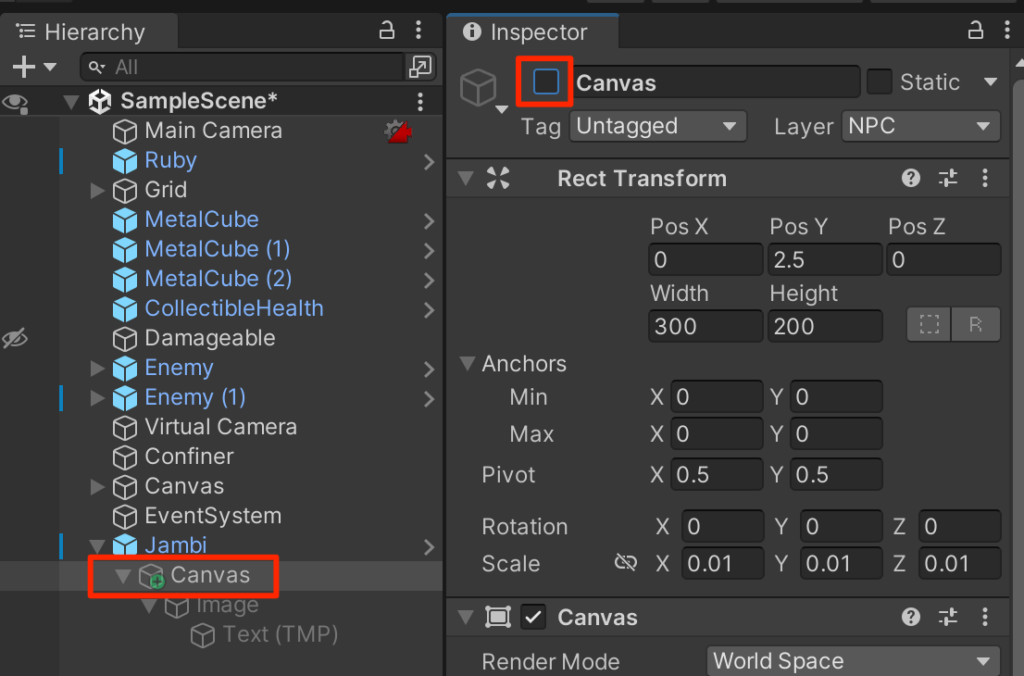
ヒエラルキーのJambiを右クリックして、UI->Canvasを選択する。
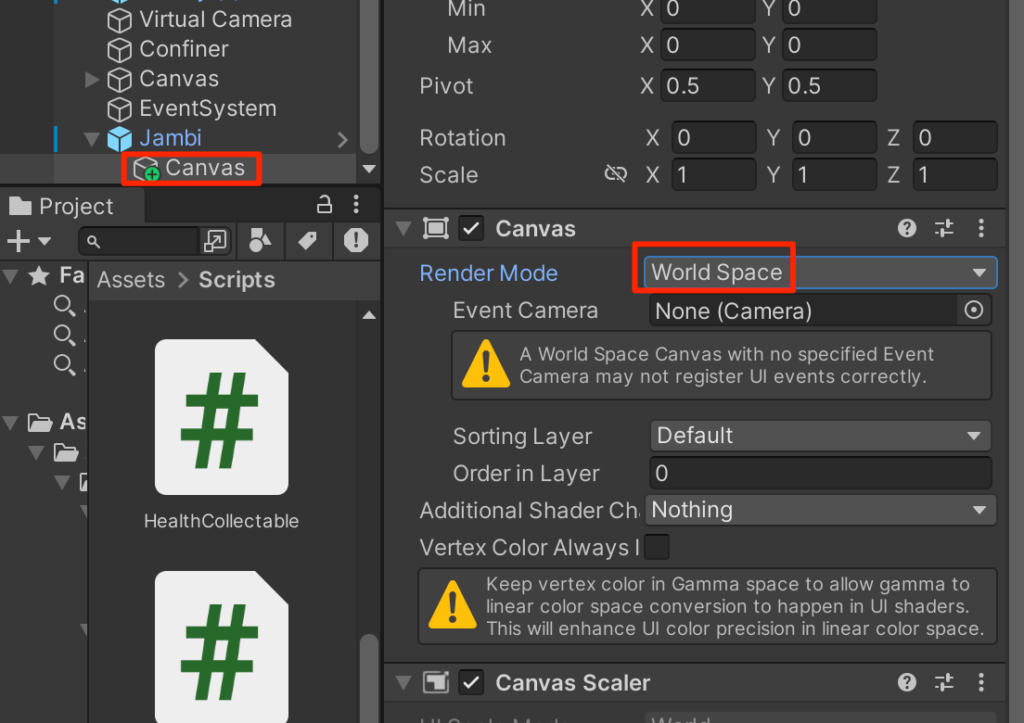
今回はワールド空間にUIを配置したいため、RnderModeをWorld Spaceに設定する。
位置と大きさを調節する。UIは大きいのでscaleを0.01にする。
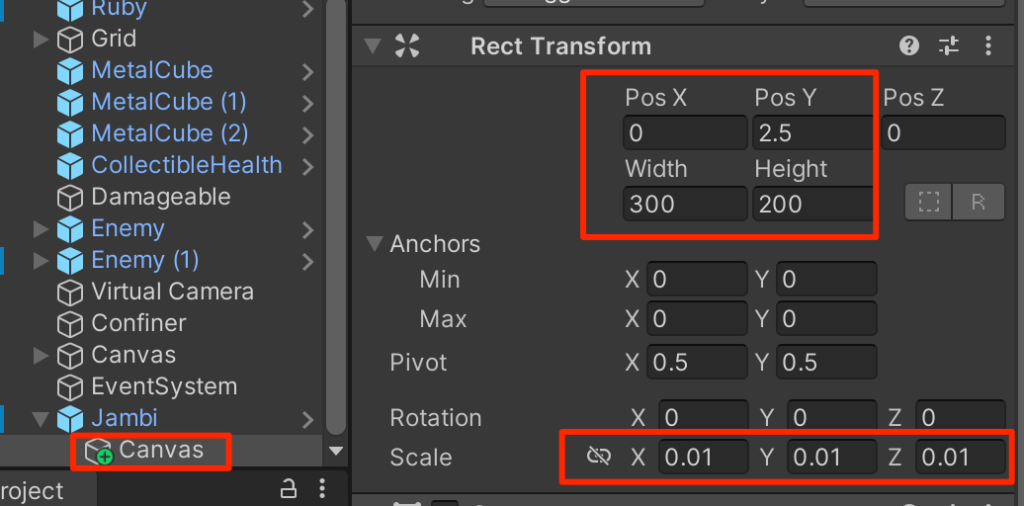
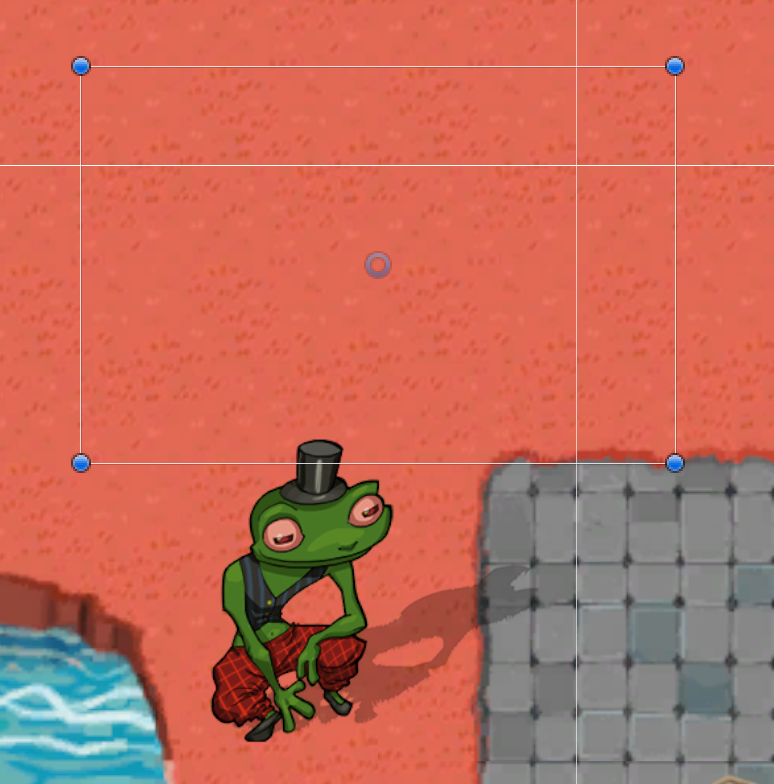
以下のようにcanvasが配置されれば成功だ。
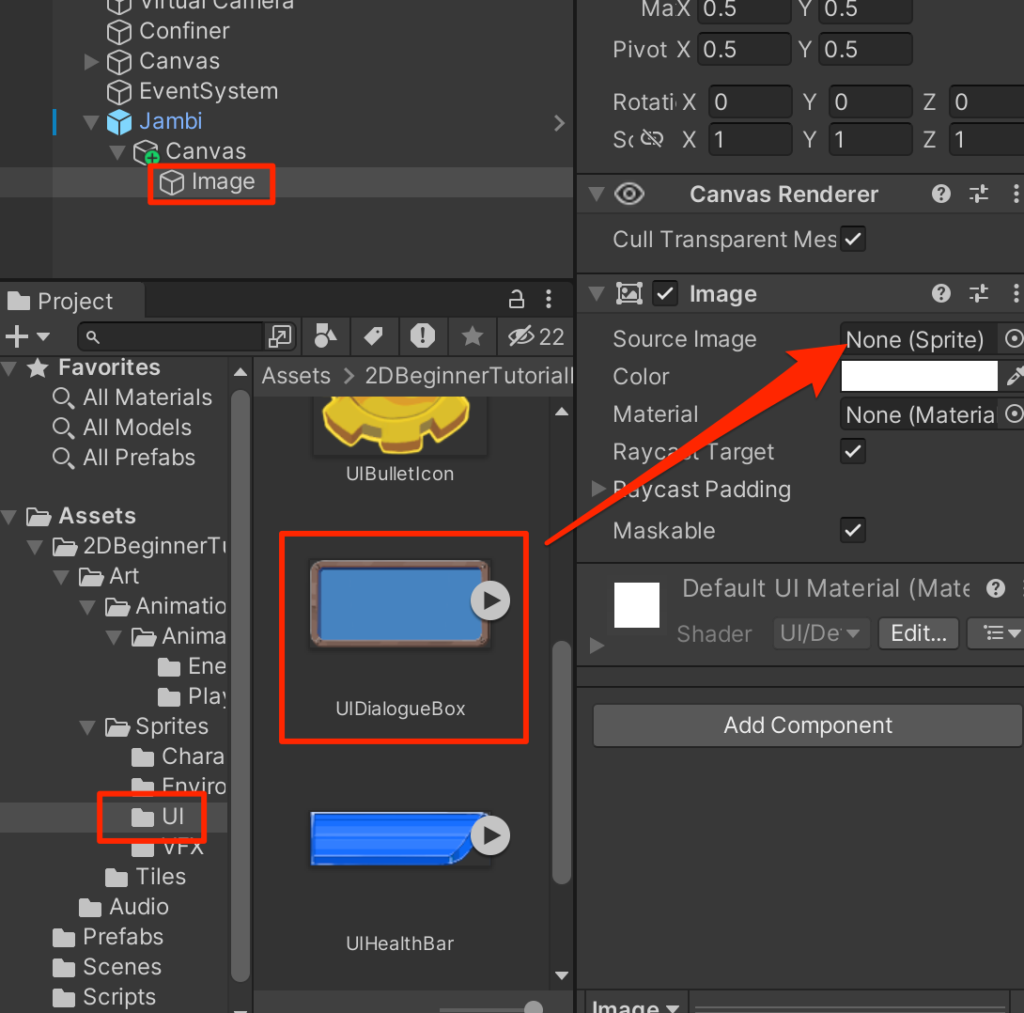
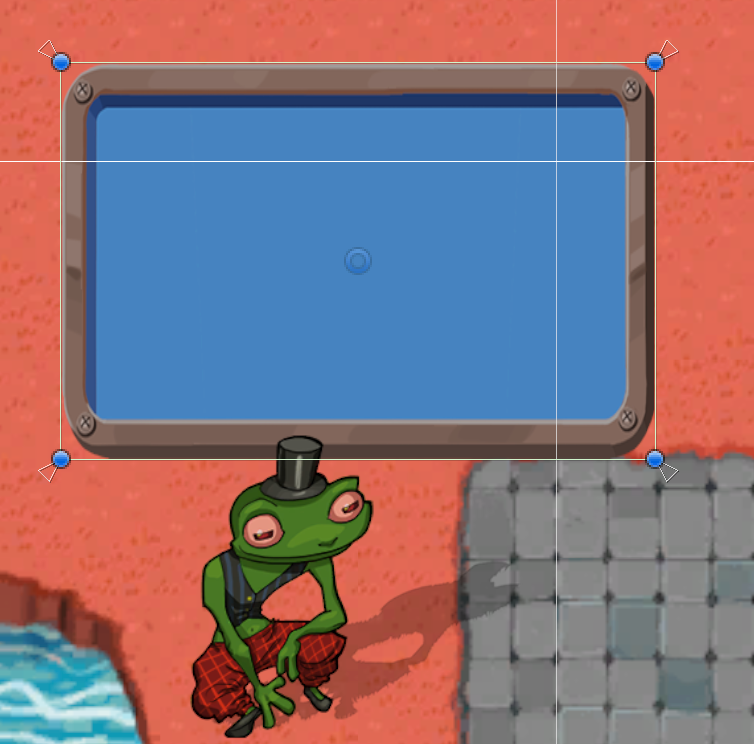
Canvasを右クリックしてImageを追加する。
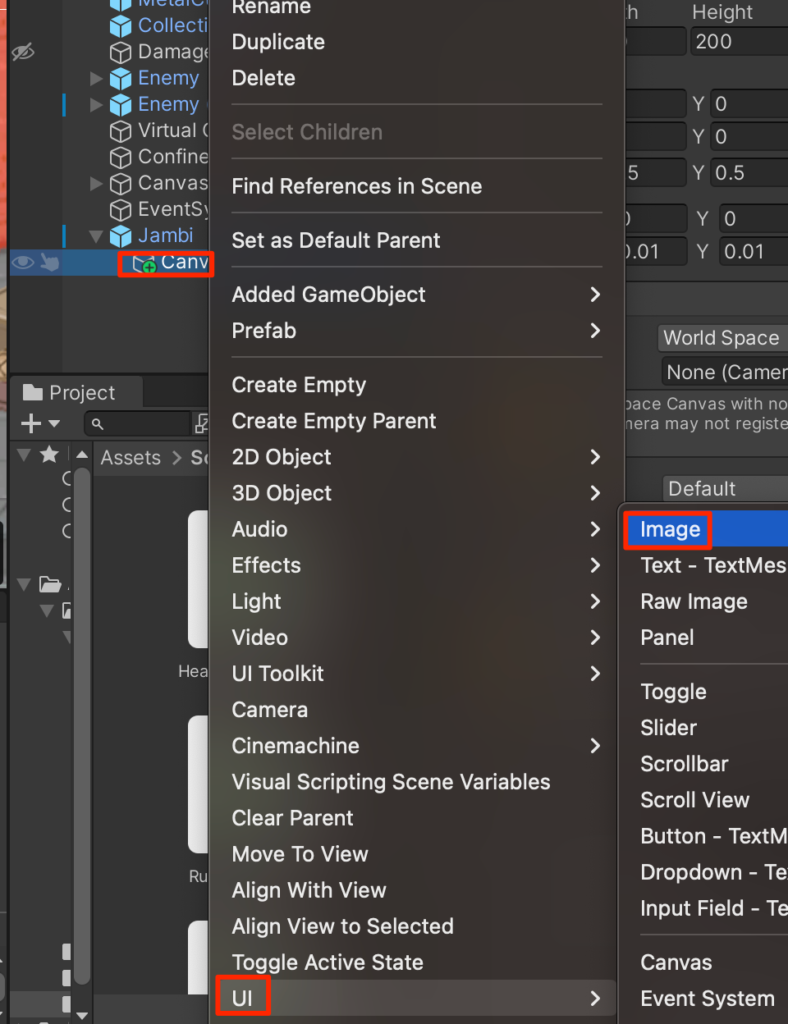
SourceイメージにUIDialogueBoxを設定する。
Rectトランスフォームを右クリックして、右下の項目をALT+CLICKすることで親要素いっぱいに画像を広げることができる。
このようになれば成功だ。
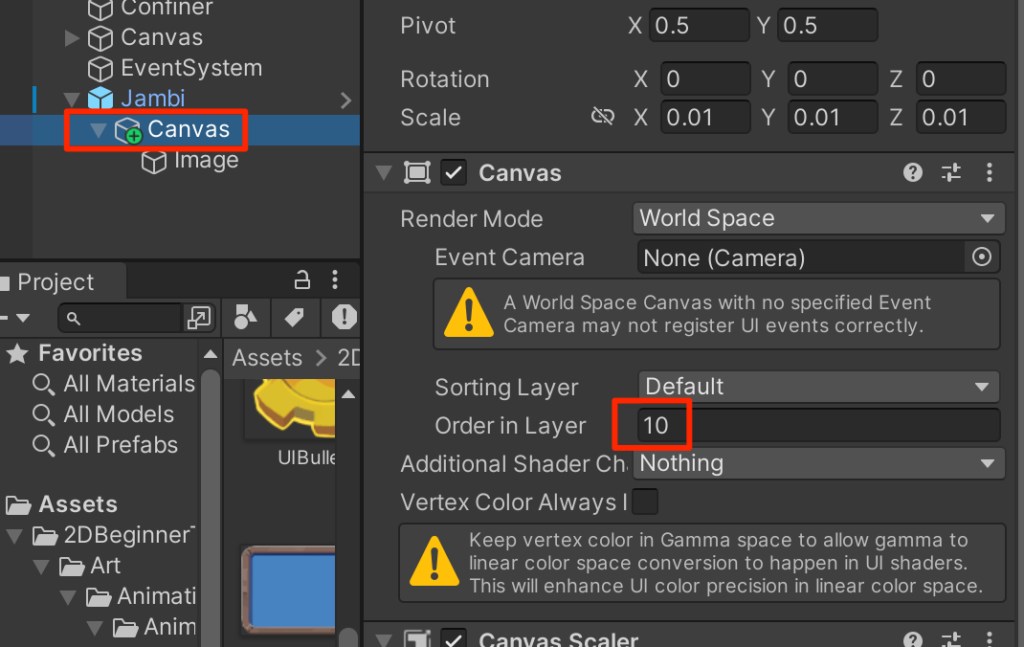
よくみると、Janbiの帽子の後ろにUIが表示されている。
canvasのorder in レイヤーを大きな値(10など)にする。
テキストの追加
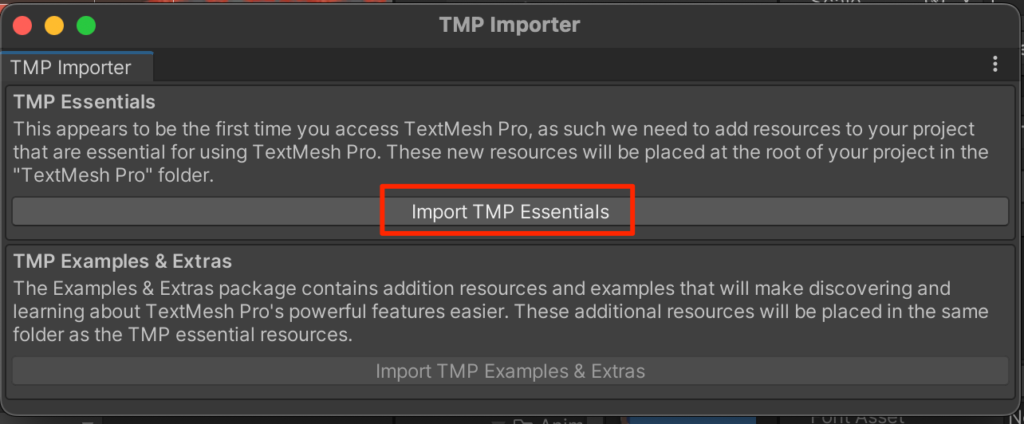
imageを右クリックしてUI->TextMeshProを選択する。
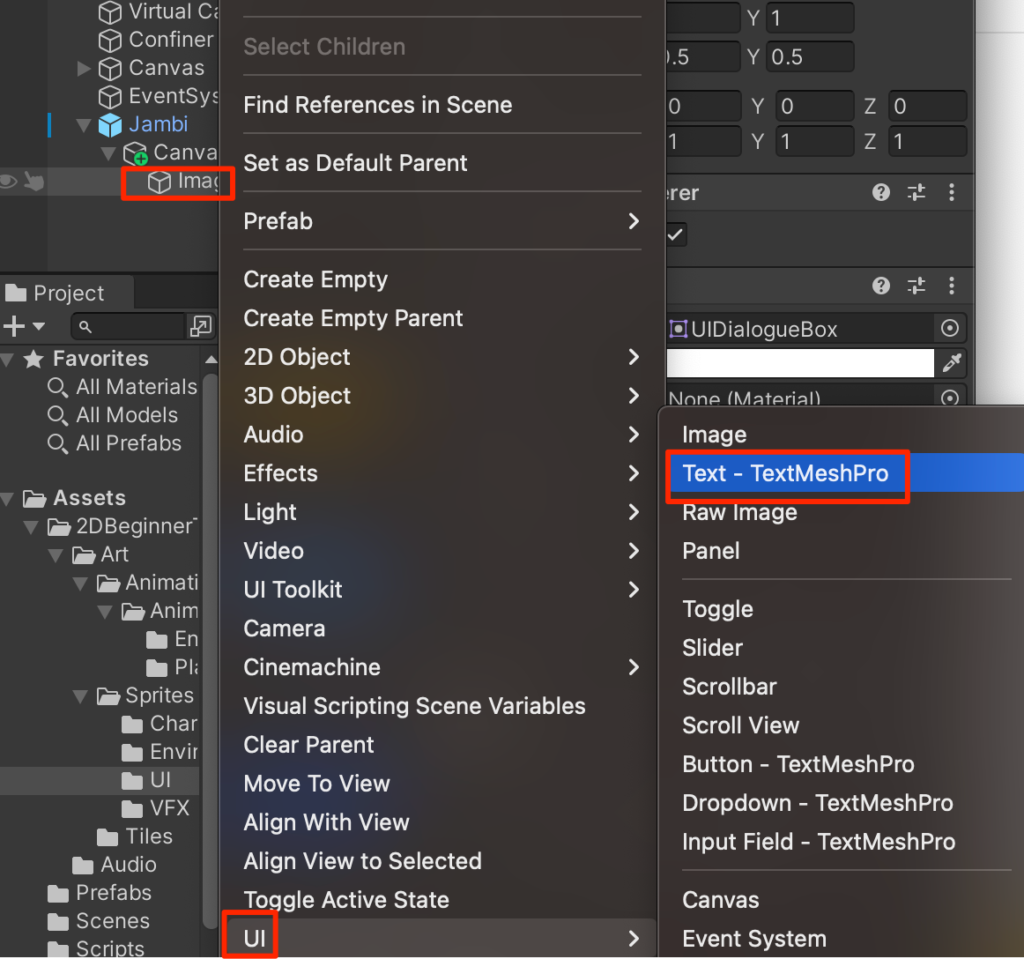
ダイアログが表示されるのでimort TMP Essentialsを押し、インポートが終わったらダイアログを閉じる。
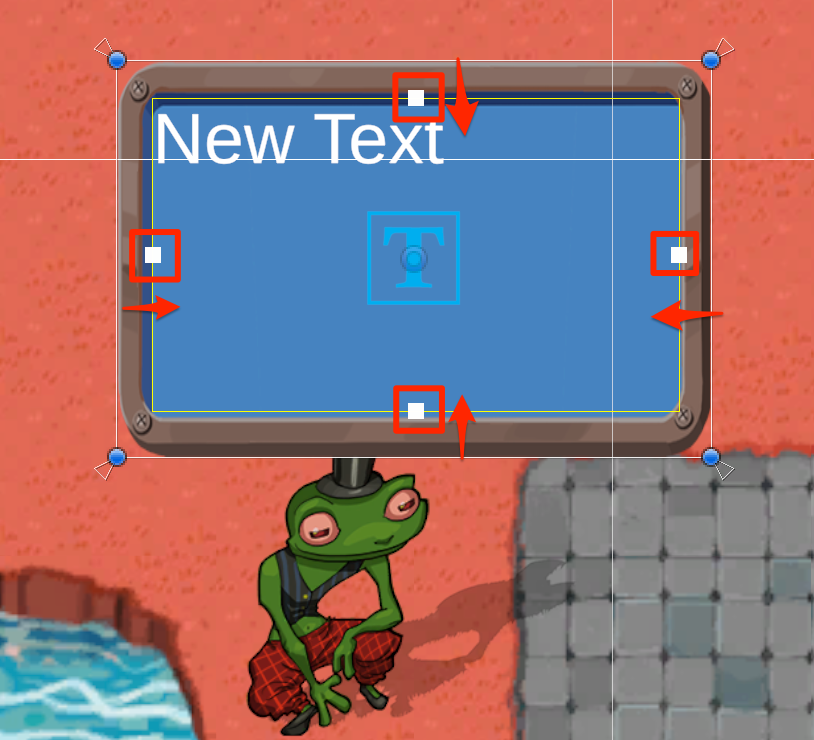
先ほどと同じようにTextを親要素いっぱいに広げる。

ちょっと大きすぎるのでコントロールポイントを内側にドラッグして表示領域を調節する。
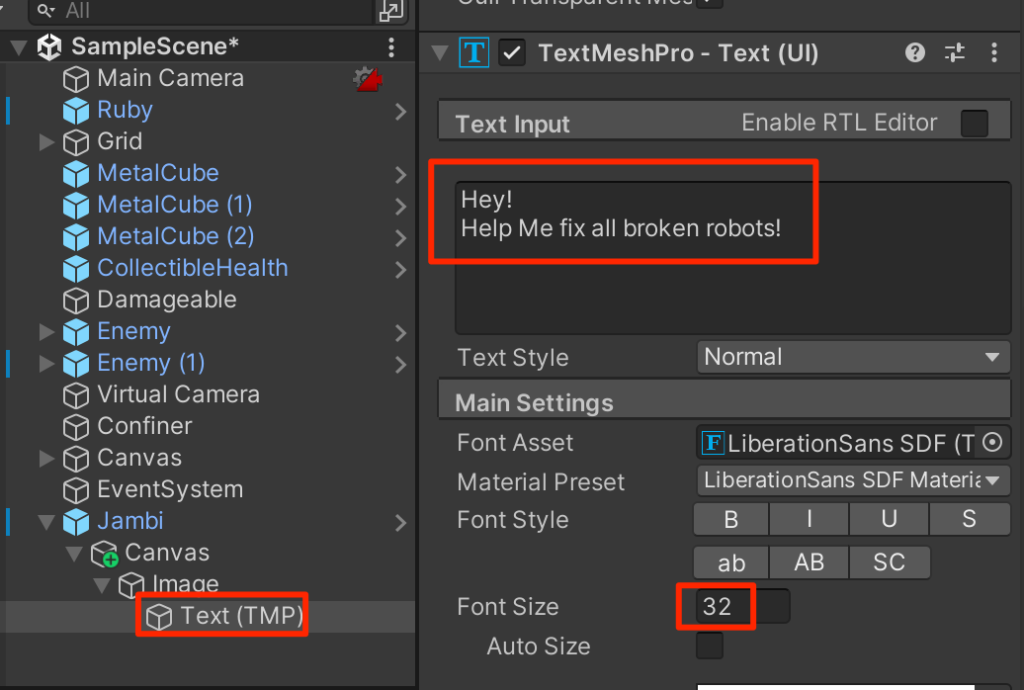
Textと大きさを以下のように設定する。
ダイアログを非表示にする
ダイアログは話しかけたときに表示したいので最初は非表示にしておこう。
一番上にあるチェックボックスをオフにする。
NonPlayerCharacterスクリプトの作成
NonPlayerCharacterスクリプトを以下のように作成し、Jambiに付与する。
using System.Collections;
using System.Collections.Generic;
using UnityEngine;

public class NonPlayerCharacter : MonoBehaviour
{
    public float displayTime = 4f;
    GameObject dialogBox;
    float timerDisplay;
    // Start is called before the first frame update
    void Start()
    {
        //最初の子要素を取得
        dialogBox=transform.GetChild(0).gameObject;
        dialogBox.SetActive(false);
        timerDisplay = -1f;
    }

    // Update is called once per frame
    void Update()
    {
       if(timerDisplay >= 0){
        timerDisplay -= Time.deltaTime;
        if(timerDisplay < 0){
            dialogBox.SetActive(false);
        }
       }
    }
    public void DisplayDialog(){
        timerDisplay = displayTime;
        dialogBox.SetActive(true);
    }
}
RubyControllerの修正
以下のようにRubyControlloerを修正する。
using System.Collections;
using System.Collections.Generic;
using UnityEngine;

public class RubyController : MonoBehaviour
{
    public float speed=3.0f;

    public int maxHealth=5;
    int currentHealth;
    public int health{get{return currentHealth;}}
    public float timeInvincible=2.0f;
    bool isInvincible;
    float invincibleTimer;

    Rigidbody2D rb;

    Animator anim;
    Vector2 lookDirection = new Vector2(1f,0);

    public GameObject prefab;
    void Start()
    {
        rb=GetComponent<Rigidbody2D>();
        currentHealth=maxHealth;
        anim=GetComponent<Animator>();
    }
    void Update()
    {
        float horizontal = Input.GetAxis("Horizontal");
        float vertical = Input.GetAxis("Vertical");

        Vector2 move = new Vector2(horizontal,vertical);
        if(move.sqrMagnitude > 0f){
            lookDirection.Set(move.x,move.y);
            lookDirection.Normalize();
        }

        anim.SetFloat("Look X",lookDirection.x);
        anim.SetFloat("Look Y",lookDirection.y);
        anim.SetFloat("Speed",move.magnitude);
        Vector2 position = rb.position;
        position.x = position.x + speed * horizontal * Time.deltaTime;
        position.y = position.y + speed * vertical * Time.deltaTime;
        rb.MovePosition(position);

        if(isInvincible){
            invincibleTimer -= Time.deltaTime;
            if(invincibleTimer < 0){
                isInvincible = false;
            }
        }
        if(Input.GetKeyDown(KeyCode.C)){
            Launch();
        }
        if(Input.GetKeyDown(KeyCode.X)){
            //rayの作成(原点、方向)
            Ray2D ray = new Ray2D(
                rb.position + Vector2.up * 0.2f,
                lookDirection);
            //RaycastHit構造体の検出
            //Raycast(レイの原点,レイの方向,レイの長さ,対象レイヤー)
            RaycastHit2D hit = Physics2D.Raycast(
                ray.origin,
                ray.direction,
                1.5f,
                LayerMask.GetMask("NPC")
            );
            //Rayをデバッグ(可視化)
            //(開始位置,方向と長さ,色,表示時間)
            //Debug.DrawRay (ray.origin, ray.direction * 1.5f, Color.green, 1f);
            if(hit.collider != null){
                //Debug.Log("Raycast has hit the object"+hit.collider.gameObject);
                NonPlayerCharacter npc = hit.collider.GetComponent<NonPlayerCharacter>();
                if(npc != null){
                    npc.DisplayDialog();
                }
            }
        }
    }
    public void ChangeHealth(int amount){
        if(amount < 0){
            if(isInvincible) return;
            isInvincible = true;
            invincibleTimer = timeInvincible;
            anim.SetTrigger("Hit");
        }
        currentHealth = Mathf.Clamp(currentHealth + amount,0,maxHealth);
        //Debug.Log(currentHealth + "/" + maxHealth);
        UIHealthBar.instance.SetValue(currentHealth/(float)maxHealth);
    }
    void Launch(){
        GameObject cogBullet= Instantiate(
            prefab,
            rb.position+Vector2.up*0.5f,
            Quaternion.identity
            );
        CogBulletController cogCon = cogBullet.GetComponent<CogBulletController>();
        cogCon.Launch(lookDirection,5f);
        anim.SetTrigger("Launch");
    }
}
実行してみよう。Jambiにxボタンを押して話しかけたときにダイアログが表示され、4秒後に表示が消えれば成功だ。
参考
using System;
using System.Collections;
using System.Collections.Generic;
using UnityEngine;
using DG.Tweening;
using TMPro;

public class NonPlayerCharacter : MonoBehaviour
{
    Transform dialogBox;
    TextMeshProUGUI tmp;

    // Start is called before the first frame update
    void Start()
    {
        dialogBox=transform.GetChild(0).gameObject.transform;
        dialogBox.localScale=Vector3.zero;
        tmp = dialogBox.GetChild(0).GetChild(0).GetComponent<TextMeshProUGUI>();

    }

    public void DisplayDialog(){
        DOTween.Kill(dialogBox);
        dialogBox.DOScale(0.01f,0.5f).SetEase(Ease.OutBounce);
        dialogBox.DOScale(0f,0.2f).SetEase(Ease.OutSine).SetDelay(6f);
        string fullText = "Hey!\nHelp Me fix all broken robots!";
        // DOTweenで文字を1文字ずつ表示する
        tmp.text = ""; // 最初は空にしておく

        DOTween.To(() => tmp.text, x => tmp.text = x, fullText, 0.05f * fullText.Length)
            .SetEase(Ease.Linear).SetDelay(0.8f);

    }
}
using System.Collections;
using System.Collections.Generic;
using UnityEngine;
using UnityEngine.UI;
using DG.Tweening;
public class UIHealthBar : MonoBehaviour
{
public static UIHealthBar instance{get;private set;}
public Image mask;
float originalSize;
void Awake(){
instance = this;
}
// Start is called before the first frame update
void Start()
{
originalSize = mask.rectTransform.rect.width;
}
public void SetValue(float value){
//mask.rectTransform.SetSizeWithCurrentAnchors(RectTransform.Axis.Horizontal,originalSize * value);
// DOTweenを使用してHPバーを徐々に変更
float targetSize = originalSize * value;
// 既存のアニメーションをキャンセルし、新しいアニメーションを開始
DOTween.Kill(mask.rectTransform);
// sizeDelta.xをアニメーションで変更するために匿名メソッドを利用
DOTween.To(
() => mask.rectTransform.rect.width,
x => mask.rectTransform.SetSizeWithCurrentAnchors(RectTransform.Axis.Horizontal, x),
targetSize,
0.5f)
.SetEase(Ease.OutCubic);
}
}

コメント