前回壊れたロボットとRubyとの間にダメージアクションを作成したが、今回は壊れたロボットを救済すべくRubyが救済アイテムを投げるアクションを作成していく。
円盤の作成
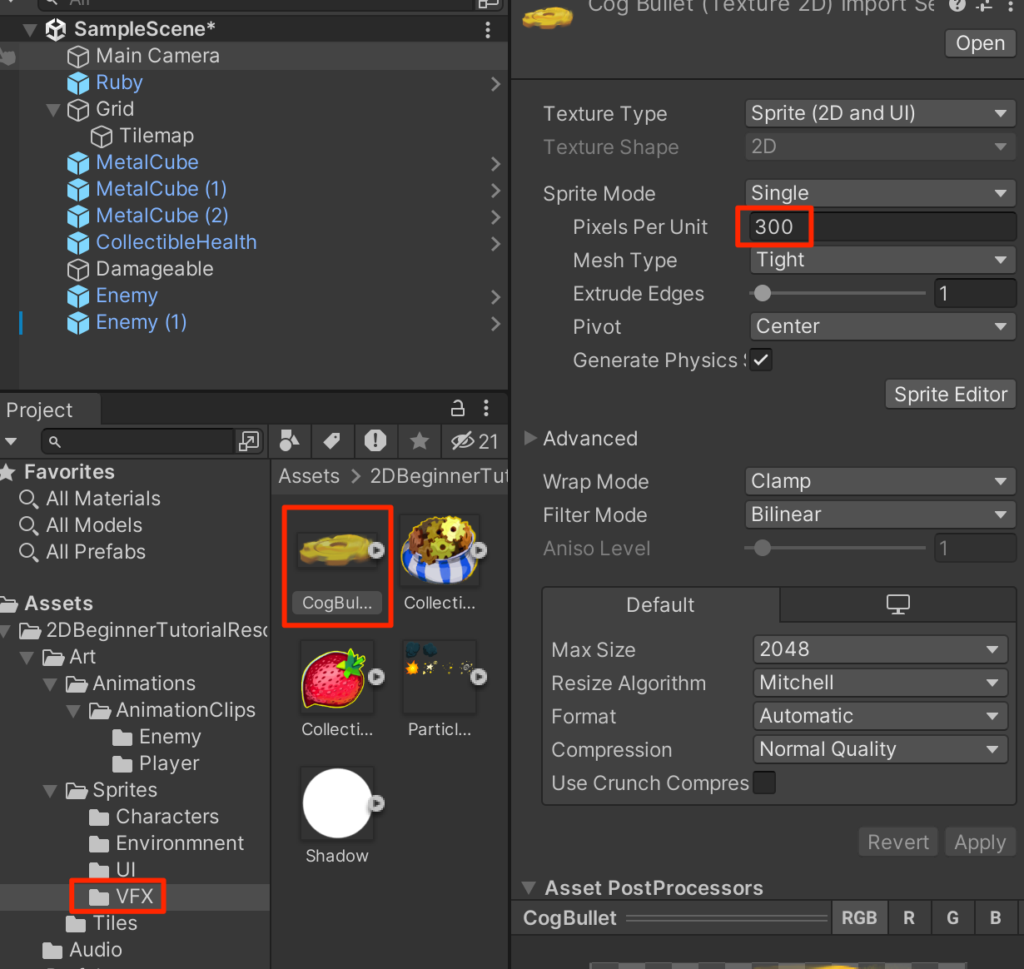
Art->Sprites->VFXフォルダにあるCogBulletを選択し、PPUを300に設定しApplyを押す。
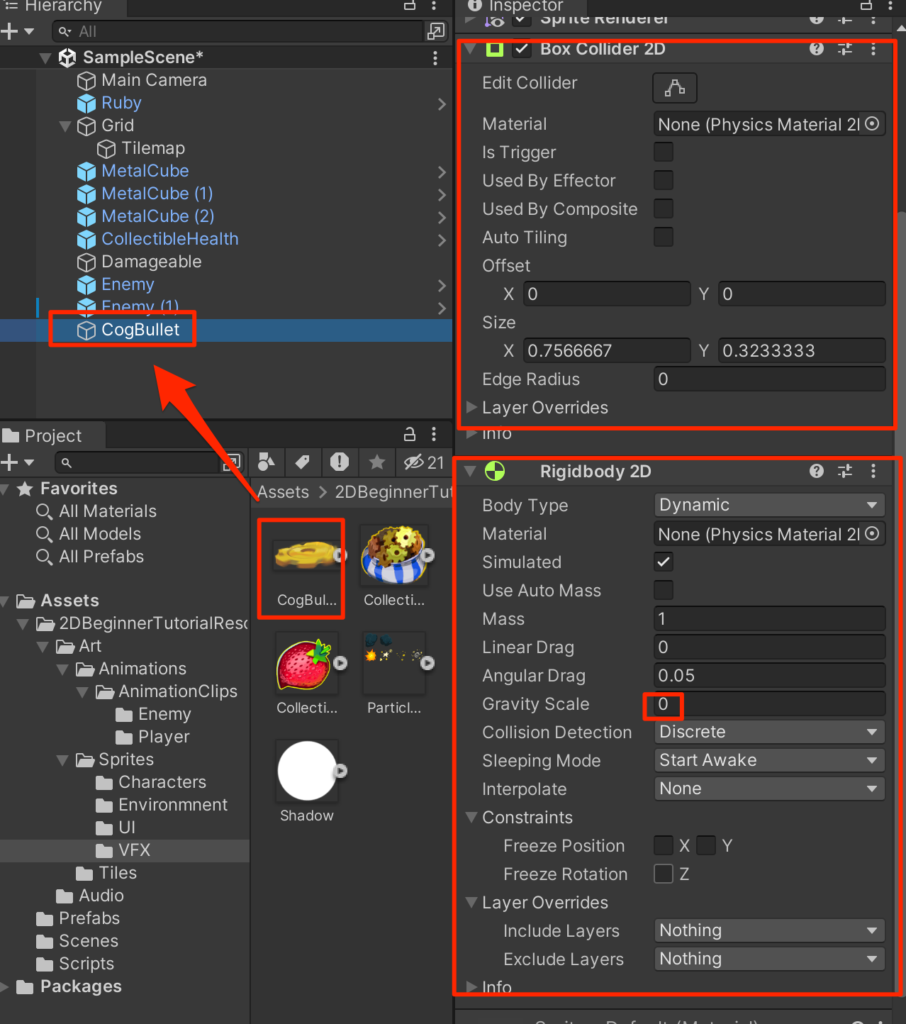
CogBullotをヒエラルキーにに配置し、BoxCollider2DとRigidbody2Dを付与する。
GravityScaleを0に設定する。
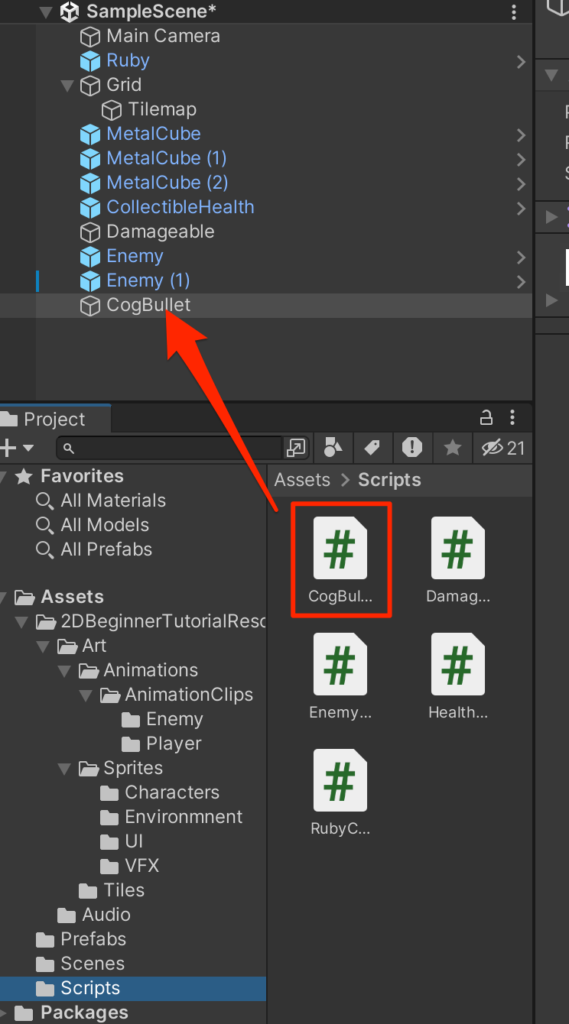
ScriptsフォルダにCogBulletControllerスクリプトを作成して、以下のように記述する。
using System.Collections;
using System.Collections.Generic;
using UnityEngine;

public class CogBulletController : MonoBehaviour
{
    Rigidbody2D rb;
    //Instantiateされた直後にGetComponetする必要があるので
    //Startでの記述は不可
    void Awake()
    {
        rb=GetComponent<Rigidbody2D>();
    }
    public void Launch(Vector2 direction,float force){
        rb.AddForce(direction*force,ForceMode2D.Impulse);
    }
    void OnCollisionEnter2D(Collision2D other) {
        Debug.Log("CogBullet Collision with " + other.gameObject);
        Destroy(gameObject);
    }
}
作成がすんだら、CogBulletControllerスクリプトをCogBulletにアタッチする。
CogBulletをプレファブ化する。
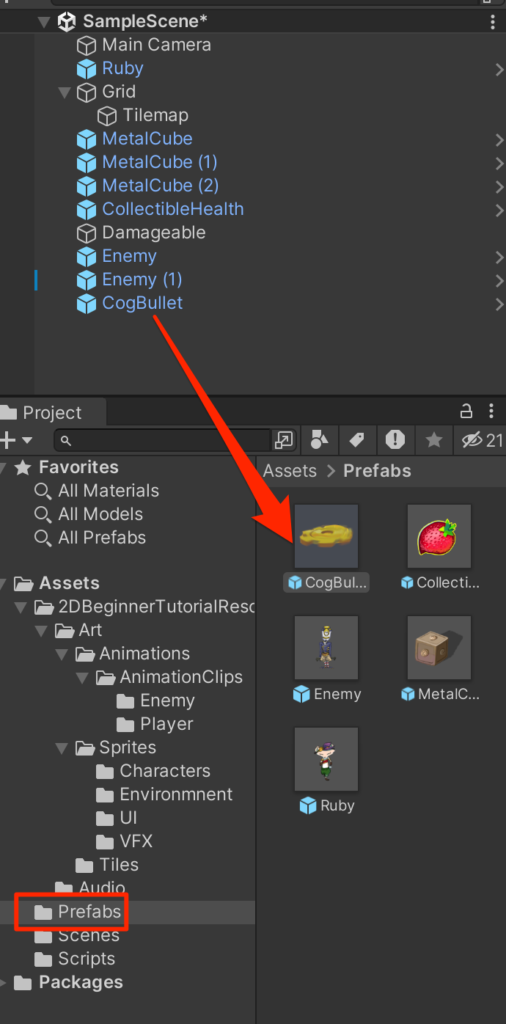
プレファブ化したら、ヒエラルキーにあるCogBulletは削除しておこう。ゲーム開始時には必要ない。
RubyControllerの変更
それではRubyが実際にCogBulletを投げられるようにして行こう。
RubyControllerを以下のように変更する。
using System.Collections;
using System.Collections.Generic;
using UnityEngine;

public class RubyController : MonoBehaviour
{
    public float speed=3.0f;

    public int maxHealth=5;
    int currentHealth;
    public int health{get{return currentHealth;}}
    public float timeInvincible=2.0f;
    bool isInvincible;
    float invincibleTimer;

    Rigidbody2D rb;

    Animator anim;
    Vector2 lookDirection = new Vector2(1f,0);

    public GameObject prefab;
    void Start()
    {
        rb=GetComponent<Rigidbody2D>();
        currentHealth=maxHealth;
        anim=GetComponent<Animator>();
    }
    void Update()
    {
        float horizontal = Input.GetAxis("Horizontal");
        float vertical = Input.GetAxis("Vertical");

        Vector2 move = new Vector2(horizontal,vertical);
        if(move.sqrMagnitude > 0f){
            lookDirection.Set(move.x,move.y);
            lookDirection.Normalize();
        }

        anim.SetFloat("Look X",lookDirection.x);
        anim.SetFloat("Look Y",lookDirection.y);
        anim.SetFloat("Speed",move.magnitude);
        Vector2 position = rb.position;
        position.x = position.x + speed * horizontal * Time.deltaTime;
        position.y = position.y + speed * vertical * Time.deltaTime;
        rb.MovePosition(position);

        if(isInvincible){
            invincibleTimer -= Time.deltaTime;
            if(invincibleTimer < 0){
                isInvincible = false;
            }
        }
        if(Input.GetKeyDown(KeyCode.C)){
            Launch();
        }
    }
    public void ChangeHealth(int amount){
        if(amount < 0){
            if(isInvincible) return;
            isInvincible = true;
            invincibleTimer = timeInvincible;
            anim.SetTrigger("Hit");
        }
        currentHealth = Mathf.Clamp(currentHealth + amount,0,maxHealth);
        Debug.Log(currentHealth + "/" + maxHealth);
    }
    void Launch(){
        GameObject cogBullet= Instantiate(
            prefab,
            rb.position+Vector2.up*0.5f,
            Quaternion.identity
            );
        CogBulletController cogCon = cogBullet.GetComponent<CogBulletController>();
        cogCon.Launch(lookDirection,5f);
        anim.SetTrigger("Launch");
    }
}
プレファブを登録して、実行してみよう。Cキーで投げられるはずだ。
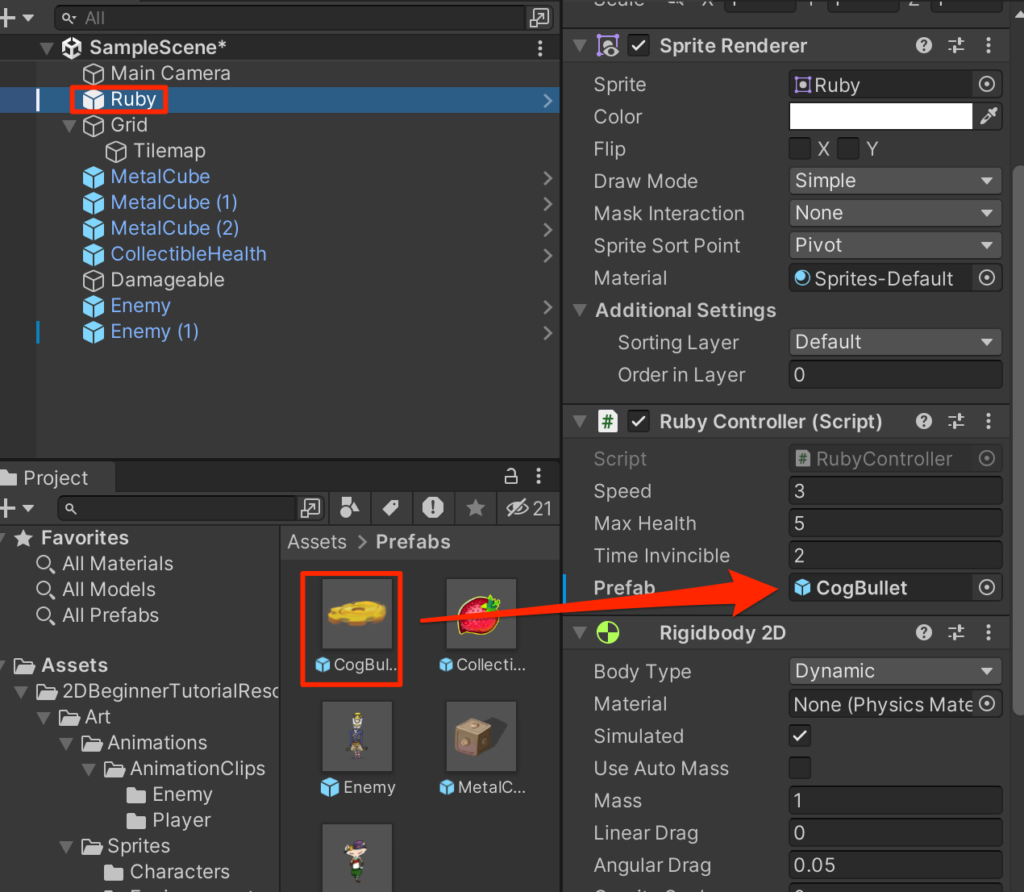
だがしかし、上や左右方向には飛んでいくのだが下方向の場合すぐに消えてしまう。
これは下に投げたときにRuby自身のコライダーとの間に接触判定が起こってしまうためだ。レイヤー設定をして接触判定の制御をしていこう。
Layerのトグルを開いてAdd Layerを選択する。
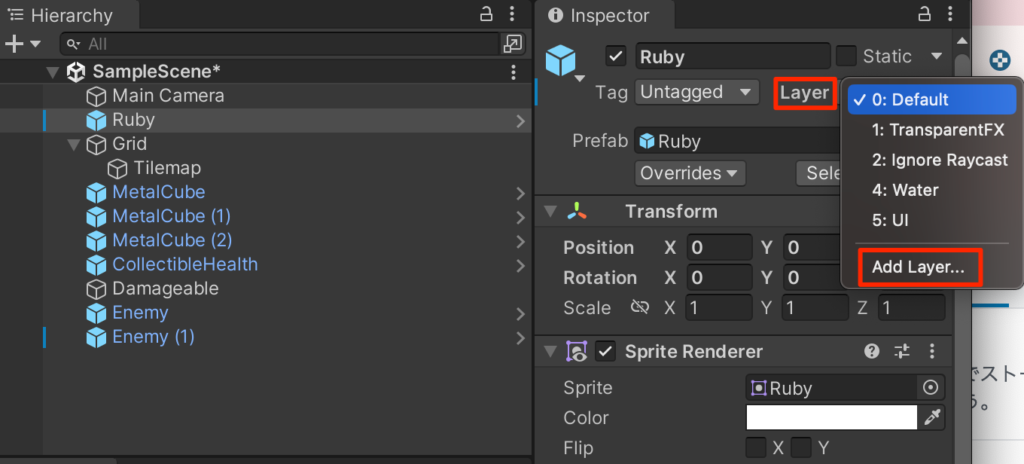
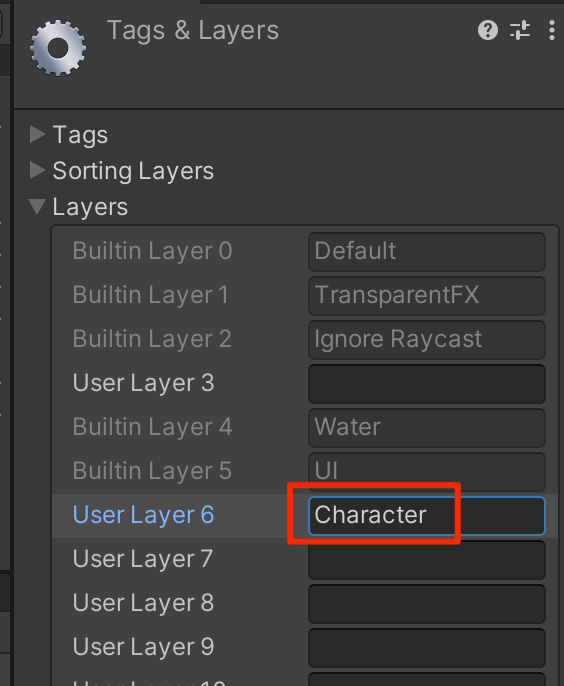
新規にCharacterレイヤーを作成する。
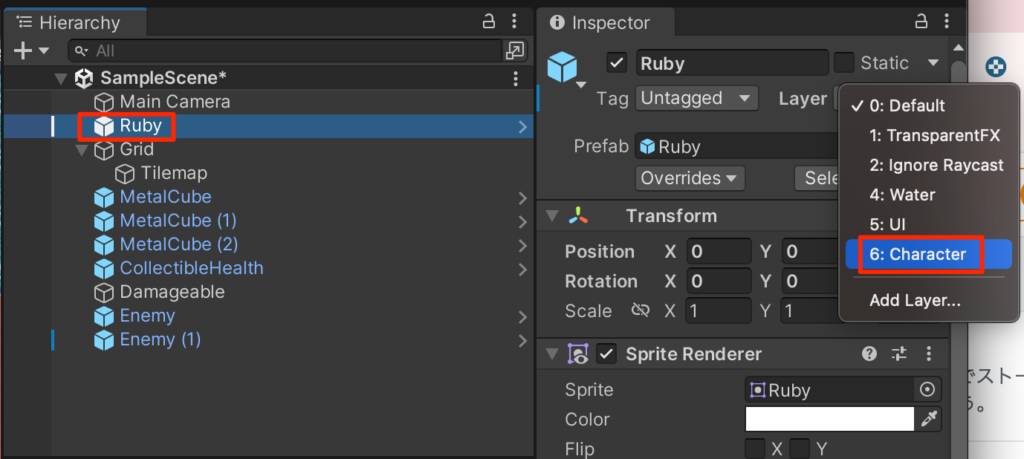
Rubyを選択して、Charaterを選択する。これでRubyがCharacterレイヤー上に描画されるようになる。
Exclude Layersの設定
CogBulletをダブルクリックしてプレファブ編集モードで開き、RigidbodyコンポーネントのLayerOverrides->ExcludeLayersでcharacterを選択する。
これでCogBulletとcharacterレイヤー上のオブジェクトとは衝突判定が起こらなくなる。
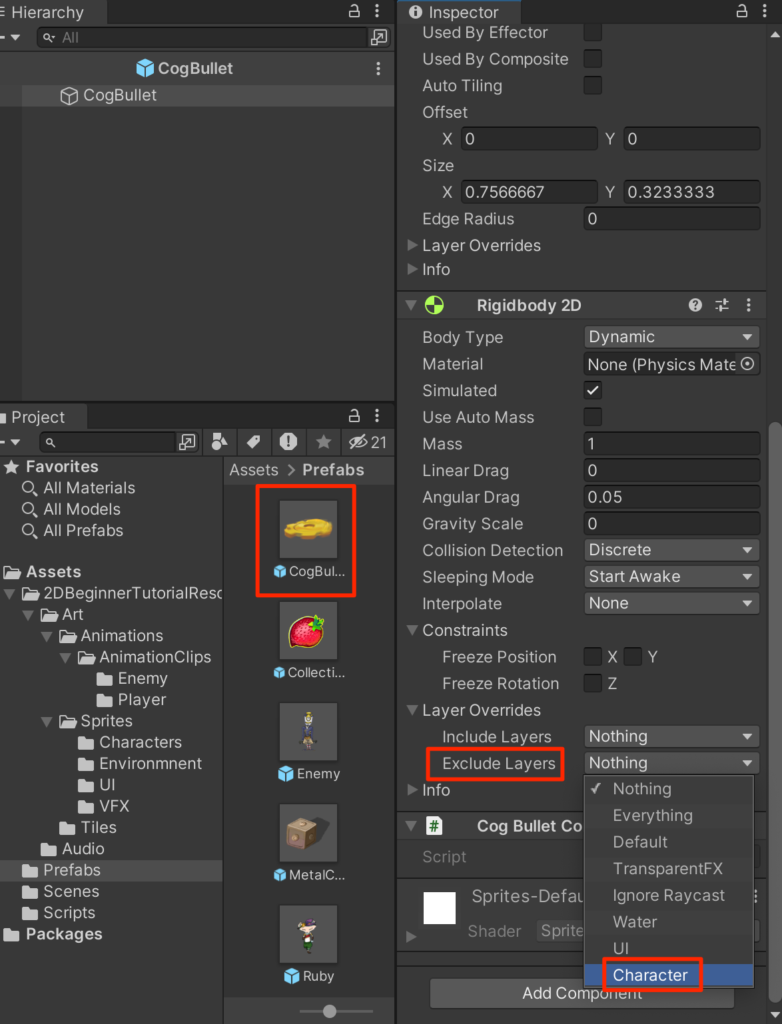
実行してみよう。下にもちゃんとCogBulletが飛んでいくことがわかる。
水の上にCogBulletが飛ばないは不自然なのでTilemapはTilemapレイヤー。
また、場合によってはCogBullet同士がぶつかる現象も起こり得るのでCogBulletはBulletレイヤー上で描画されるようにレイヤー設定をしよう。
まずは TilemapレイヤーとBulletレイヤーを作成する。
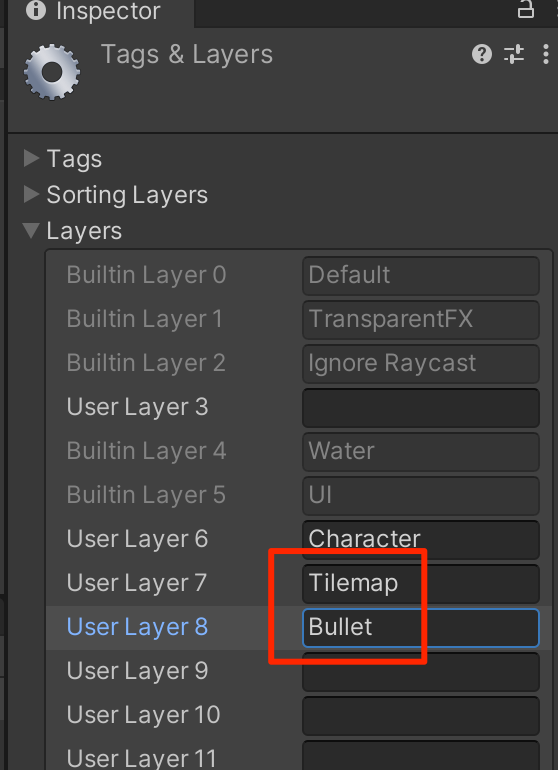
TilemapにTilemapレイヤーを設定

CogBulletプレファブにはBulletレイヤーを設定する。
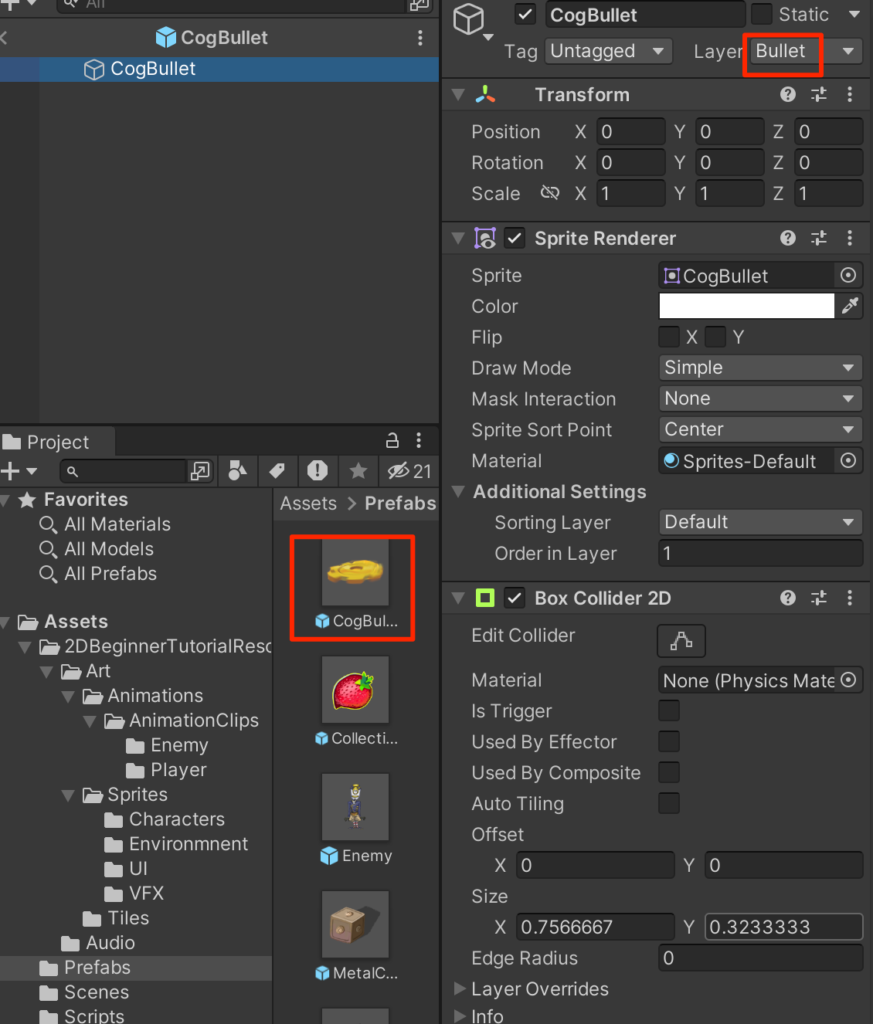
CogBulletのRigidbodyのLayerOverrides->ExcludeLayerを選択して、
TilemapとBulletにもチェックをいれる。
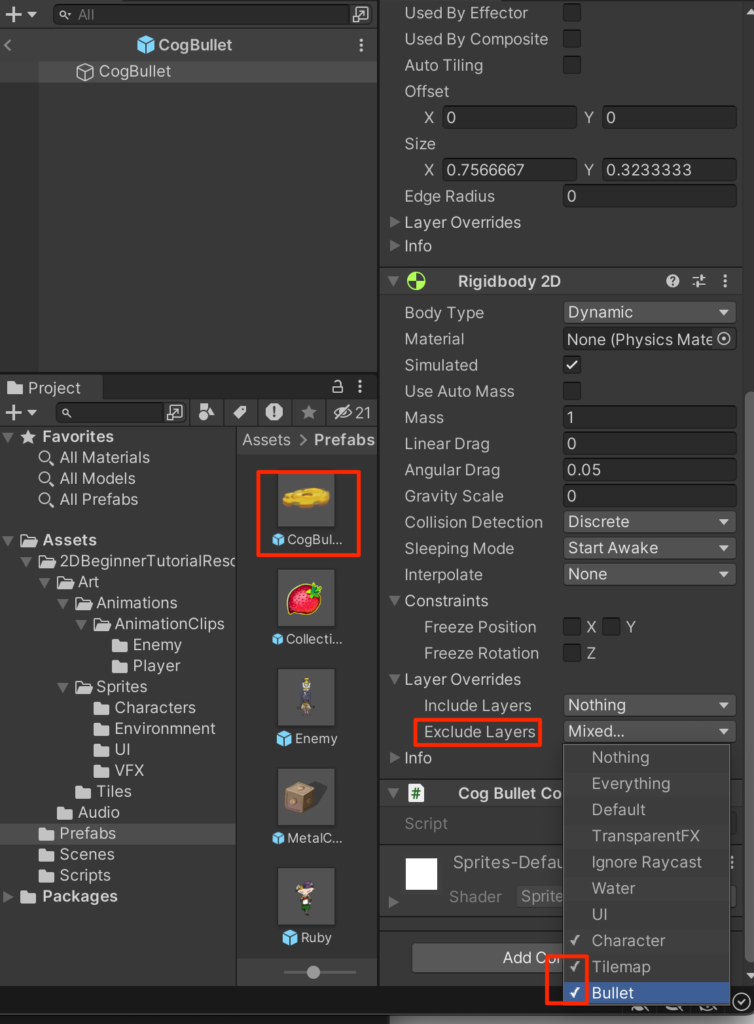
プレファブモードを抜けて、実行してみよう。
無用な衝突が発生しないようになったことがわかる。
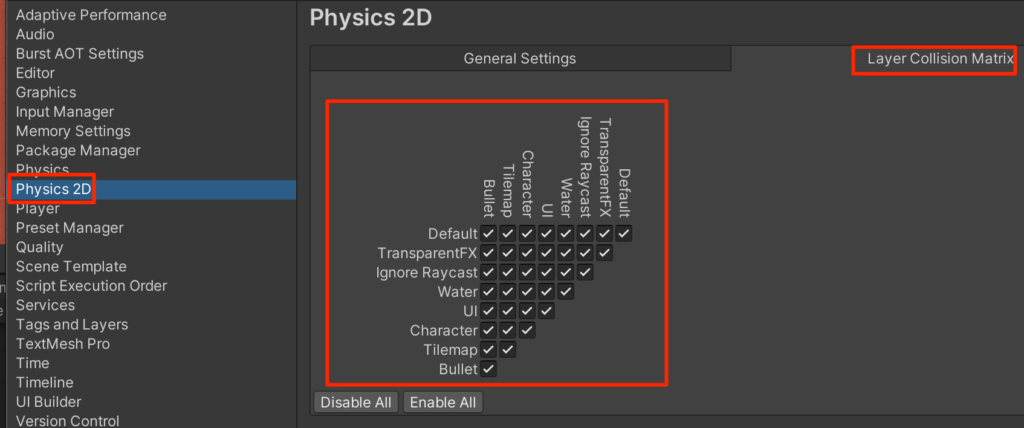
このレイヤー間の衝突の制御が2022のUnityからRigidbodyコンポーネントのExcludeLayresで設定できるようになった。以前のバージョンでは以下のようなマトリックスで設定しなければならなかったので便利なバージョンアップだ。
(方法が2つに増えたのでこちらで基本的なレイヤー間での衝突設定をして、特定の部分でオーバーライドして上書きするという細かい設定もできるようになった。)
Enemyを修理する。
EnemyにこのCogBulletをぶつけるとEnemyの故障が直るという挙動を作成していこう。(故障してしまったロボットが暴れているという設定だ)
まずはEnemyControllerを以下のように修正する。
using System;
using System.Collections;
using System.Collections.Generic;
using UnityEngine;

public class EnemyController : MonoBehaviour
{
    public float speed = 1.0f;
    public bool isVertical;
    public float changeTime = 2.0f;

    Rigidbody2D rb;
    float timer;
    int direction = 1;

    Animator anim;
    bool broken = true;

    void Start()
    {
        rb=GetComponent<Rigidbody2D>();
        timer = changeTime;
        anim = GetComponent<Animator>();

    }

    void Update()
    {
        if(!broken) return;
        timer -= Time.deltaTime;

        if(timer < 0){
            direction = -direction;
            timer = changeTime;
        }
        Vector2 pos = rb.position;

        if(isVertical){
            pos.y=pos.y + Time.deltaTime * speed * direction;
            anim.SetFloat("MoveX",0);
            anim.SetFloat("MoveY",direction);
        }else{
            pos.x=pos.x + Time.deltaTime * speed * direction;
            anim.SetFloat("MoveX",direction);
            anim.SetFloat("MoveY",0);
        }
        rb.MovePosition(pos);
    }
    void OnCollisionEnter2D(Collision2D other) {
        RubyController rubyCon = other.gameObject.GetComponent<RubyController>();
        if(rubyCon != null){
            rubyCon.ChangeHealth(-1);
        }
    }
    public void Fix(){
        broken = false;
        rb.simulated = false;
    }
}
現在壊れているかどうかを保持するboolのbrokenという変数を定義して、
Fixが呼ばれるとbrokenをfalseに設定するというものだ。
rigidbody2d.simulated にfalseを代入すると、物理シミュレーションからこの物体が除外され、コライダー判定などが起こらなくなる。
CogBulletControllerの変更
CogBulletControllerを以下のように変更する。
using System.Collections;
using System.Collections.Generic;
using UnityEngine;

public class CogBulletController : MonoBehaviour
{
    Rigidbody2D rb;
    //Instantiateされた直後にGetComponetする必要があるので
    //Startでの記述は不可
    void Awake()
    {
        rb=GetComponent<Rigidbody2D>();
    }
    public void Launch(Vector2 direction,float force){
        rb.AddForce(direction*force,ForceMode2D.Impulse);
    }
    void OnCollisionEnter2D(Collision2D other) {
        //Debug.Log("CogBullet Collision with " + other.gameObject);
        EnemyController enemyCon = other.collider.GetComponent<EnemyController>();
        if(enemyCon != null){
            enemyCon.Fix();
        }
        Destroy(gameObject);
    }
}
実行してみよう。EnemyがCogBulletに衝突すると動きが止まり、それ以降はCogBulletやRubyと衝突が発生しないことがわかる。
画面外に飛んでいったCogBulletの掃除
現状画面外に飛んでいったCogBulletは消えることなく存在し続ける。つまりゲームを長くプレイしているとメモリを大量に消費してしまうということだ。
不要になったCogBulletを削除する処理を追加しよう。CogBulletControllerに以下を追記する。
using System.Collections;
using System.Collections.Generic;
using UnityEngine;

public class CogBulletController : MonoBehaviour
{
    Rigidbody2D rb;
    //Instantiateされた直後にGetComponetする必要があるので
    //Startでの記述は不可
    void Awake()
    {
        rb=GetComponent<Rigidbody2D>();
    }
    void OnBecameInvisible() {
        Destroy(gameObject);
    }
    public void Launch(Vector2 direction,float force){
        rb.AddForce(direction*force,ForceMode2D.Impulse);
    }
    void OnCollisionEnter2D(Collision2D other) {
        //Debug.Log("CogBullet Collision with " + other.gameObject);
        EnemyController enemyCon = other.collider.GetComponent<EnemyController>();
        if(enemyCon != null){
            enemyCon.Fix();
        }
        Destroy(gameObject);
    }
}
OnBecameInvisibleメソッドはカメラの描画範囲から出たときに呼ばれるメソッドだ。このタイミングでDestroyしておけば、無駄なオブジェクトが増え続けることはない。
直ったときのEnemyアニメーション
今回の最後としてCogBulletがあたって修理されたときのEnemyアニメーションを作成していこう。
まずは、プレファブフォルダにあるEnemyをダブルクリックしてプレファブ編集モードで開き、Animationウインドウ左上のトグルを開いてCreateNewClipを選択する。
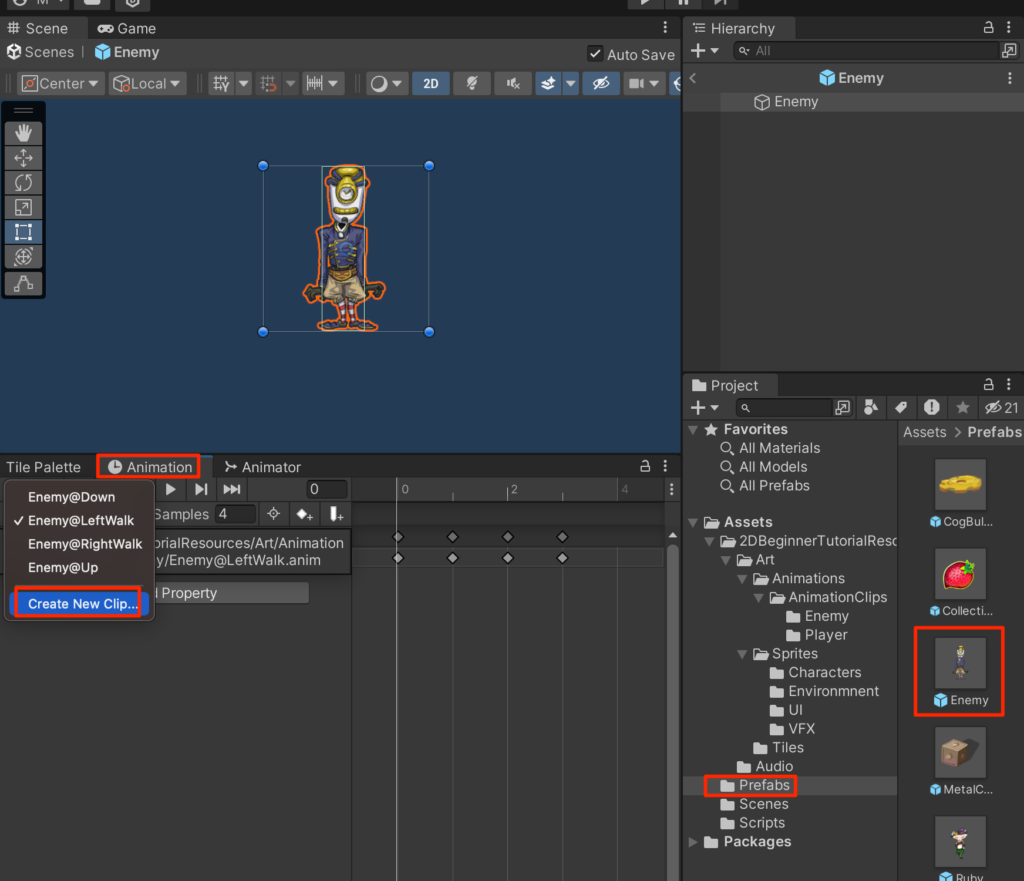
保存ウインドウが開くので
Art->Animations->AnimationClips->Enemy
フォルダを選択し、
Enemy@Fixed.anim
として保存する。
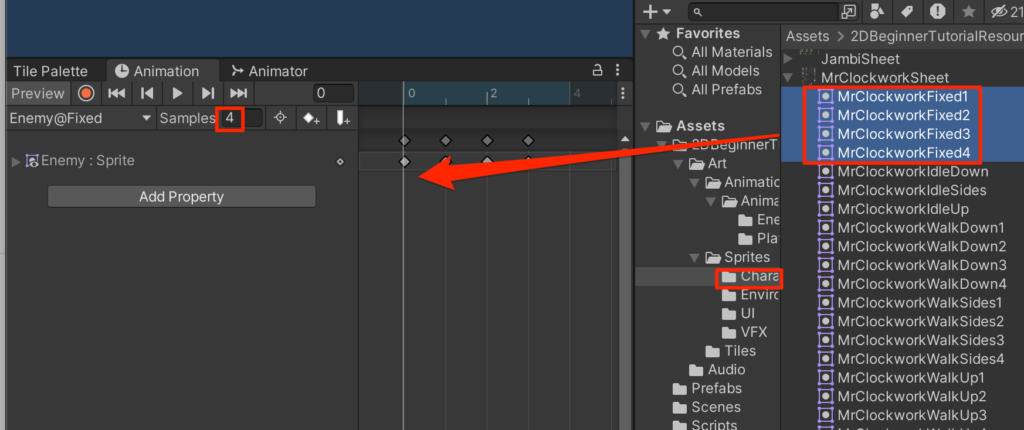
Sprites->CharactersフォルダにあるMrColockWorkSheetから
xxxxxFixed
とつく4枚の画像をドラッグで配置し、Samplesを4に設定する。
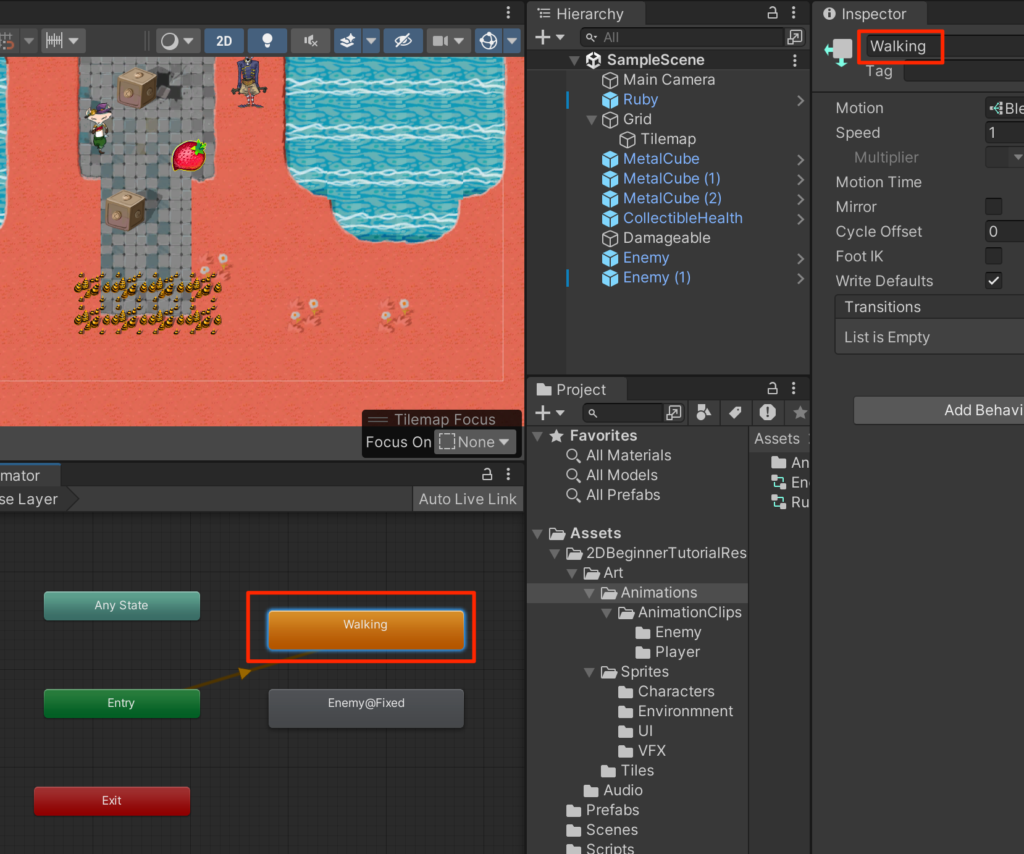
Animatorビューに移動しBlend treeと書かれたステイトを選択し、インスペクターから名前をWalkingに変更する。
+ボタンを押して新規tirggerからFixedを追加する
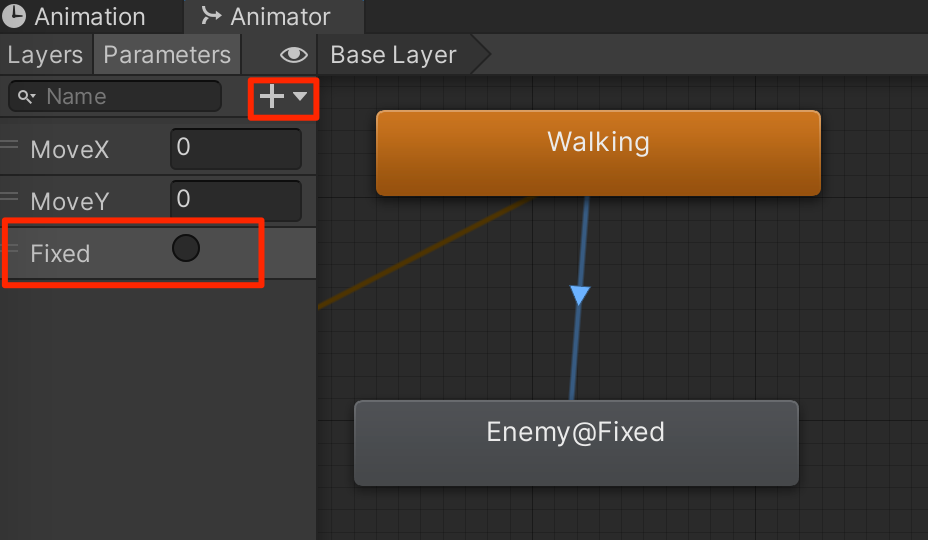
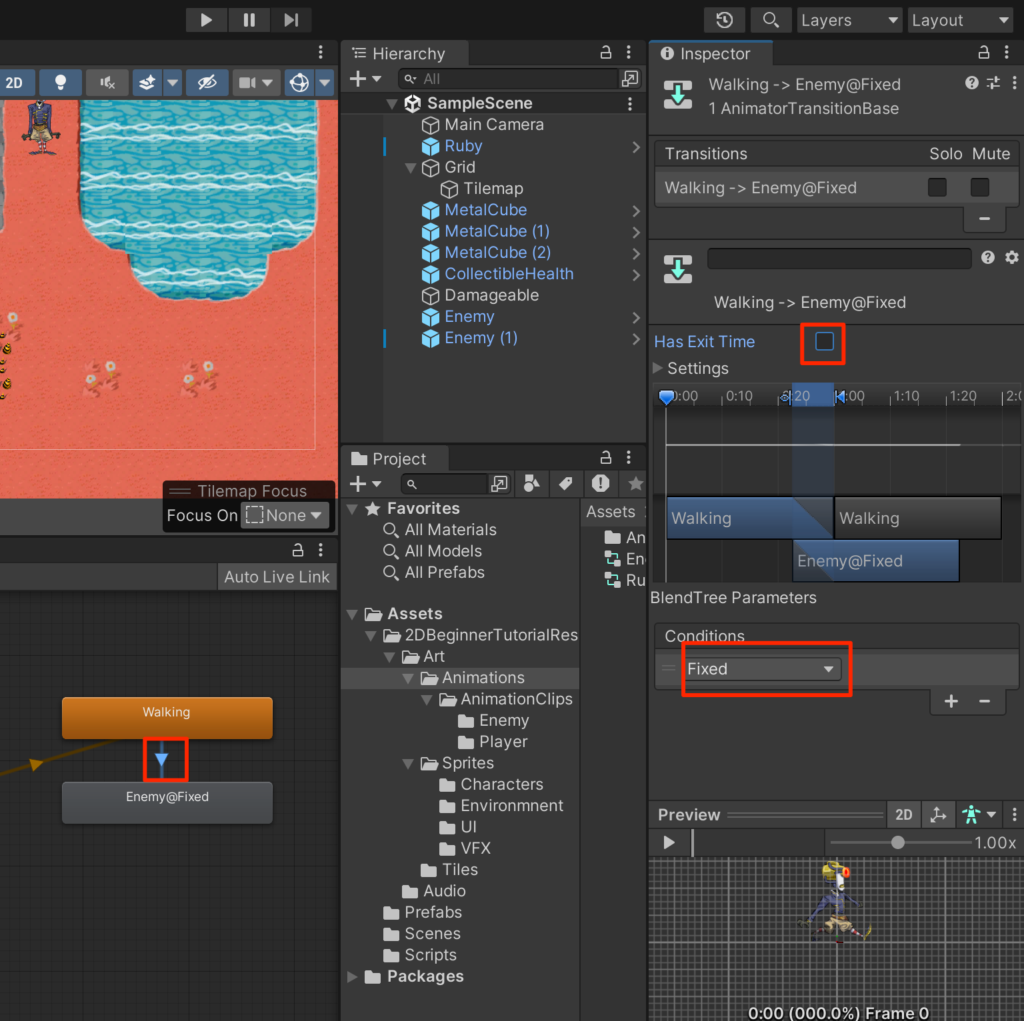
Walkingを右クリック->Make transitionを選択し、Enemy@Fixedと接続し、
HasExitTImeをオフ、CondisionsにFixedを選択する。
EnemyControllerを以下のように修正する。
using System;
using System.Collections;
using System.Collections.Generic;
using UnityEngine;

public class EnemyController : MonoBehaviour
{
    public float speed = 1.0f;
    public bool isVertical;
    public float changeTime = 2.0f;

    Rigidbody2D rb;
    float timer;
    int direction = 1;

    Animator anim;
    bool broken = true;

    void Start()
    {
        rb=GetComponent<Rigidbody2D>();
        timer = changeTime;
        anim = GetComponent<Animator>();

    }

    void Update()
    {
        if(!broken) return;
        timer -= Time.deltaTime;

        if(timer < 0){
            direction = -direction;
            timer = changeTime;
        }
        Vector2 pos = rb.position;

        if(isVertical){
            pos.y=pos.y + Time.deltaTime * speed * direction;
            anim.SetFloat("MoveX",0);
            anim.SetFloat("MoveY",direction);
        }else{
            pos.x=pos.x + Time.deltaTime * speed * direction;
            anim.SetFloat("MoveX",direction);
            anim.SetFloat("MoveY",0);
        }
        rb.MovePosition(pos);
    }
    void OnCollisionEnter2D(Collision2D other) {
        RubyController rubyCon = other.gameObject.GetComponent<RubyController>();
        if(rubyCon != null){
            rubyCon.ChangeHealth(-1);
        }
    }
    public void Fix(){
        broken = false;
        rb.simulated = false;
        anim.SetTrigger("Fixed");
    }
}
実行してみよう、修理されたEnemyのごきげんな様子が 微笑ましい。
今回はこれで終了だ。次回はカメラワークを作成していく。


コメント