
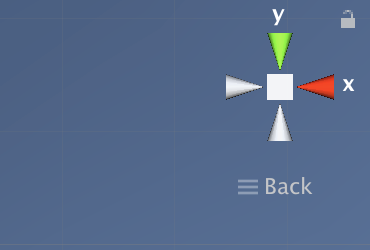
1.3Dでプロジェクトを作成したら3dギズモを以下のように調整する
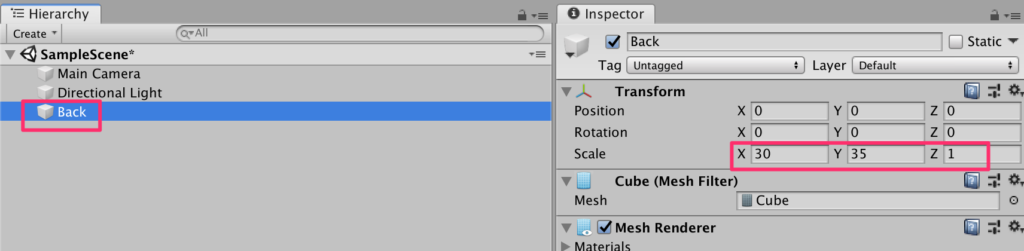
2.Backの作成。配置の目安となる板を背面に設置しよう。CreateからCubeを選択し、transformを以下のように設定。Backにリネーム。
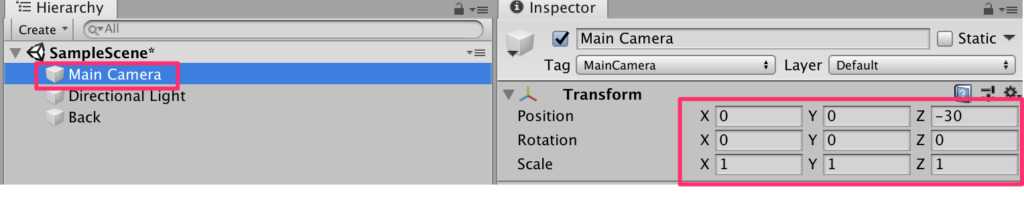
3.カメラの設定
MainCamera を選択し、以下のようにtransformを設定する
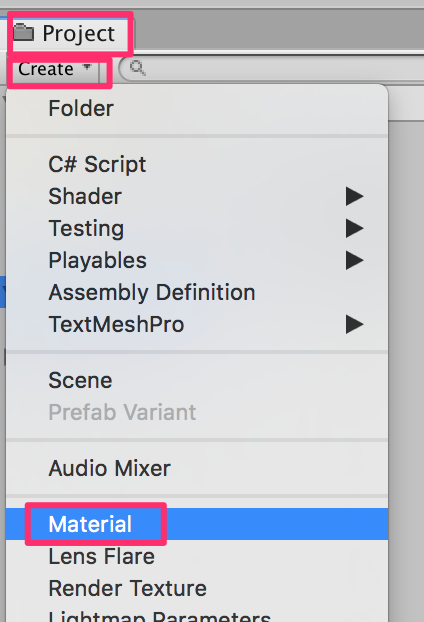
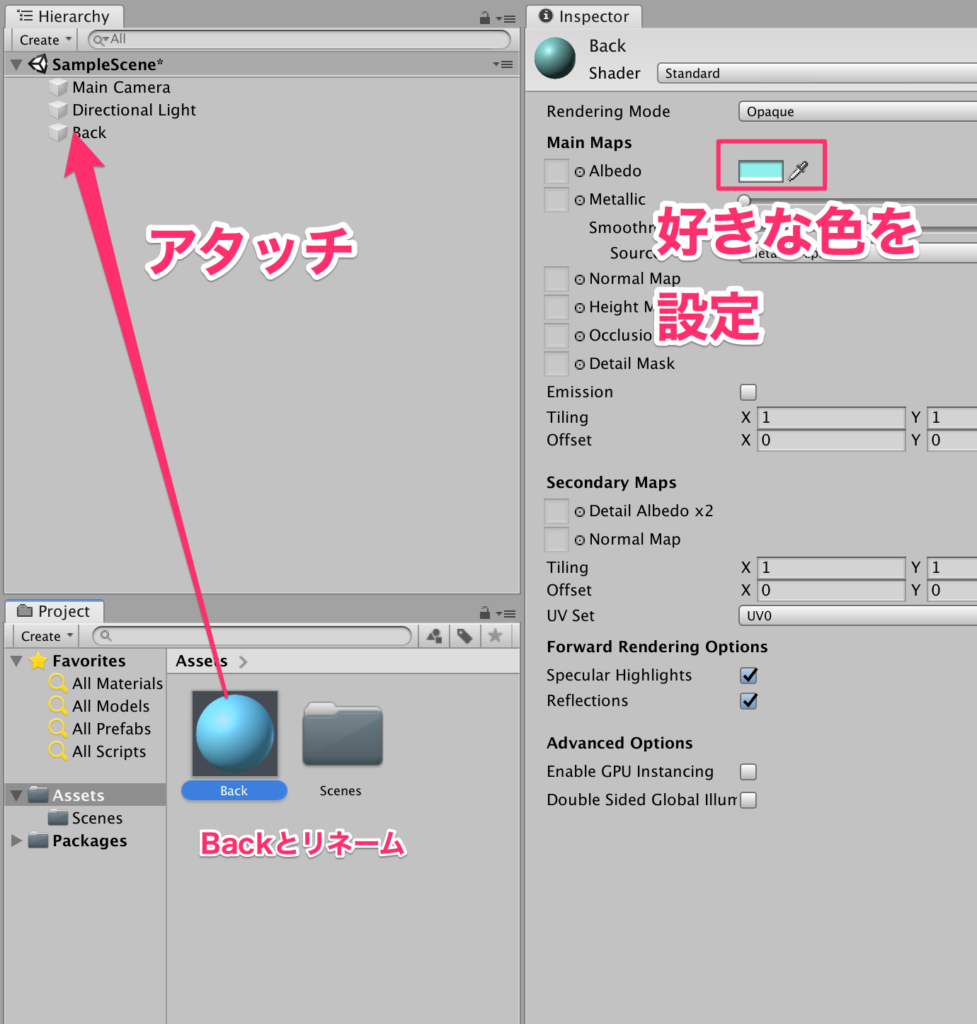
4.Backの表面材質の設定。
背景が真っ白だと味気ないので表面材質を設定しよう。ProjectビューのCreateからmaterialを選択
Backとリネームし、好きな色を設定したらBackにアタッチする
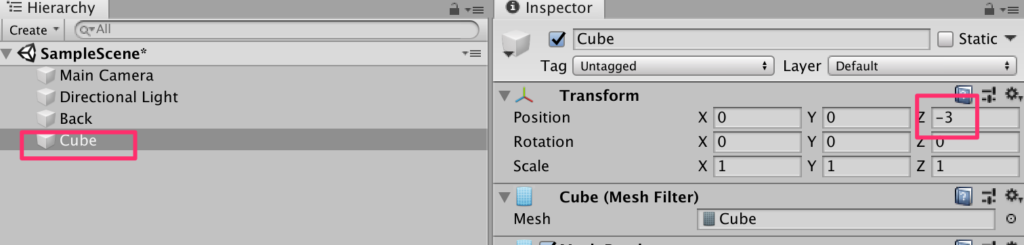
5.落下してくるオブジェクトの作成
まずは原点にCubeを作成する
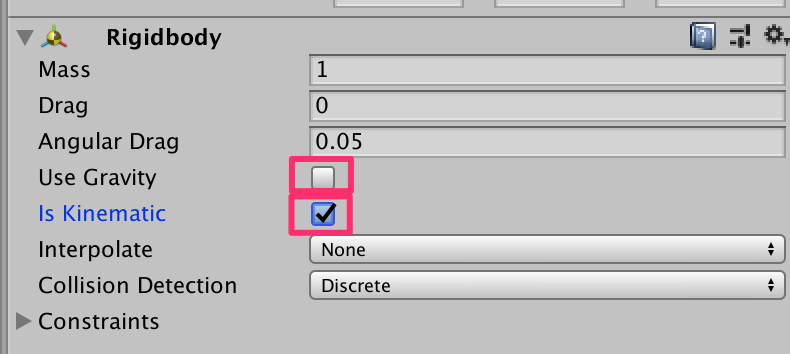
6.Rigidbodyを付与し、UseGravityのチェックを外し、IsKinematicにチェックを入れる。
今回は重力は使用せず、スクリプトによって落下させる。後に行う衝突判定にRigidbodyコンポーネントが必要となる。
7.Fallsスクリプトの作成
新規にC#スクリプトを作成し、名前をFallsとする。記述内容は以下
using System.Collections;
using System.Collections.Generic;
using UnityEngine;

public class Falls : MonoBehaviour
{
    public float speed;

    void Update()
    {
        transform.Rotate(Vector3.one);
        transform.Translate(Vector3.down * speed, Space.World);
    }
}
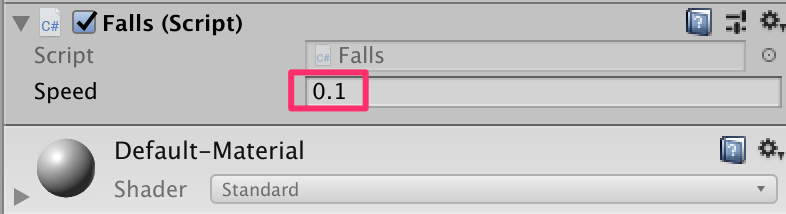
できたらヒエラルキーにあるCubeオブジェクトにアタッチし、インスペクターからspeedに0.1を入力する。
実行してみよう。回転しながら下に移動していけば成功だ。
8.プレファブ化
いい感じにできたのでこれをプレファブにしよう。プロジェクトビューにドラッグ&ドロップ(以後D&D)してプレファブにする。
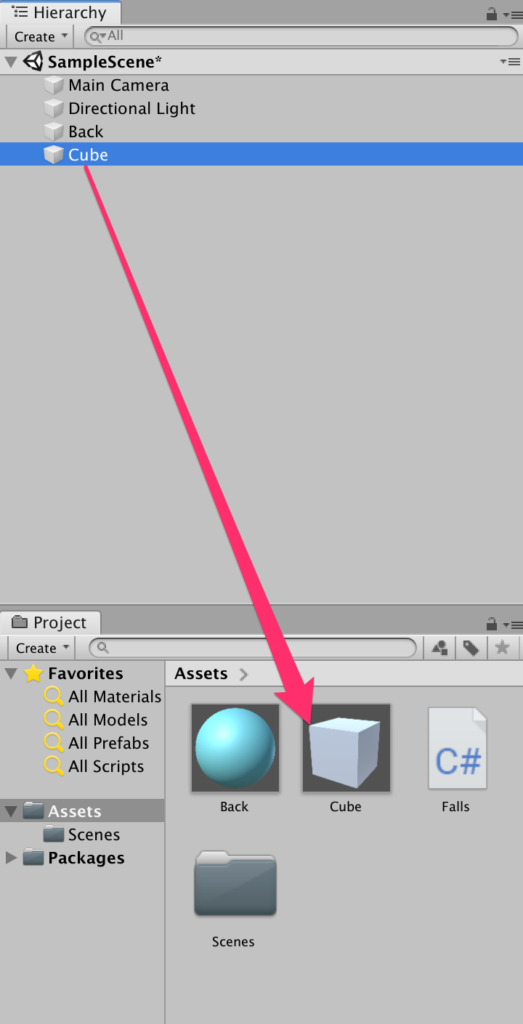
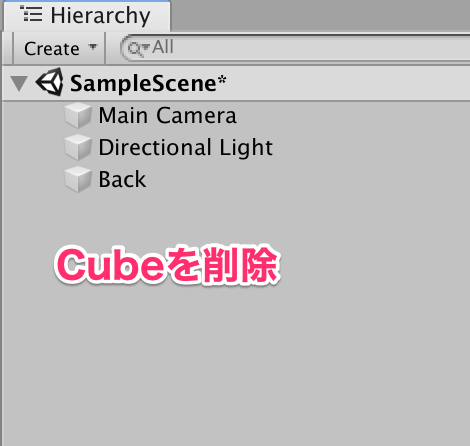
プレファブにした後はヒエラルキーにあるCubeは削除しておく。
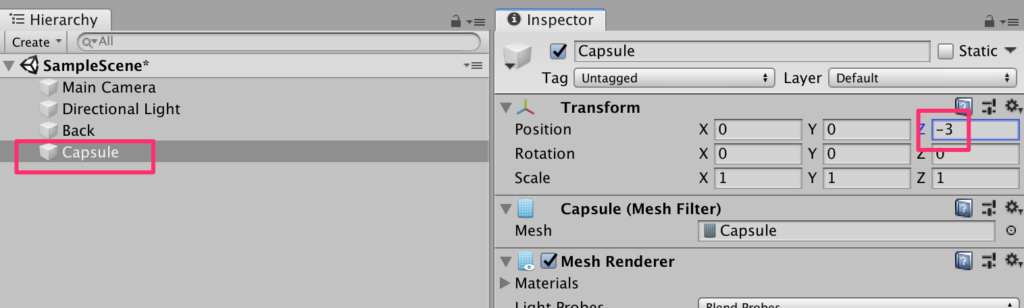
9.同様にCreateからCapsuleを作成しtransformを以下のように設定し、Cubeと同様なRigidbodyを付与しておくこと
先程作成したFallsスクリプトをCapsuleにアタッチしspeedを0.08に設定する

Cubeと同様にプレファブ化してヒエラルキーからは削除しておこう。

同様にSphereを作成しプレファブにする。speedは0.07とした。

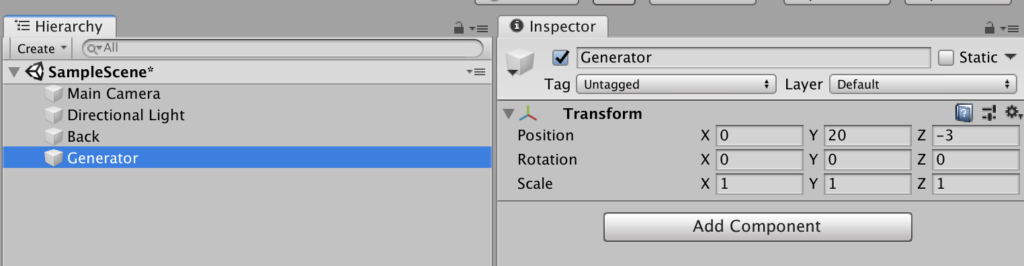
10.Generatorの作成
先程作ったFallsを生成するGeneratorを作成していこう。まずは空のオブジェクトをCreateEmptyから作成し名前をGeneratorとする。transfromは以下
11.Generator.csの作成。
新規にC#スクリプトを作成し名前をGeneratorとする。
以下のように記述する。
using System.Collections;
using System.Collections.Generic;
using UnityEngine;

public class Generator : MonoBehaviour
{
    public GameObject[] falls;

    // Update is called once per frame
    void Update()
    {
       if(Time.frameCount % 30 == 0) {
            GameObject fall = Instantiate(
                falls[Random.Range(0,falls.Length)],
                new Vector3(Random.Range(-14f,14f),transform.position.y,transform.position.z),
                Quaternion.identity
                );
            Destroy(fall, 10f);
        }
    }
}
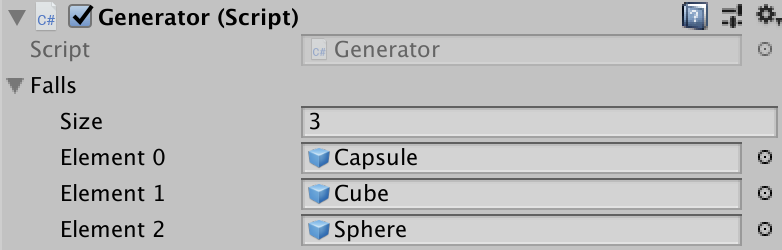
作成したGeneratorスクリプトをヒエラルキーにあるGeneratorオブジェクトにアタッチし、インスペクターから3つのFallsを登録する
実行してみよう。ランダムに3つのFallsが落ちてくれば成功だ。
12.影の消去
影が目障りなので消去しよう。Directional lightを選択して影をNo Shadowsに設定する。

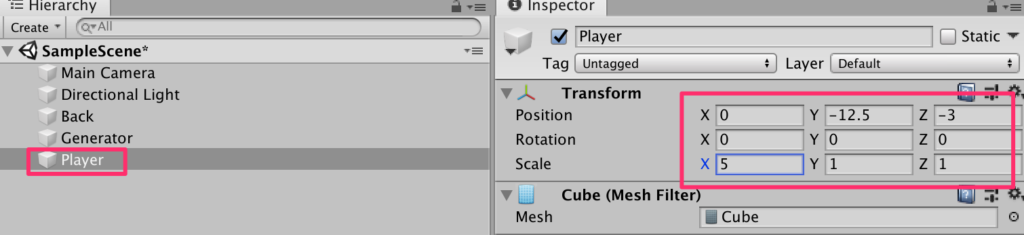
13.Playerの作成
CreateからCubeを作成しPlayerにリネーム。transformを以下のように設定する
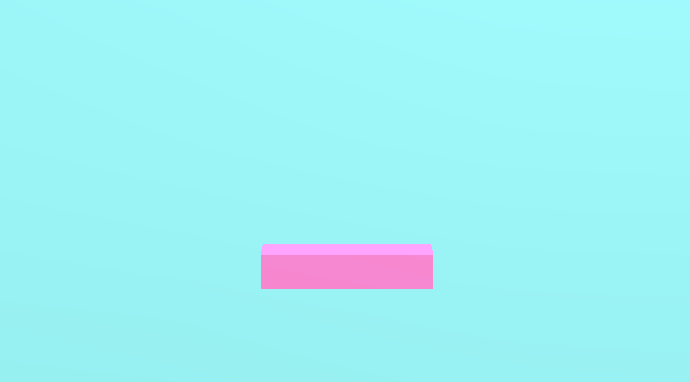
真っ白では寂しいのでPlayerにはマテリアルを付与した。好きな色を設定してもらいたい
14.Playerスクリプトの作成
Playerが左右キーによって移動できるようにしよう。Playerスクリプトを作成し以下のように記述しPlayerにアタッチする
using System.Collections;
using System.Collections.Generic;
using UnityEngine;

public class Player : MonoBehaviour
{
    Vector3 pos;

    void Start()
    {
        pos = transform.position;
    }

    void Update()
    {
        pos.x += Input.GetAxis("Horizontal");
        if (pos.x > 12f) {
            pos.x = 12f;
        }
        if (pos.x < -12f) {
            pos.x = -12f;
        }
        transform.position = pos;
    }
}
実行してみよう。左右キーでPlayerが移動する。移動しすぎて画面の外にいってしまわないようにする処理が入っている
15.接触したFallsを削除する処理の実装
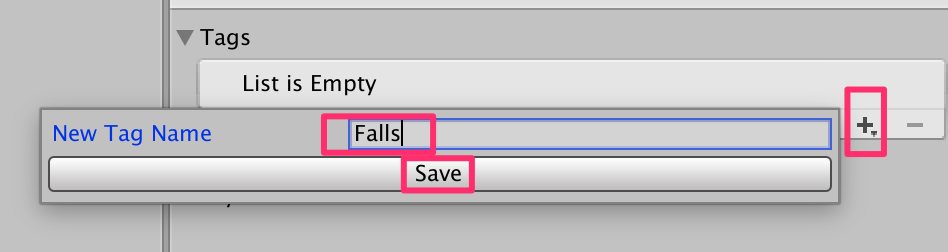
ぶつかったFallsを削除してみよう。まずはFallsたちにタグを設定する。
Player(なんでもよい)を選択してTagのプルダウンを開きAddTagを選択する。
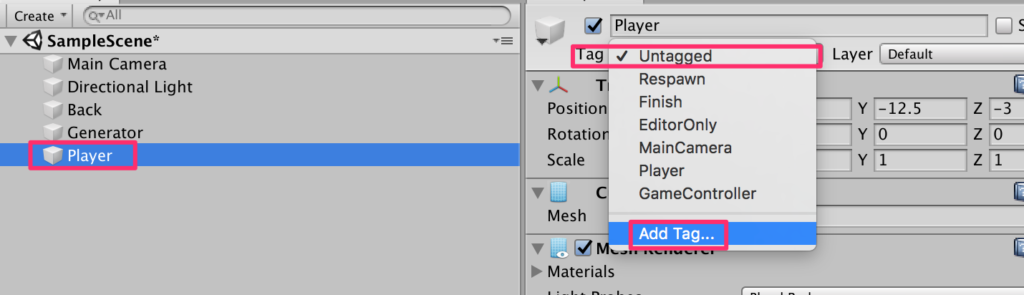
+ボタンを押してFallsと入力してsaveボタンを押す
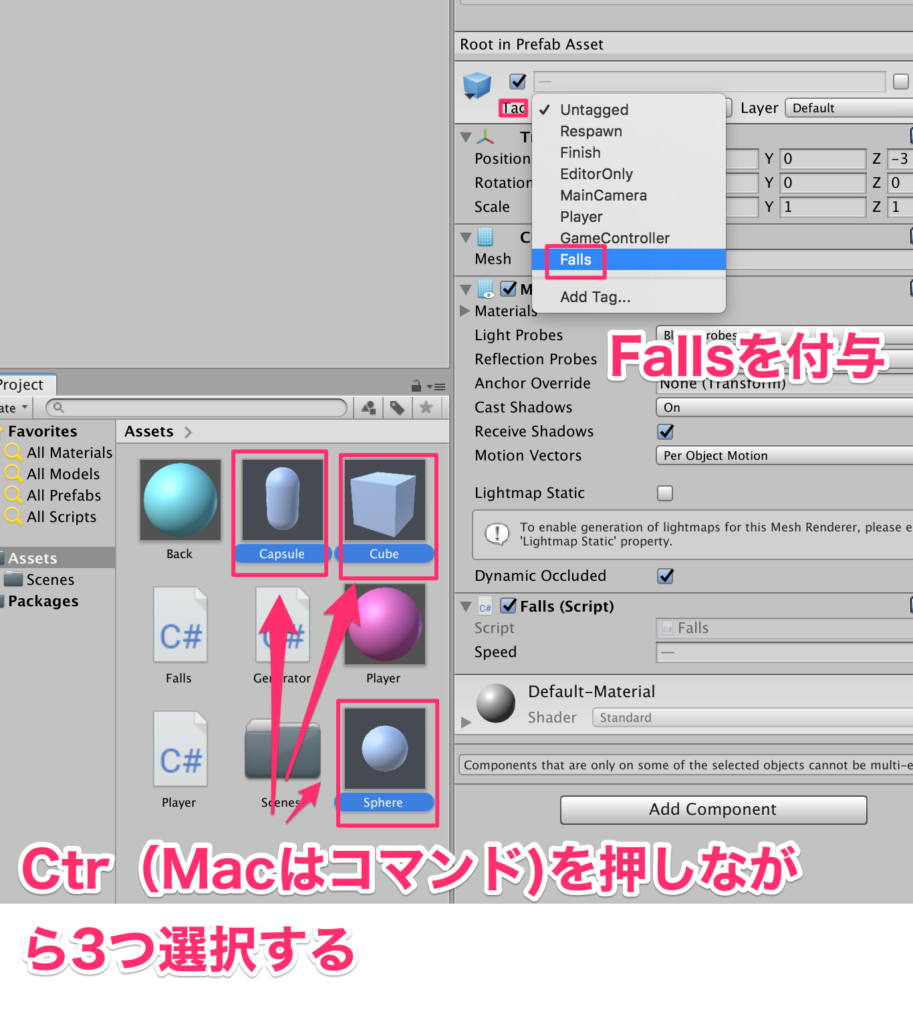
プロジェクトビューにある3つのプレファブを選択して、Fallsタグを設定する
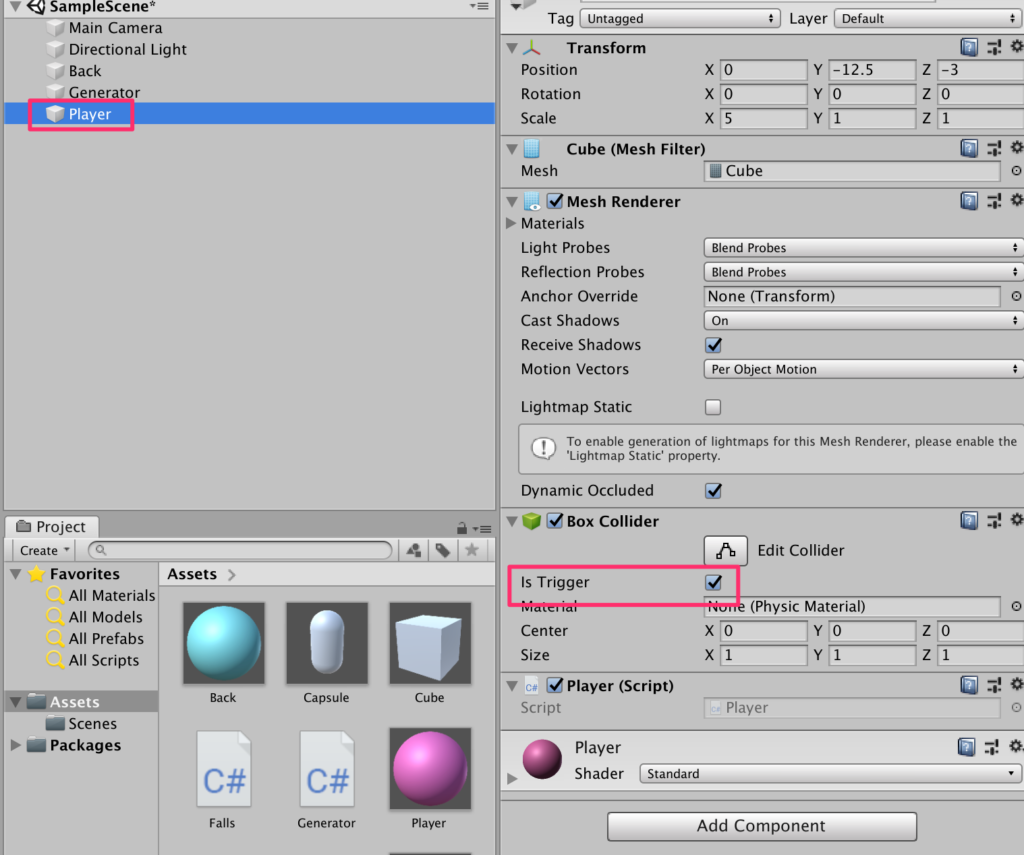
16.PlayerのコライダーをTriggerにする
今回はTriggerで接触を判定してみよう。まずはPlayerのコライダーのIs TriggerをONにする。
これでこのコライダーは実際に衝突が起こるのではなくセンサーとして働くようになる
17.Playerスクリプトに以下のように追記する
using System.Collections;
using System.Collections.Generic;
using UnityEngine;

public class Player : MonoBehaviour
{
    Vector3 pos;

    void Start()
    {
        pos = transform.position;
    }

    void Update()
    {
        pos.x += Input.GetAxis("Horizontal");
        if (pos.x > 12f) {
            pos.x = 12f;
        }
        if (pos.x < -12f) {
            pos.x = -12f;
        }
        transform.position = pos;
    }

    private void OnTriggerEnter(Collider other) {
        if (other.gameObject.tag == "Falls") {
            Destroy(other.gameObject);
        }
    }


}
以上で完成だ。落ちてくるFallsにお好きな表面材質を設定しよう。
今回は基本的な動きしか実装していないので点数の概念やGameOverの概念をいれてみるのもよいだろう。

コメント