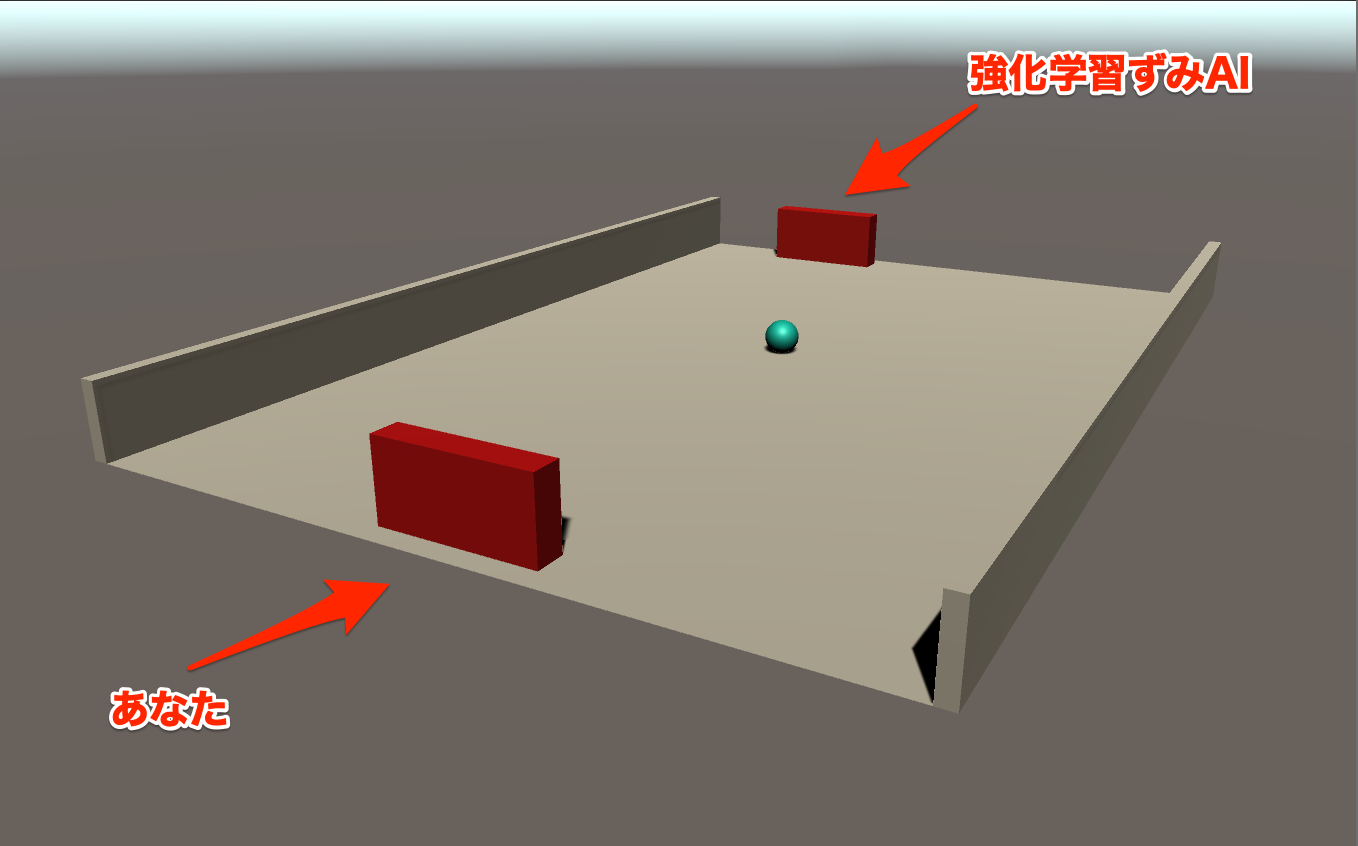
今回はセルフプレイと呼ばれるエージェント同士を戦わせることで上達させていく機械学習を学ぶ。最後には強化済みのAIと対戦することもできるぞ!
作成
UnityHumを開き新規3DプロジェクトからSelfPlayMLという名でプロジェクトを作成する。
packageのインストール
PackageManagerを開き+ボタンからadd package from diskを選択する
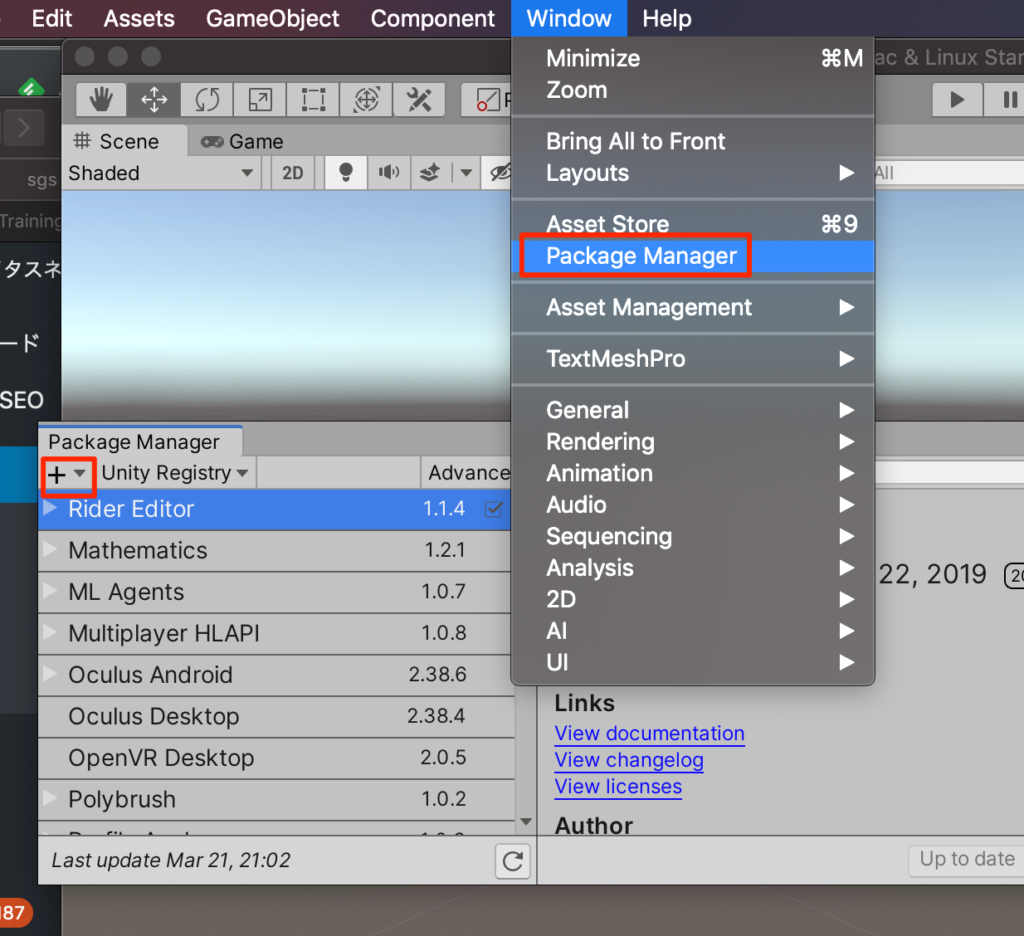
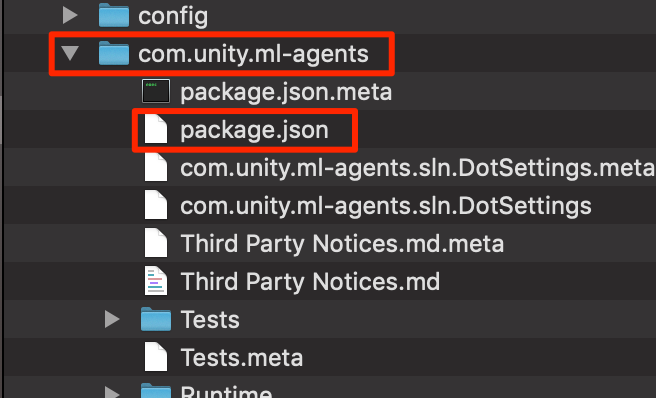
GitHubからインストール済みのml-agentsフォルダ->com.unity.ml-agents->package.jsonを選択しインポートする。(ここらへんの手順はここに詳しく記載Mac,Win)
ステージの作成
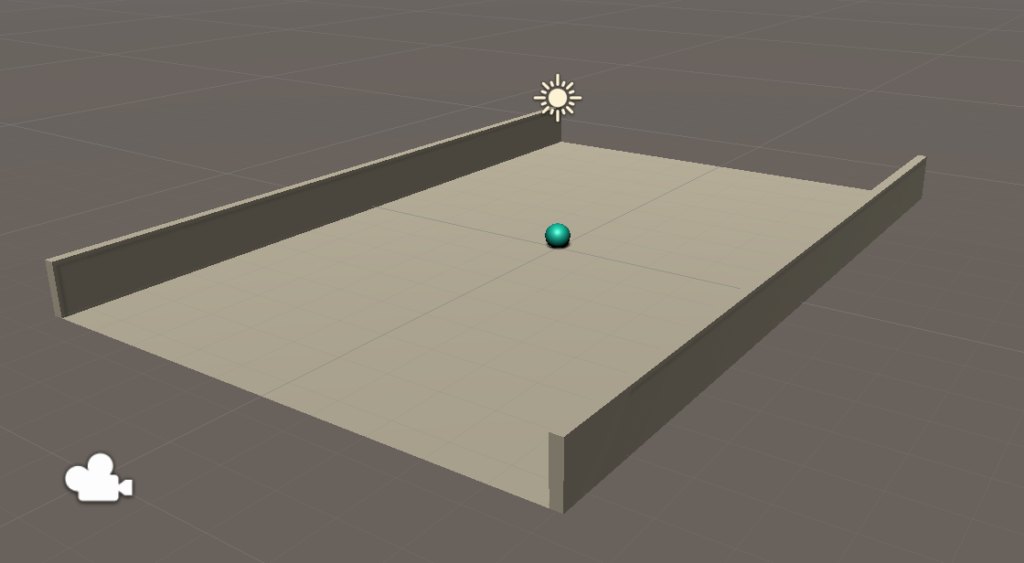
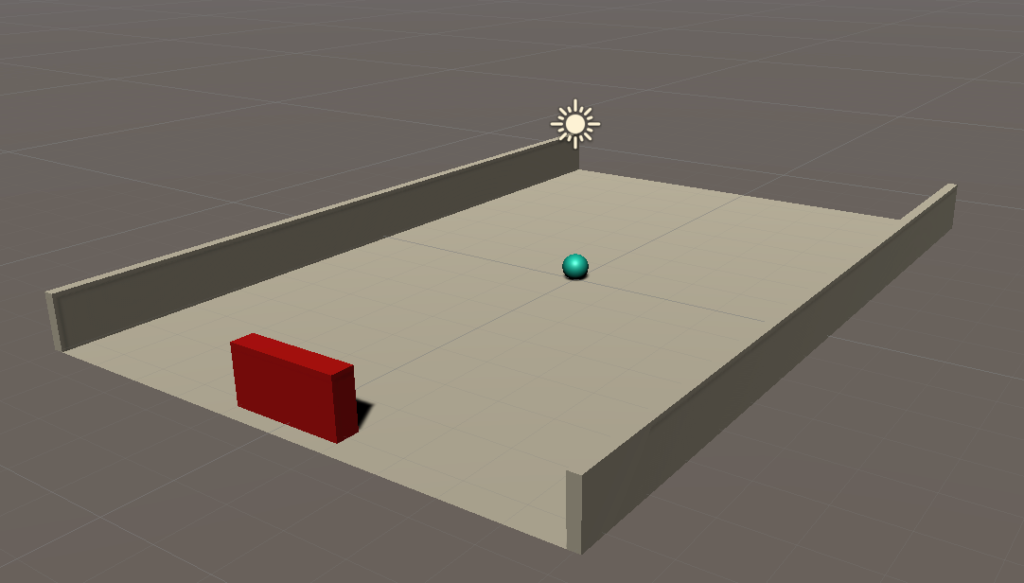
準備ができたのでさっそくステージを作成していこう。
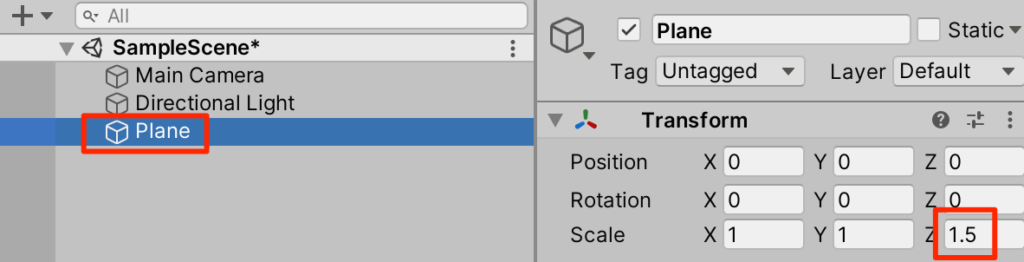
○Create3Dオブジェクトからplaneを選択
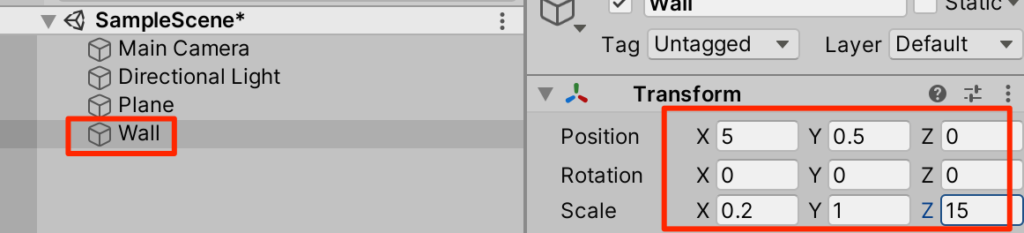
○Create3DオブジェクトからCubeを作成。Wallとリネームする。トランスフォームは以下
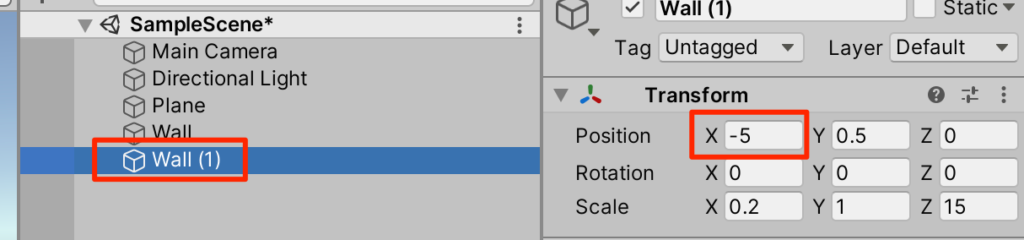
○Wallを複製するトランスフォームは以下
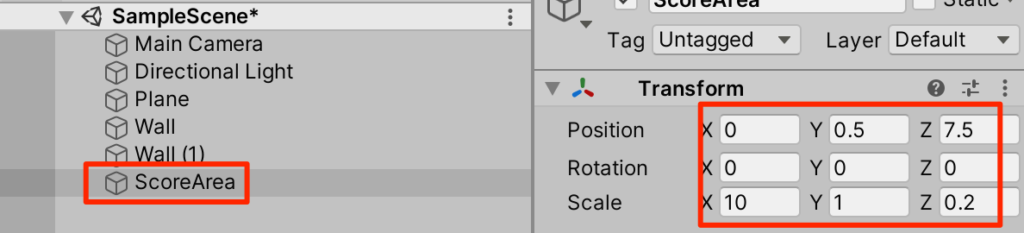
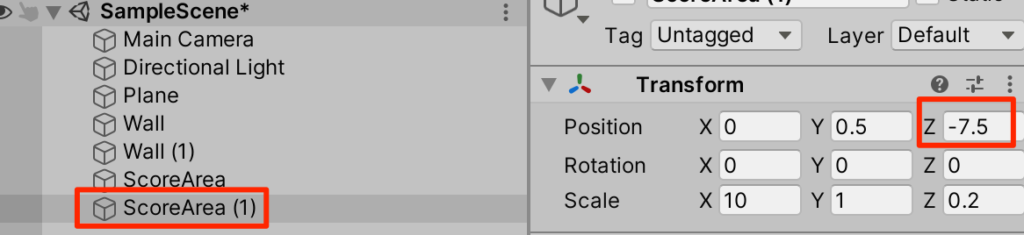
○Create3DオブジェクトからCubeを作成。ScoreAreaとリネームする。トランスフォームは以下(Postionのzは7.5ではなく8.0で作ってください!)
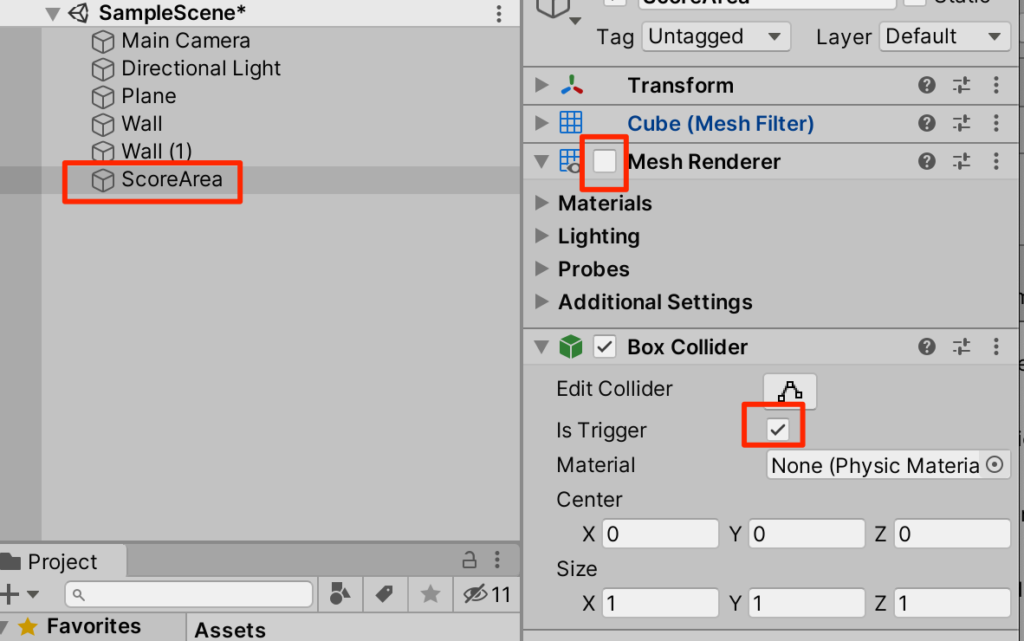
○今作成したScoreAreaのMeshRendererをオフにし、ColliderのisTriggerにチェックをいれる
○ScoreAreaを複製し、トランスフォームを以下のようにする。
(Postionのzは-7.5ではなく-8.0で作ってください!)
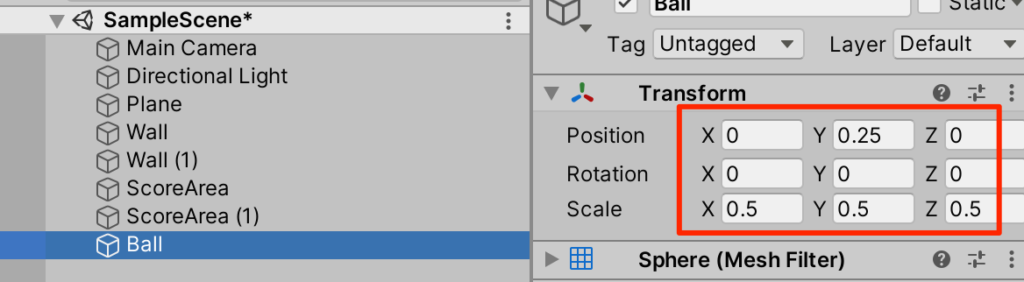
○新規3DオブジェクトからSphereを選択。Ballとリネームしてトランスフォームを以下のように調整
○(任意)マテリアルを付与しよう。ここでは青くしてみた。
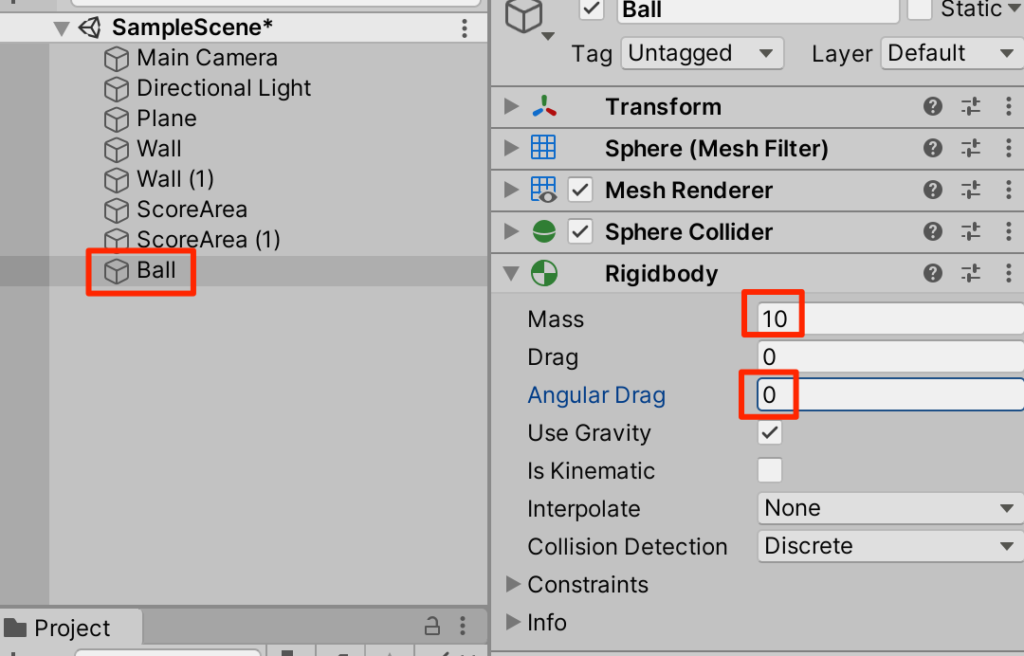
○BallにRigidbodyを付与して。以下のように調整。質量を増やし、抵抗を無くすことで徐々に原則してしまうのを防ぐ
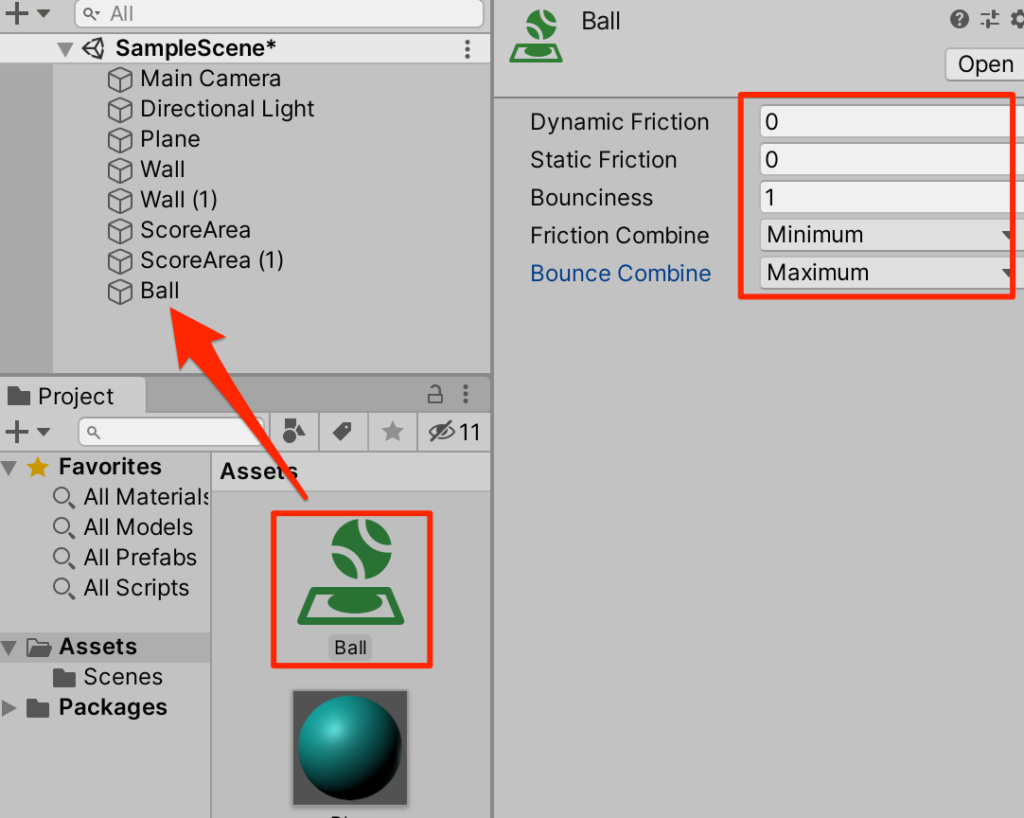
○プロジェクトから新規PhysicMaterialを作成し、Ballとリネーム。以下のように設定し、Ballに付与する。跳ね返り係数を最大にしている
Ballスクリプトの作成
跳ね返り時にボールの移動が並行になってしまわないように以下のようにBallスクリプトを作成し、Ballに付与する。
using System.Collections;
using System.Collections.Generic;
using UnityEngine;

public class Ball : MonoBehaviour {
    Rigidbody rb;

    void Start() {
        rb = GetComponent<Rigidbody>();
    }

    private void OnCollisionEnter(Collision collision) {
        if (collision.gameObject.tag == "paddle") {
            Vector3 vec = Vector3.zero;
            if (Mathf.Abs(rb.velocity.z) < 5f) {
                vec.z = rb.velocity.z > 0 ? 5f : -5f;
            }
            if (Mathf.Abs(rb.velocity.x) < 5f) {
                vec.x = rb.velocity.x > 0 ? 5f : -5f;
            }
            rb.velocity += vec;
        }
    }
}
paddleAgentの作成
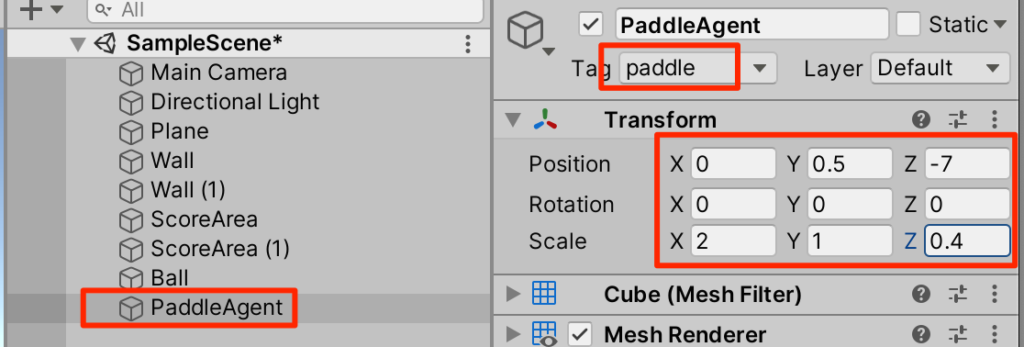
○新規3DオブジェクトからCubeを作成し、PaddleAgentとリネーム。paddleタグを作成&付与して、トランスフォームを以下のように調整する。
○適当なマテリアルを付与する。ここでは赤くしてみた。
PaddleAgentスクリプトの作成
○新規C#スクリプトからPaddleAgentを作成し、以下のように記述しPaddleAgentに付与する。
using UnityEngine;
using Unity.MLAgents;
using Unity.MLAgents.Sensors;
using Unity.MLAgents.Actuators;

public class PaddleAgent : Agent {
    public int agentId;
    public GameObject ball;
    Transform ballTf;
    Rigidbody ballRb;
    void Start() {
        ballTf = ball.transform;
        ballRb = ball.GetComponent<Rigidbody>();
    }
    public override void CollectObservations(VectorSensor sensor) {
        float dir = (agentId == 0) ? 1.0f : -1.0f;
        sensor.AddObservation(ballTf.localPosition.x * dir);
        sensor.AddObservation(ballTf.localPosition.z * dir);
        sensor.AddObservation(ballRb.velocity.x * dir);
        sensor.AddObservation(ballRb.velocity.z * dir);
        sensor.AddObservation(transform.localPosition.x * dir);

    }
    private void OnCollisionEnter(Collision collision) {
        AddReward(0.1f);
    }
    public override void OnActionReceived(ActionBuffers actions) {
        float dir = (agentId == 0) ? 1.0f : -1.0f;
        int action = actions.DiscreteActions[0];
        Vector3 pos = transform.localPosition;
        if (action == 1) {
            pos.x -= 0.2f * dir;
        } else if (action == 2) {
            pos.x += 0.2f * dir;
        }
        if (pos.x < -4.0f) pos.x = -4.0f;
        if (pos.x > 4.0f) pos.x = 4.0f;
        transform.localPosition = pos;
    }
    public override void Heuristic(in ActionBuffers actionsOut) {
        var action = actionsOut.DiscreteActions;
        action[0] = 0;
        if (Input.GetKey(KeyCode.LeftArrow)) action[0] = 1;
        if (Input.GetKey(KeyCode.RightArrow)) action[0] = 2;
    }
}
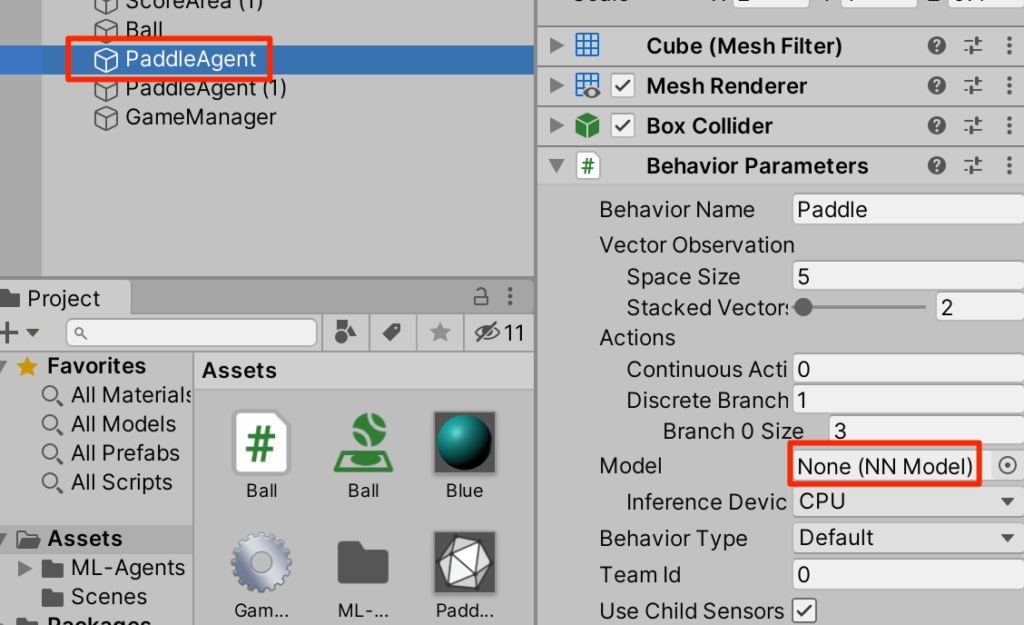
○PaddleAgentにDecisionDiscripterを付与しインスペクターを以下のように調整する。

(解説)
SpaceSizeの5は観測時に使われるfloat値で今回は以下の5つ
ボールのx座標
ボールのz座標
ボールのx方向の速度
ボールのz方向の速度
パドルのx座標
StackVectorsはスタックされた観測データを幾つ使うか?
今回は2にしているので、一回前の5つも合わせて(計10個)で考察を行う。
Branch sizeの3は行動時に渡されるintの値で今回は
0:パドルの移動なし
1:パドルの左移動
2:パドルの右移動
テスト
Heuristicをオーバーライドしているので実行すると手動で動かせる。まだボールは動かないがここでpaddleの動きを確認しておこう。実行を押し、左右の矢印キーで移動を試す。
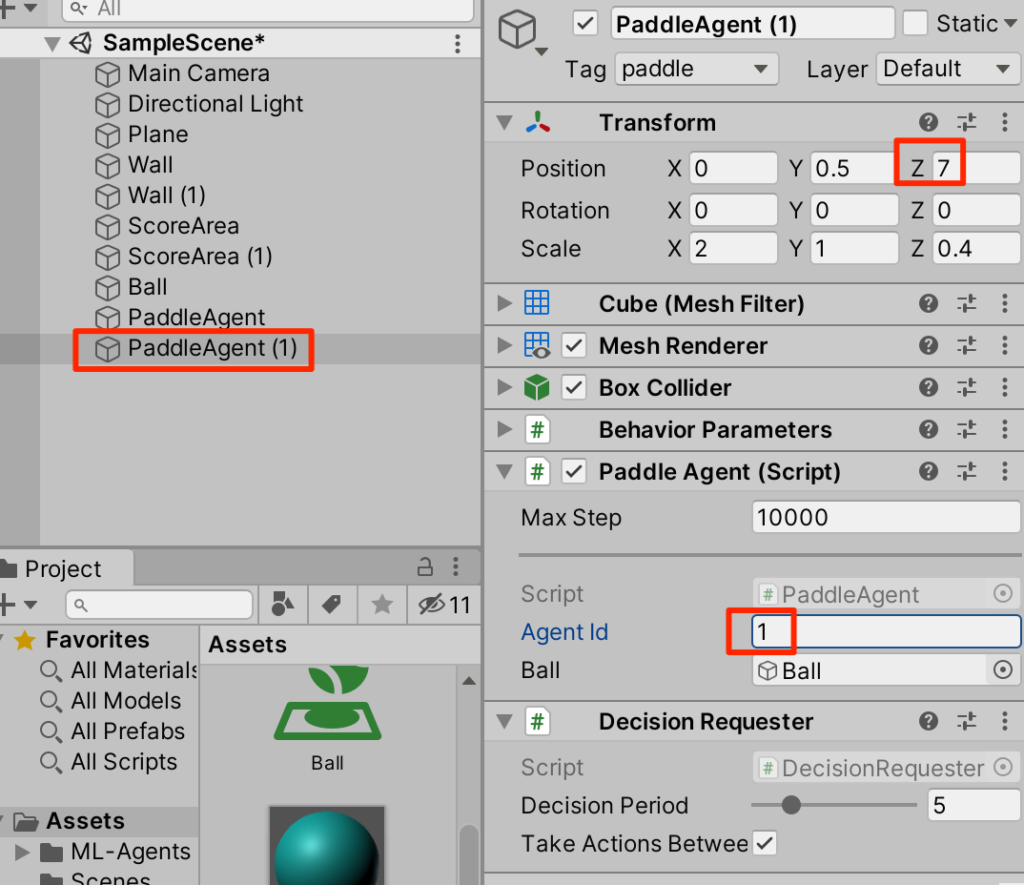
○paddleを複製し、インスペクターを以下のように調整する。
GameManagerの作成
○ゲームを統括するGameManagerを作成しよう。まずはCreateEmptyから空オブジェクトを作成しGameManagerとリネームする。
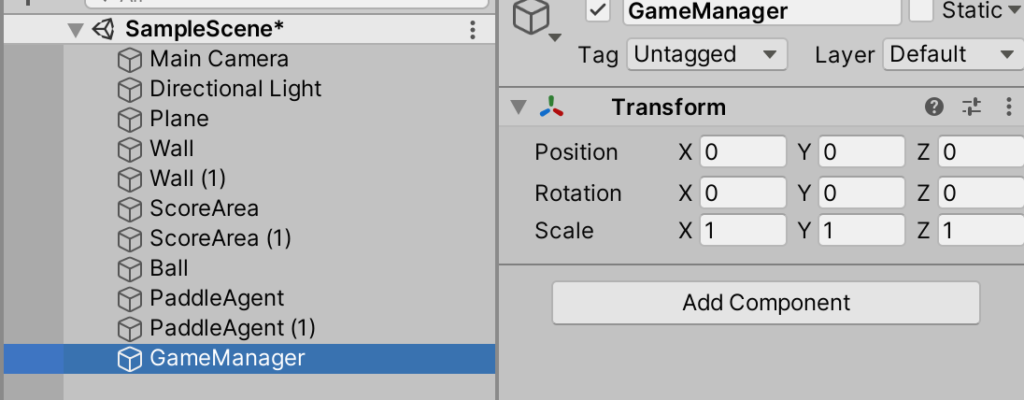
○新規C#スクリプトからGameManagerを作成する付与する。内容は以下
(GameManagerという名で作るとアイコンが変わるが特別な意味はない)
using UnityEngine;
using Unity.MLAgents;

public class GameManager : MonoBehaviour
{
    public Agent[] agents;
    public GameObject ball;

    void Start()
    {
        Reset();
    }

    public void Reset() {
        agents[0].gameObject.transform.localPosition =
            new Vector3(0, 0.5f, -7.0f);
        agents[1].gameObject.transform.localPosition =
            new Vector3(0, 0.5f, 7.0f);

        float speed = 10.0f;
        ball.transform.localPosition = new Vector3(0, 0.25f, 0);
        float radius = Random.Range(45f, 135f) * Mathf.Deg2Rad;
        Vector3 force = new Vector3(
            Mathf.Cos(radius)*speed,0,Mathf.Sin(radius)*speed);
        if(Random.value < 0.5f) {
            force.z = -force.z;
        }
        Rigidbody rb = ball.GetComponent<Rigidbody>();
        rb.velocity = force;
    }
    public void EndEpisode(int agentId) {
        if(agentId == 0) {
            agents[0].AddReward(1.0f);
            agents[1].AddReward(-1.0f);
        }
        else {
            agents[1].AddReward(1.0f);
            agents[0].AddReward(-1.0f);
        }
        agents[0].EndEpisode();
        agents[1].EndEpisode();
        Reset();
    }
}
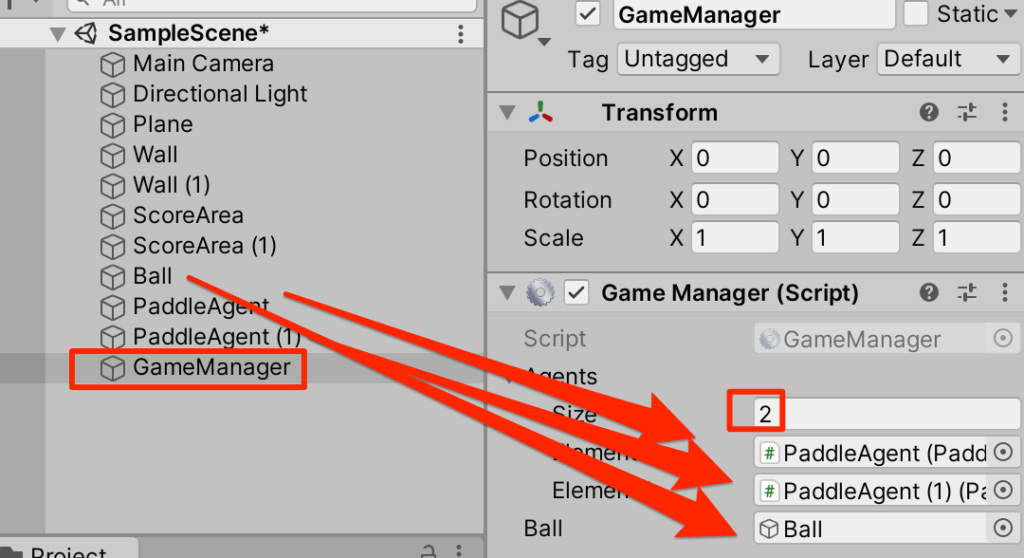
○インスペクターを以下のように調整する
テスト
ゲーム開始時にボールに初速度が与えられようになったのでやってみよう。
鼻血がでるほど難しい!!
しかも、まだEndEpisodeメソッドが呼ばれないので一回ミスったら継続不能になってしまう。
ScoreAreaにスクリプトを追加
○以下のScoreAreaスクリプトを新規に作成し、最初に作成した2つのScoreAreaにアタッチしよう。
using UnityEngine;
public class ScoreArea : MonoBehaviour
{
public GameManager gameManager;
public int agentId;
private void OnTriggerEnter(Collider other) {
gameManager.EndEpisode(agentId);
}
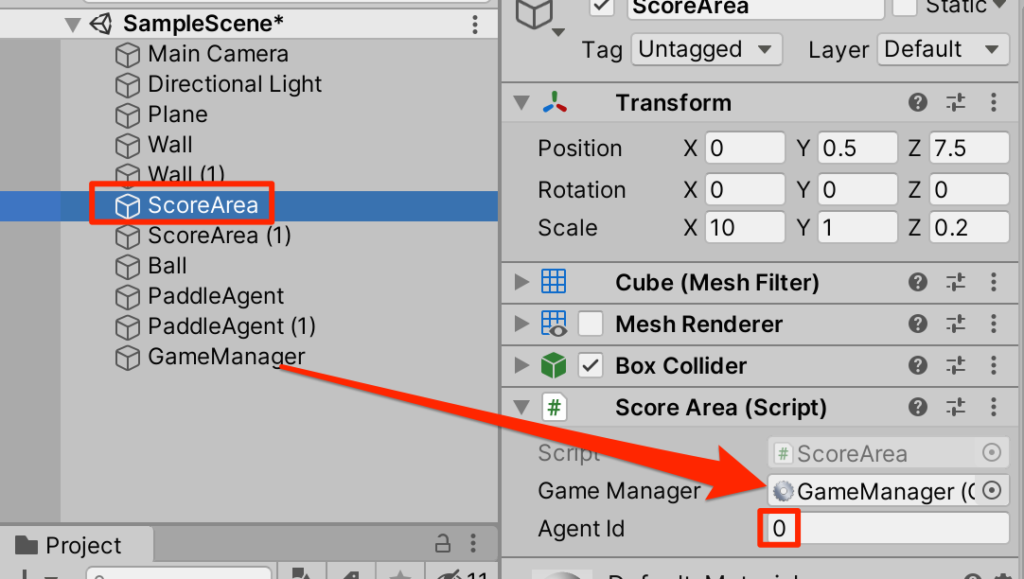
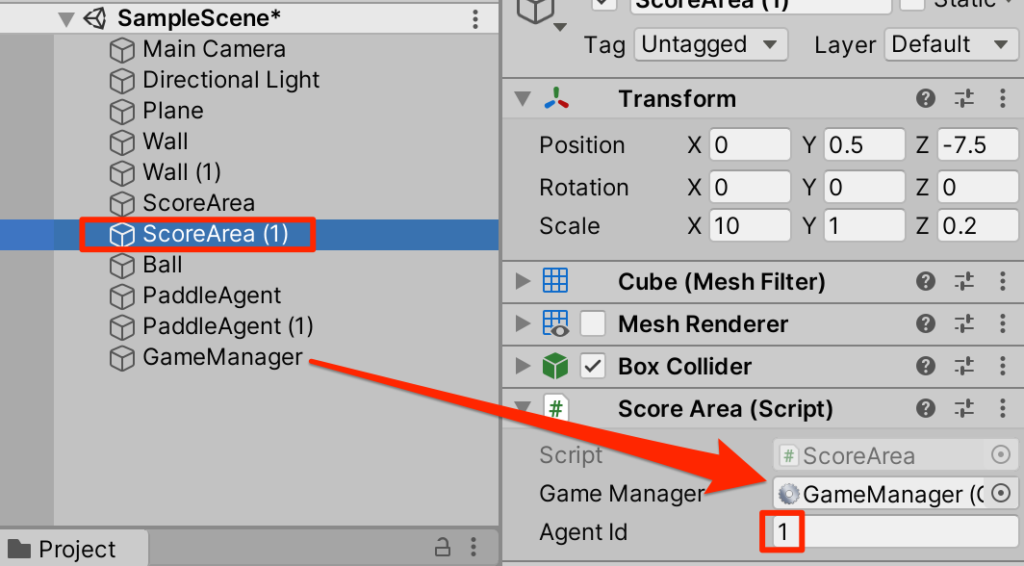
}○2つのScoreAreaを以下のように設定する
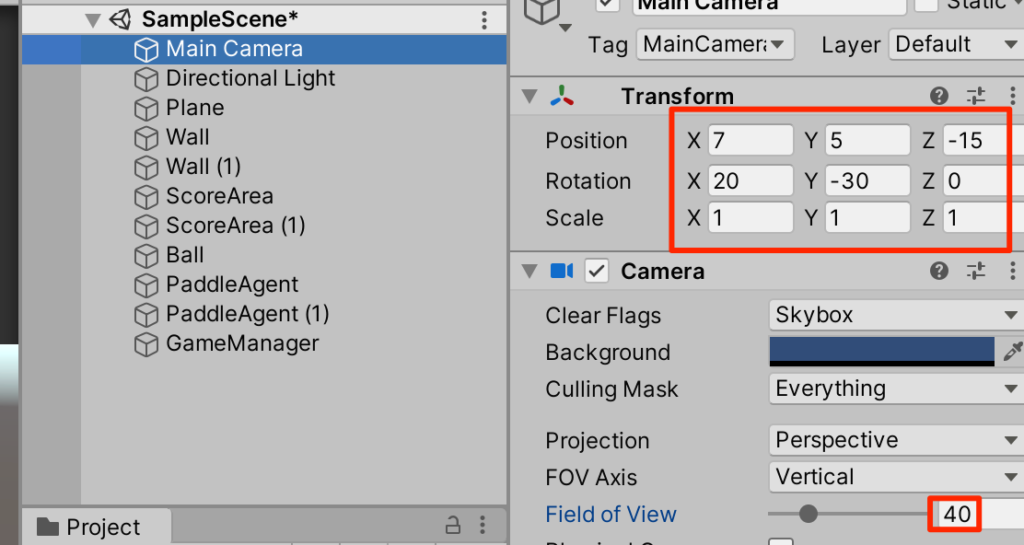
カメラの調整
○メインカメラを選択し以下のように調整する
機械学習の実践
それではこの2つのパドルにお互い対戦をしながら学習をしてもらおう。
訓練ファイルの作成
bashに行き、my-unity-envをアクティブにする
$ source ~/python-envs/my-unity-env/bin/activate
bGitHubからクローンしたml-agentsフォルダに移動し、configフォルダ内にpaddle.yamlを作成する。

内容は以下をコピペする。
behaviors:
  Paddle:
    trainer_type: ppo
    hyperparameters:
      batch_size: 1024
      buffer_size: 10240
      learning_rate: 0.0003
      beta: 0.005
      epsilon: 0.2
      lambd: 0.95
      num_epoch: 3
      learning_rate_schedule: constant
    network_settings:
      normalize: true
      hidden_units: 128
      num_layers: 2
      vis_encode_type: simple
    reward_signals:
      extrinsic:
        gamma: 0.99
        strength: 1.0
    keep_checkpoints: 5
    checkpoint_interval: 500000
    max_steps: 50000000
    time_horizon: 1000
    summary_freq: 10000
    threaded: true
    self_play:
      save_steps: 50000
      team_change: 100000
      swap_steps: 50000
      window: 10
      play_against_latest_model_ratio: 0.5
      initial_elo: 1200.0
このパラメータの詳細はここにある。
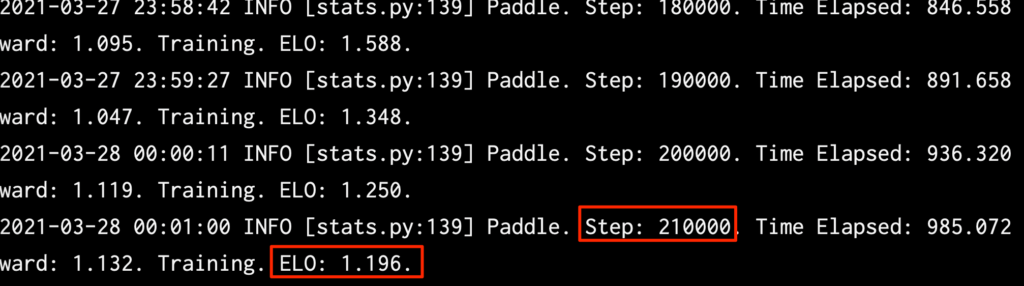
学習開始
では学習を開始しよう。以下のコマンドを入力して、Unityを実行する
$ mlagents-learn ./config/paddle.yaml --run-id=paddle1
ELOが収束してきたので210000Stepで学習を停止した。
学習ファイルは以下の場所にあるのでプロジェクトにドラッグ
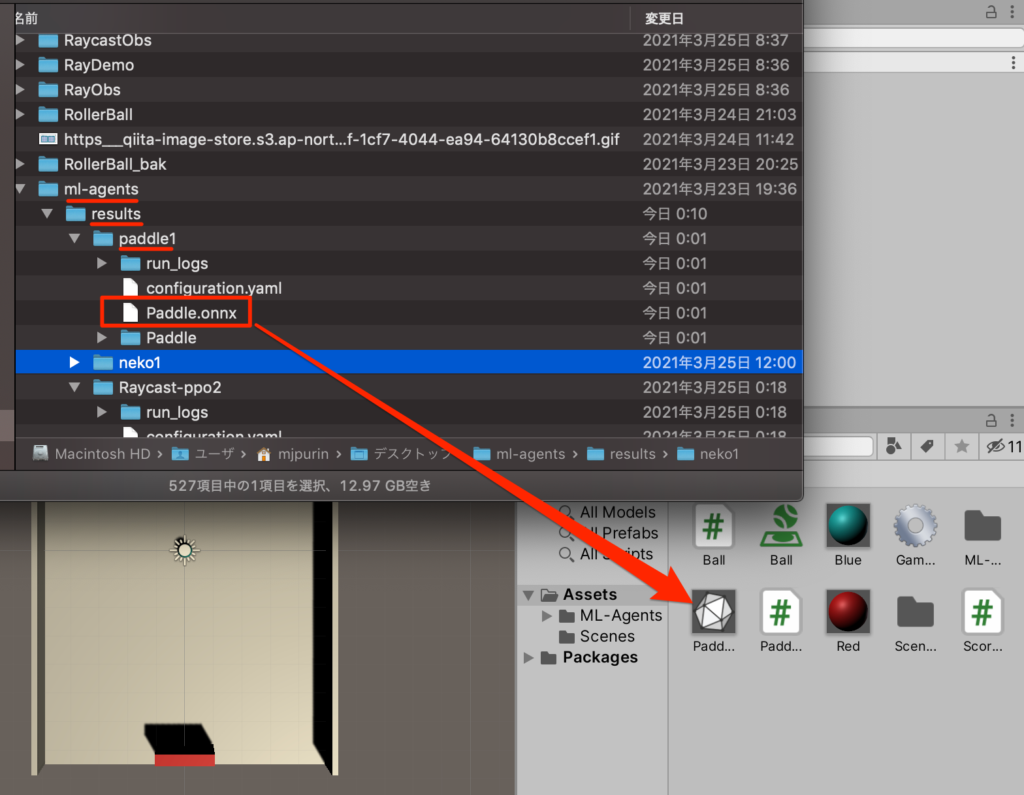
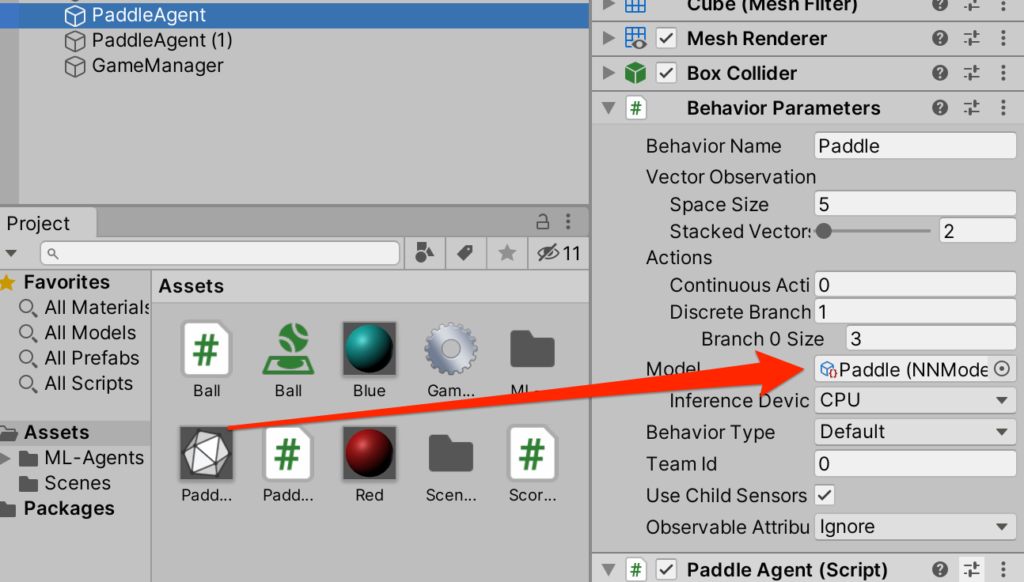
2つのPaddleAgentに対してBehavior PrametersのModelに登録。再生して学習の成果を見よう。
学習の成果をご覧あれ
いざ勝負
ではAIと対戦してみよう。手前のpaddleから学習ファイルを外すとこちらは手動で動かすことができるのでやってみよう。カメラアングルなども自由に調整してもらいたい。
終わりに
今回はセルフプレイというお互いに対戦させることで学習させる手法を学んだ。学習時間を調整することで強さを調整できるのでAI対戦時の相手の強さを切り替えることなども簡単に実装できそうだ。
 参考書
参考書
以下の書籍を参考にしています。


コメント