
以下の動画のようなゲームを作成せよ。
仕様:
●ボールが出てくる間隔は1.5秒ごと
●上下動している青いブロックは空中ジャンプできない
作例
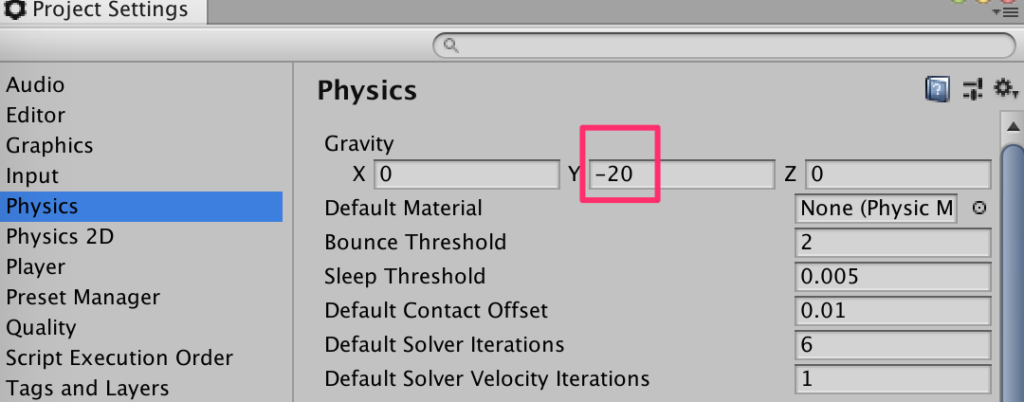
重力の設定
スケールを1でsphereを作成すると地球換算で1mである。見た目の印象とは違い実際はかなり大きな球ということとなる。
結果としてrigidbodyなどで動かした場合ちょっともっさり動いている印象を受ける。
その修正のため、重力を強く設定しよう。
Edit->Project SettingsからPhysicsを選択し、重力を-20に設定する。
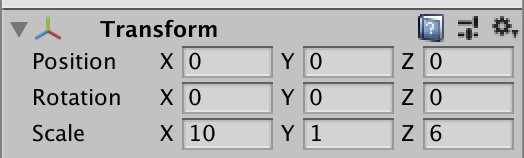
floorの作成
create->3dオブジェクトからcubeを作成し、Floorとリネームする。
トランスフォームは以下。
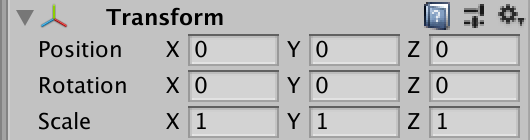
Ballの作成
赤いボールを作成しよう。
CreateからSphereを選択し、Ballとリネームする。
トランスフォームは以下
(Floorにめり込んでいるのが気になる人は一旦Floorを非表示しておくとよい)
CreateMaterialから赤の素材を作成し、Ballにアタッチ。
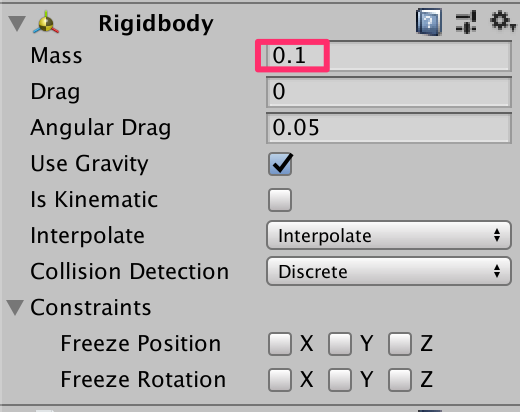
Rigidbodyを付与し、Mass(質量)を吹っ飛びやすいように0.1にする。
Ballタグを作成し、Ballに設定する。
そこまで作業を行ったらこれを再利用できるようにプレファブにしよう。
プレファブにしたら、ヒエラルキーからは削除しておく。
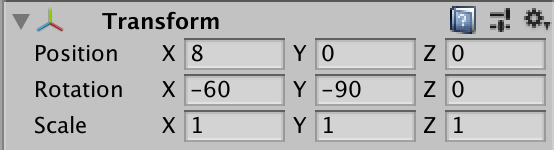
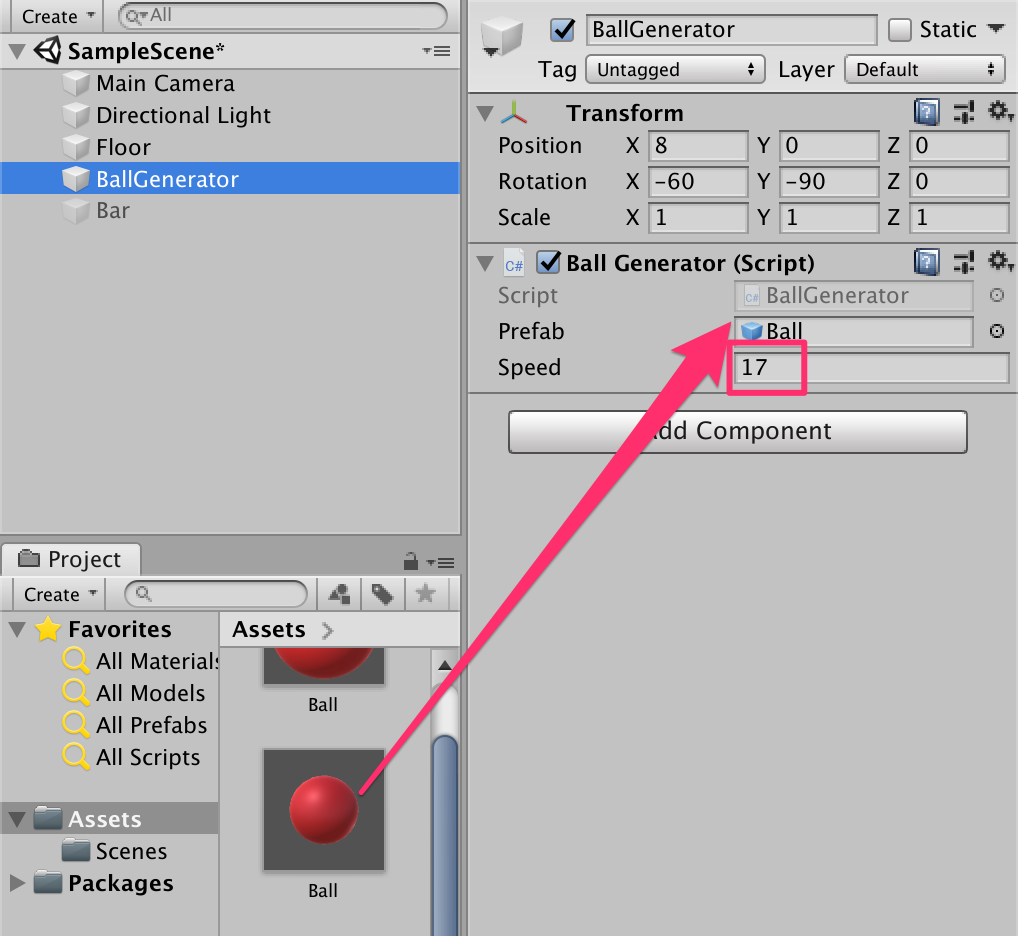
BallGeneratorの作成
ボールを生成し、発射する。ボールジェネレータを作成しよう。
Create->CreateEmptyして、BallGeneratorとリネーム。
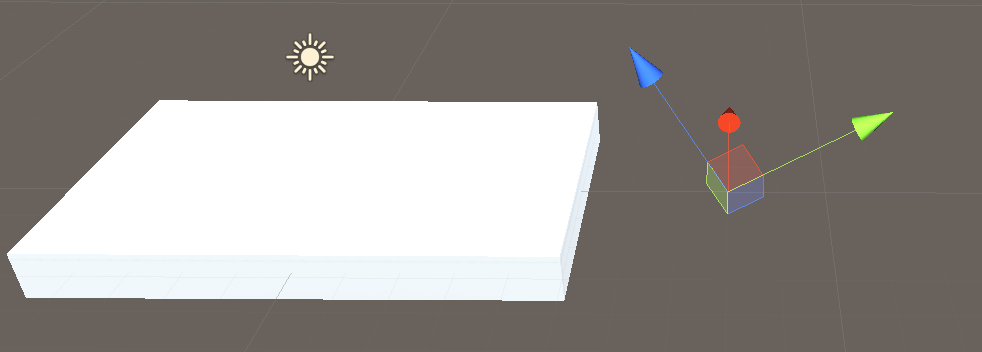
トランスフォームは以下
以下のように配置されればOKだ。打ち出したい方向にz軸(青の矢印)を向けておくのがポイントだ。
BallGeneratorスクリプトの作成
ボールが1.5秒ごとに生成され、飛んでいく処理を作ろう。
BallGereratorスクリプトを作成し、以下の記述。
using System.Collections;
using System.Collections.Generic;
using UnityEngine;

public class BallGenerator : MonoBehaviour
{
    public GameObject prefab;
    public float speed;

    void Start() {
        StartCoroutine(GenerateBall());
    }

    IEnumerator GenerateBall() {
        while (true) {
            GameObject ball = Instantiate(
                prefab,
                transform.position,
                transform.rotation
                );
            ball.GetComponent<Rigidbody>().velocity=transform.forward*speed;
            yield return new WaitForSeconds(1.5f);
        }
    }
}
作成したらヒエラルキーにあるBallGeneratorにアタッチし、インスペクターから以下のように設定する。
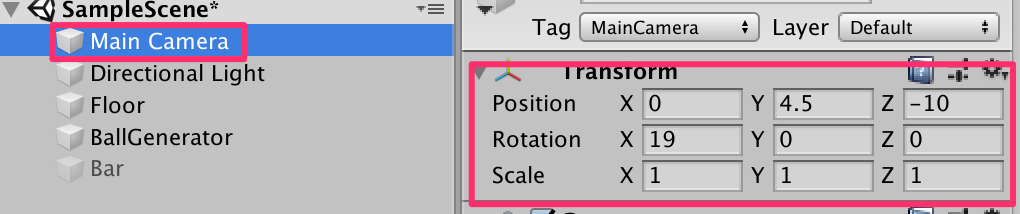
カメラの設定
mainカメラの設定をしよう。以下のようにトランスフォームを設定する。
確認
再生してみよう。以下のように1.5秒間隔でボールが発射されれば成功だ。
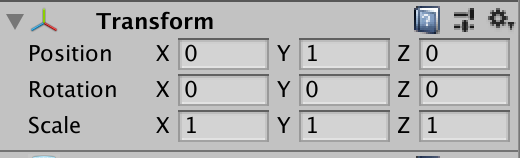
Barの作成
CreateからCubeを作成し、Barとリネーム。
トランスフォームは以下
マテリアルを付与
新しい青いマテリアルを作成し、Barに付与する。
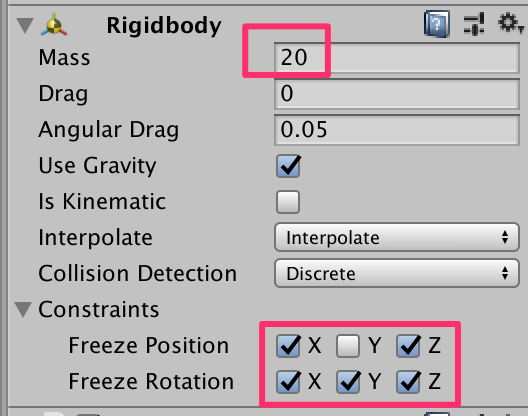
Rigidbodyの付与
リジッドボディを付与する。
相手を強くふっとばすために質量を重くする。
また、今回は上下運動以外の余計な挙動をしてほしくないのでConstraintsを以下のように設定する。
BarControllerの作成
スペースキーを押されたときにジャンプする処理を作る。
空中ジャンプをしない処理を盛り込んで以下のようにBarControllerを作成する。
using System.Collections;
using System.Collections.Generic;
using UnityEngine;

public class BarController : MonoBehaviour
{
    Rigidbody rb;
    public float jumpPower;
    bool isGrounded;
    void Start()
    {
        rb = GetComponent<Rigidbody>();
    }
    void Update()
    {
        if (Input.GetKeyDown(KeyCode.Space) && isGrounded) {
            rb.velocity=Vector3.up * jumpPower;
            isGrounded = false;
        }
    }
    private void OnCollisionEnter(Collision collision) {
        if (collision.gameObject.tag == "Floor") {
            isGrounded = true;
        }
    }
}
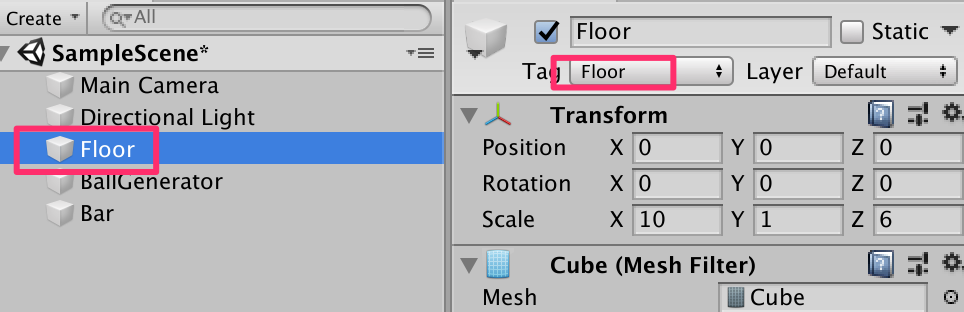
Floorにタグの付与
手順が前後したが、床と接触したときにフラグを反転させているのでFloorにFloorタグを作成&アタッチしておこう。
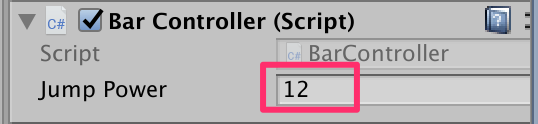
BarにBarControllerをアタッチ
ヒエラルキーにあるBarに今作成したBarControllerをアタッチし、JumpPowerを12に設定する。
確認
実行して確認してみよう。
ぶつかったときの跳ね返りが少ないようだ。PhysicMaterialを作成し調整しよう。
ProjectビューにあるCreateからPhysicMaterialを作成し、Ballとリネームし以下のように調整しよう。
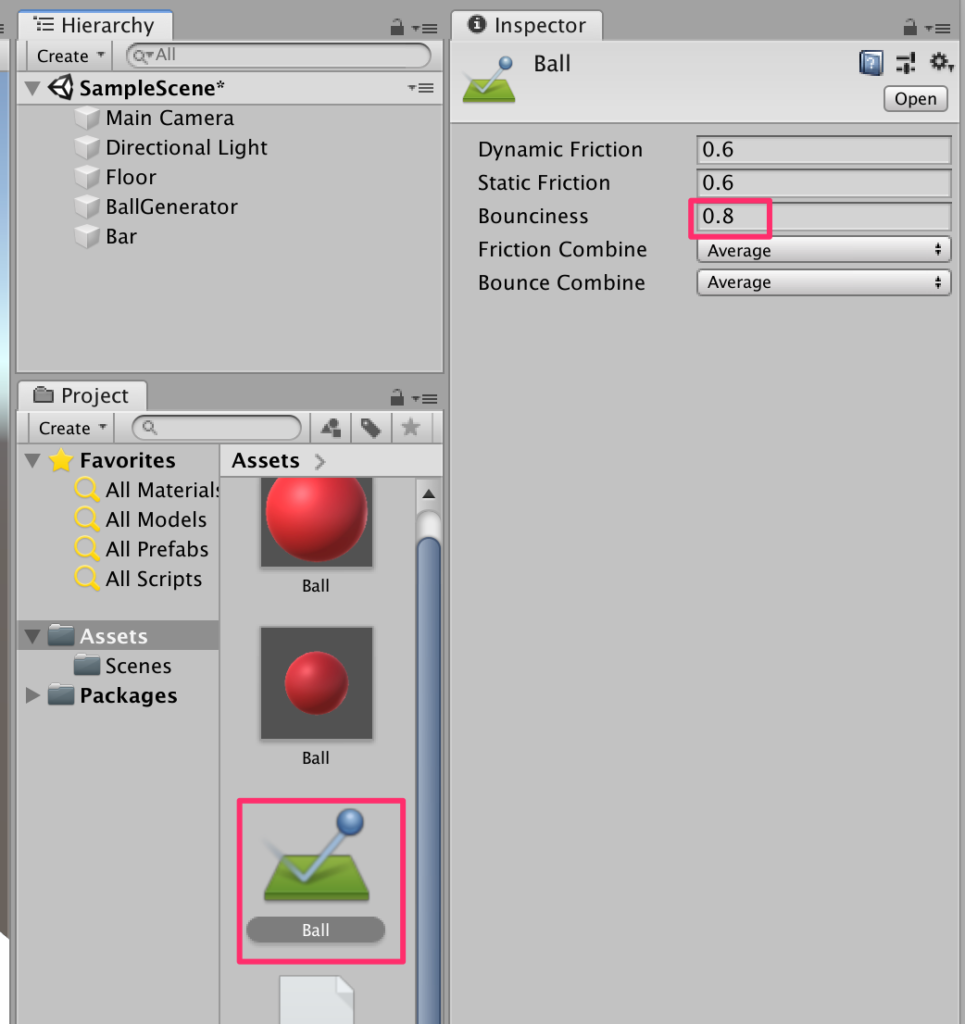
作成した素材をドラッグ&ドロップでBallプレファブに付与する。
確認
実行してみよう。だいぶ気持ちよく跳ね返るようになった!
スコア表示実装
まずはスコアをカウントできるようにしよう。
BarControllerの以下ハイライト部分を追記する。
using System.Collections;
using System.Collections.Generic;
using UnityEngine;

public class BarController : MonoBehaviour
{
    Rigidbody rb;
    public float jumpPower;
    bool isGrounded;
    public int Count { get; set; } = 0;
    // Start is called before the first frame update
    void Start()
    {
        rb = GetComponent<Rigidbody>();
    }

    void Update()
    {
        if (Input.GetKeyDown(KeyCode.Space) && isGrounded) {
            rb.velocity=Vector3.up * jumpPower;
            isGrounded = false;

        }
    }
    private void OnCollisionEnter(Collision collision) {
        if (collision.gameObject.tag == "Floor") {
            isGrounded = true;
        }
        else if (collision.gameObject.tag == "Ball") {
            Count++;
        }
    }
}
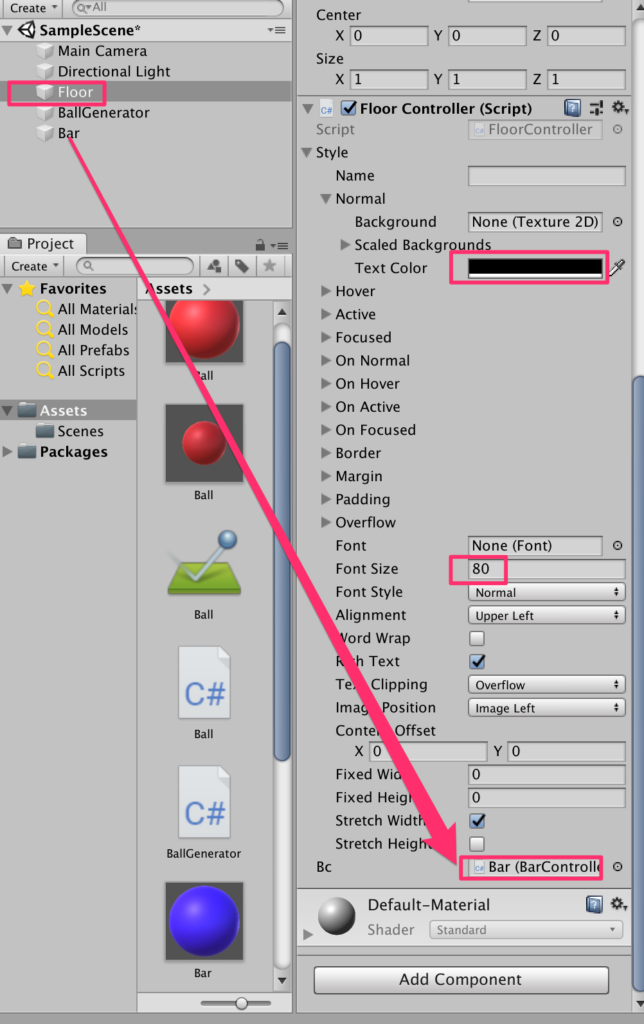
FloorControllerの作成
表示関連はFloorControllerにさせよう。
以下のようにFloorController.csを作成する
using System.Collections;
using System.Collections.Generic;
using UnityEngine;

public class FloorController : MonoBehaviour
{
    public GUIStyle style;
    public BarController bc;
    bool isGrounded;
    private void OnCollisionEnter(Collision collision) {
        if (collision.gameObject.tag == "Ball") {
            isGrounded = true;
        }
    }

    private void OnGUI() {
        string label;
        label = $"{bc.Count}";

        if (isGrounded) {
            label += " GameOver";
        }

        GUI.Label(new Rect(10, 10, 100, 100), label,style);
    }

}
作成ができたらFloorにアタッチしてBarControllerを登録をし、文字色の設定などを以下のように行う。
確認
実行して確認してみよう。点数が上がっていき床に接触するとGameOverが出力される。
ゲームオーバー処理
ゲームオーバーになったら処理を止めよう。FloorControllerに1行追記する。
using System.Collections;
using System.Collections.Generic;
using UnityEngine;

public class FloorController : MonoBehaviour
{
    public GUIStyle style;
    public BarController bc;
    bool isGrounded;
    private void OnCollisionEnter(Collision collision) {
        if (collision.gameObject.tag == "Ball") {
            isGrounded = true;
            Time.timeScale = 0;
        }
    }

    private void OnGUI() {
        string label;
        label = $"{bc.Count}";

        if (isGrounded) {
            label += " GameOver";
        }

        GUI.Label(new Rect(10, 10, 100, 100), label,style);
    }

}
Time.timeScaleを0にすることによりゲームを止めることができる。
不要になったBallの削除
これでだいたい終了だが、不要になったBallの削除を行っておこう。
Ballスクリプトを以下のように作成し、Ballプレファブにアタッチする。
using System.Collections;
using System.Collections.Generic;
using UnityEngine;

public class Ball : MonoBehaviour
{
    private void OnBecameInvisible() {
        Destroy(gameObject);
    }
}
これでBallがカメラの描画範囲外に出たときに削除することができる。
おまけ
Time.timeScaleが出てきたので。スローモーション効果も入れてみよう。
今回はBarとBallがぶつかった瞬間に少しスローモーションになるようにしてみる。BarControllerに以下ハイライト部分を追記する。
using System.Collections;
using System.Collections.Generic;
using UnityEngine;

public class BarController : MonoBehaviour
{
    Rigidbody rb;
    public float jumpPower;
    bool isGrounded;
    public int Count { get; set; } = 0;

    void Start()
    {
        rb = GetComponent<Rigidbody>();
    }

    void Update()
    {
        if (Input.GetKeyDown(KeyCode.Space) && isGrounded) {
            rb.velocity=Vector3.up * jumpPower;
            isGrounded = false;

        }
    }
    private void OnCollisionEnter(Collision collision) {
        if (collision.gameObject.tag == "Floor") {
            isGrounded = true;
        }
        else if (collision.gameObject.tag == "Ball") {
            Count++;
            StartCoroutine(SlowMotion());
        }
    }

    IEnumerator SlowMotion() {
        Time.timeScale = 0.2f;
        yield return new WaitForSeconds(0.1f);
        Time.timeScale = 1.0f;
    }
}
確認
実行してみよう。ぶつかった瞬間にTimeScaleをいじることでスローにしている。
ただレンダリング結果がブレブレになっている。
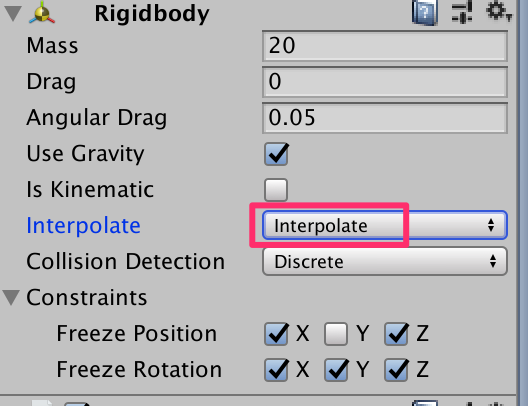
ブレブレの修正
こういったときにはrigidbodyコンポーネントになるInterpolateをInterpolateにする。BallプレファブとBarの両方のrigidbodyに対して行おう。
確認
ウルトラスムーズに表示されるようになった!
ゲームの演出としてスローモーションが有効なことも多い。
是非あなたのゲームにスローモーション効果を入れてみてほしい。

コメント